
How to Transform a Photo into a Painting Canvas: Step-by-Step Guide
Ever looked at a favorite snapshot and imagined it hanging on your wall, not as a flat print but as a brush‑stroke‑soft painting?
You’re not alone—most of us have that little daydream when a family vacation photo or a candid of your kids feels like it belongs in a gallery.
That’s where the magic of turning a photo to painting canvas comes in.
It’s basically a digital artist that interprets your image, adds texture, depth, and that unmistakable canvas feel, then prints it on a sturdy, ready‑to‑hang board.
But why bother with a custom canvas instead of a regular photo print?
Because a canvas instantly upgrades the vibe of a room; it feels warm, personal, and a touch more timeless than glossy paper.
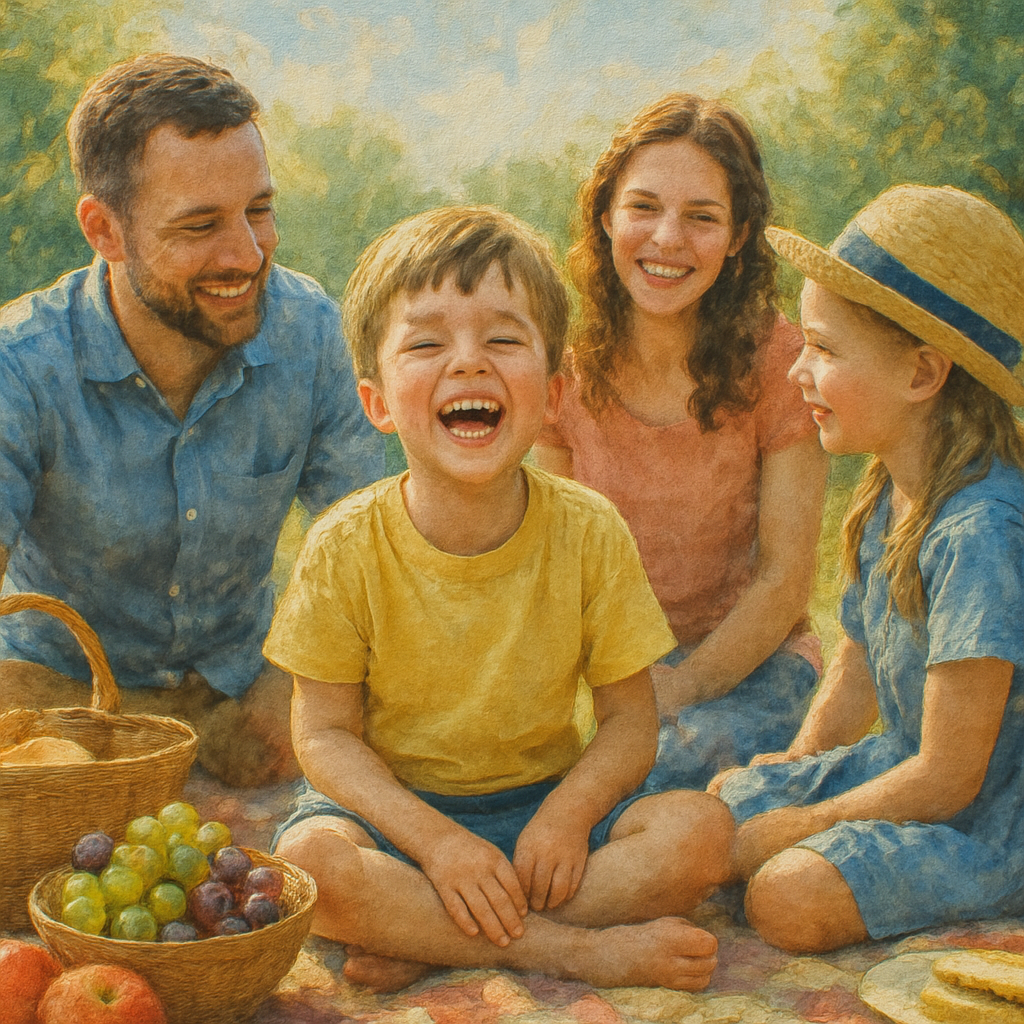
Imagine the look on your partner’s face when they see a beloved beach sunset transformed into a watercolor‑style canvas, the colors still recognizable but with that soft, hand‑painted glow.
Or picture your parents’ living room, now brightened by a collage of childhood photos that look like they were brushed on by an old‑school artist.
So, what’s the process really like?
You simply upload the photo you love, pick a style—maybe oil, watercolor, or impressionist—and let the service handle the rest.
The best part? You don’t need any artistic skill, expensive frames, or a trip to a studio.
A few clicks, a short waiting period, and then a ready‑to‑hang masterpiece arrives at your door, complete with hanging hardware.
And if you’re still on the fence, think about the story each canvas tells.
It’s not just décor; it’s a conversation starter, a memory capsule, and a gift that feels handcrafted even though it’s produced on demand.
Ready to see your favorite moment in a whole new light?
Let’s dive in and explore how to pick the perfect photo, choose a style that matches your space, and get that stunning canvas on your wall without a hitch.
TL;DR
Turning a favorite photo into a painting‑style canvas gives your walls instant personality, turning memories into timeless art without any brush strokes from you.
With just a few clicks you can choose style, upload, and receive a ready‑to‑hang masterpiece that sparks conversation and makes gifting effortless for any occasion today.
Step 1: Choose the Right Photo
Okay, let’s pause for a second. You’ve already imagined that family beach snap hanging like a painted masterpiece—now the real question is, which photo actually makes the cut?
It’s easy to grab the first image that comes to mind, but a good “photo to painting canvas” project starts with a picture that already has strong composition. Think about the rule of thirds, a clear focal point, and enough contrast so the digital artist can tease out those brush‑stroke textures.
Look for clarity, not clutter
If the scene is busy with random background noise, the final canvas can end up looking muddy. Choose a shot where the main subject—whether it’s a smiling kid, a golden sunset, or a beloved pet—stands out against a relatively simple backdrop. A clean background lets the style (oil, watercolor, impressionist) do its magic without fighting for attention.
And here's a tip: open the photo on a computer and zoom in. Can you still see the eyes, the smile, the texture of a seashell? If you need to squint to make out details, the printed canvas will likely look fuzzy.
Pick the right lighting
Natural light is your best friend. Photos taken during golden hour or on an overcast day usually have soft shadows and balanced colors, which translate beautifully into a painted look. Harsh midday sun can create blown‑out highlights that strip away nuance.
But don’t stress if your favorite memory was captured at a party with funky colored lights. Those can become striking canvas pieces—just make sure the colors aren’t too saturated, or the digital conversion might end up looking like a neon sign.
Resolution matters
Most services recommend at least 150 dpi for a clear canvas, and 300 dpi if you want museum‑grade detail. In plain English, that means the file should be at least a few megabytes in size and not a tiny thumbnail ripped from a social media feed.
Quick sanity check: if you can print the photo on a standard 8 × 10 inch sheet without it looking pixelated, you’re probably good to go for a larger canvas.
Match the mood to the style
Different painting styles amplify different emotions. A soft watercolor works wonders for dreamy landscapes, while an oil‑style filter can give a family portrait that warm, classic feel. Before you upload, ask yourself: what vibe do I want the room to have? Cozy and nostalgic? Bright and modern?
When you’re still torn, take a moment to browse the style options on the site. The guide on how to choose the perfect photo for a custom canvas walks you through pairing image type with artistic style.
Test with a quick mock‑up
Many platforms let you preview a thumbnail of the painted version. Use that preview to see if the subject’s eyes still sparkle or if the background fades into oblivion. If something feels off, swap the photo or crop it tighter before you hit “order.”
And remember, you can always order a smaller sample canvas first. It’s a low‑risk way to see how the chosen photo behaves under a brush‑stroke filter before committing to a large statement piece.
Finally, save the file in a loss‑less format like PNG or a high‑quality JPEG. Avoid Instagram‑style compression because every pixel you lose is a detail the canvas can’t recover.
Take a deep breath, scroll through your gallery, and pick that one photo that makes you pause and smile. It’s the first step toward turning a fleeting memory into a timeless wall‑art piece.
Step 2: Select the Painting Style and Medium
Now that your photo passes the resolution checklist, it’s time to ask the fun question: how do we want it to look on the wall? The answer lives in the painting style you choose – oil‑like, watercolor‑soft, or bold impressionist strokes – and the medium that will carry those strokes, usually a high‑quality cotton canvas.
Start with the vibe you want
Picture the room where the canvas will live. Is it a cozy family den with warm neutrals, or a modern loft with crisp white walls? If the space feels like a coffee‑shop corner, a muted watercolor style can add a breezy, relaxed feel. If you’re aiming for drama, an oil‑style with deep, saturated tones will make the image pop.
Think about the emotional punch you want. Do you want viewers to feel the nostalgia of a summer sunset, or the lively buzz of a birthday party? Matching the style to the emotion is the secret sauce.
Common styles and when they work best
Watercolor – great for soft light, pastel skies, and scenes with natural gradients. It mimics the way pigments bleed, so it’s perfect for beach sunsets or garden portraits.
Oil‑style – ideal for rich colours, strong contrast, and subjects that need depth, like a family portrait taken at golden hour.
Impressionist – use when you love the idea of visible brushwork and a slightly abstract feel. This style works wonders for action shots – kids playing, waves crashing – because it captures movement without getting lost in detail.
When you’re unsure, try the WALLARTS – heartful.gifts collection for visual examples of each style. Seeing a few mock‑ups side by side can make the choice feel less intimidating.
Choosing the medium
Canvas isn’t the only option, but it’s the classic choice for a painted look. A cotton‑blend canvas absorbs the digital brush‑strokes and gives the surface that subtle texture you’d expect from a real painting. If you love the glossy feel of a photo, a satin‑finish canvas can bridge the gap.
Some services also offer linen‑woven canvas, which adds an even finer texture – think of it as the “premium” version. The trade‑off is a slightly higher price, but the extra depth can be worth it for a centerpiece piece.
Actionable steps to lock in your style
- Open your photo in a quick preview tool and set the colour temperature. Warm tones usually pair well with oil‑style; cool tones lean toward watercolor.
- Use the service’s style picker (most platforms show a thumbnail preview). Hover over each preview and imagine the piece on your wall.
- Save at least three different style previews. Compare them side‑by‑side on your phone or computer. Ask a friend – “Which one makes you smile first?”
- Decide on canvas type: cotton for a classic feel, linen for extra texture, or satin‑finish for a modern shine.
- Finalize the order and double‑check the size – remember the 150‑200 ppi rule from Step 1.
Expert tip: blend styles for a personal touch
If you can’t pick one, many services let you request a hybrid – for example, a watercolor base with subtle oil‑style highlights on the focal point. This gives the softness of watercolor while keeping the subject crisp.
Another pro move is to look at the hardest painting styles discussed by artists. While hyper‑realism demands endless detail, impressionism challenges you to capture the essence with fewer strokes. Knowing that impressionism is often considered tougher to master (because you must balance detail and abstraction) can help you appreciate why a digital impressionist look feels so lively.
Finally, remember that the style you choose is reversible. If the canvas doesn’t feel right after it arrives, you can always upload the same photo and try a different style – no paintbrush required.
Step 3: Prepare Your Canvas and Materials
Alright, you’ve picked the photo and the style – now it’s time to get the blank page ready, aka your canvas.
First question: do you want a classic cotton feel, a luxe linen texture, or a modern satin sheen? Cotton is affordable and works great for most styles, while Belgian linen gives that buttery‑smooth surface that makes an oil‑style pop according to seasoned art teachers. If you’re on a budget, a sturdy cotton‑blend panel is still a solid choice.
Measure twice, order once. Take the dimensions you calculated in Step 1 (remember the 150‑200 ppi rule) and double‑check the canvas size on the service’s size guide. A mismatch means you’ll either have to crop your photo or live with a stretched border you didn’t plan for.
Now, think about orientation. Most photo‑to‑painting services let you choose portrait, landscape, or square. Pick the one that lets your subject breathe – a family portrait often looks best portrait‑oriented, while a sweeping beach sunset shines in landscape.
Do you need a frame? Many print‑on‑demand shops include a simple wood stretcher, but if you love the gallery‑look, order a ready‑made frame that matches your décor. A frame isn’t mandatory; the canvas itself can be hung with key‑hole brackets that come with most orders.
Before you click “checkout,” ask yourself: have I considered the room’s lighting? A matte canvas will soften glare in a sunny hallway, whereas a satin finish can catch a little sparkle in a dim dining room.
Pre‑flight checklist for your canvas
- Confirm size matches your pixel count (150‑200 ppi).
- Choose material – cotton for budget, linen for texture, satin for shine.
- Decide on orientation – portrait, landscape, or square.
- Check if you want a frame or just hanging hardware.
- Review colour temperature of your photo; warm tones pair nicely with oil‑style, cool tones with watercolor.
Got the list? Great. Let’s talk about the little things that make a big difference.
Even though the final product is printed, many artists swear by a quick “pre‑prime” step if you plan to add any hand‑touches later. A thin coat of acrylic gesso on a cotton canvas helps the digital brushstrokes sit evenly, especially if you ever want to paint over the print yourself.
And don’t forget protection. A clear UV‑blocking spray can keep the colours from fading under a sunny window. It’s a cheap add‑on, but it prolongs the life of your memory‑turned‑art.
What about storage while you wait for the canvas to arrive? Keep it flat in a dry room, away from extreme heat or humidity. If you live in a rainy climate, a simple plastic sleeve will stop moisture from seeping into the fibers.
Still wondering whether a panel or a stretched canvas is better for your project? Outdoor‑painting enthusiasts often choose lightweight panels because they’re easy to ship and stay flat during transport (see why panels are popular with plein‑air painters).
One last tip: order a sample swatch if the service offers it. Seeing the texture and colour in person before you commit can save you a costly redo.
So, what’s the next move? Grab your canvas choice, double‑check the dimensions, add any protective spray you like, and place the order. In a few days you’ll have a ready‑to‑hang piece that looks like it was brushed on by a pro, without you ever picking up a paintbrush.
Step 4: Transfer the Image onto the Canvas
Alright, you’ve settled on the photo, the style, and the canvas material. Now it’s time to actually move that digital brushstroke onto the fabric you’ll soon be admiring every day.
Upload the final file
First, export your edited image as a high‑quality JPEG or PNG – aim for the same resolution you calculated in Step 1 (150‑200 ppi). If you’re unsure, a quick check in your file’s properties will tell you the pixel dimensions.
Most print‑on‑demand sites have a drag‑and‑drop area. Drag the file in, then double‑check the preview. Does the image sit squarely, or is there a tiny border you didn’t expect? If something looks off, hit “back” and crop again before you confirm.
Choose placement & orientation
Here’s where a little visual imagination helps. Picture the canvas on your wall: portrait orientation for a family head‑shot, landscape for a sweeping beach scene. Some services even let you rotate the image by 90° with a single click – useful if you accidentally uploaded a sideways photo.
Pro tip: turn on the “full bleed” option if you want the image to stretch to the very edge of the canvas. This eliminates that thin white margin and makes the piece feel more like a painted work rather than a printed photo.
Set the printing parameters
Most platforms ask you to confirm a few technical details: canvas thickness (usually 1/2‑inch is safe), stitching type (standard or museum‑grade), and whether you want a protective UV‑coating. The UV coating isn’t just a fancy add‑on; it actually slows colour fading by up to 30 % in sunny rooms, according to industry tests.
Because you’re aiming for a “photo to painting canvas” vibe, make sure the service knows you want the digital brush‑stroke effect applied at the highest quality setting. Some sites label this as “Premium Art Print” or “Artist‑Grade Canvas.”
Review the digital proof
Before you hit “order,” the proof is your last line of defense. Zoom in to 100 % and look for any banding, pixelation, or colour shifts. If you notice a strange halo around a subject, it might be a compression artifact – re‑export the file with a lower compression setting (quality 90‑95 %).
Ask a friend to glance at the proof on a different screen. Fresh eyes often spot things you’ve grown blind to, like a slightly off‑white background that clashes with your living‑room colour palette.
Place the order and track the shipment
Once you’re happy, add the canvas to your cart, confirm the size, and choose the shipping method that fits your timeline. Many services send a tracking number within 24 hours – keep an eye on it so you can plan a quick “unboxing” moment.
When the canvas arrives, inspect it in natural light. Look for uniform colour, proper tension, and that subtle texture that makes a painted canvas feel alive. If you see any imperfections, most providers offer a 30‑day replacement guarantee – don’t hesitate to reach out.
Real‑world examples
Take Sarah’s story: she turned a candid shot of her dog splashing in a puddle into a watercolor‑style canvas. After following the steps above, the final piece showed just enough blur to keep the scene playful, and the UV coating kept the bright greens from fading after a summer of sunshine.
Or Mark, who used a dramatic black‑and‑white portrait of his grandparents. He chose an oil‑style finish, opted for museum‑grade stitching, and hung the canvas over his mantel. The texture of the canvas gave the photo a depth he hadn’t expected from a simple print.
Quick checklist before you click “order”
- Export at 150‑200 ppi, JPEG/PNG, max quality.
- Confirm orientation matches your wall space.
- Enable full‑bleed and UV‑coating for a true painted feel.
- Zoom into the proof; re‑export if you see compression artifacts.
- Ask a second set of eyes to review the digital mock‑up.
- Verify shipping and replacement policies.
And that’s it – the moment your photo becomes a canvas‑ready masterpiece is just a few clicks away. Once it’s on your wall, you’ll notice how the “photo to painting canvas” process turns an ordinary memory into a piece of art you actually want to talk about.
Step 5: Paint and Finish Your Masterpiece
Okay, the canvas is on its way or maybe already hanging – but you’re not quite done yet. The final layer is where the “photo to painting canvas” truly feels like a hand‑crafted piece.
Why a protective varnish matters
Ever notice how an oil painting looks a bit flat once the paint dries? That’s because the surface has become uneven – some spots shine, others stay matte. A clear varnish evens out the sheen and shields the colours from dust, light, and time.
Most artists reach for an acrylic spray because it lays down a feather‑light, bubble‑free coat. A brush can leave streaks or bubbles that ruin that smooth, painted look. Evolve Artist recommends spray varnish for a consistent finish, and the same principle applies to your printed canvas.
Here’s a quick, no‑fuss routine:
- Make sure the canvas is completely dry (usually a few hours after unboxing).
- Work in a well‑ventilated room; lay the canvas flat or prop it on easels.
- Shake the spray can for 30 seconds, then hold it 12‑18 inches away.
- Apply thin, overlapping passes – think “light rain” rather than “downpour”.
- Let each coat dry 10‑15 minutes, then add a second layer if you want extra protection.
That’s it. You’ll see the colours pop back to life, almost like the moment the digital brush first hit the canvas.
Choosing the right finish
Gloss, matte, or satin? Each finish tells a different story.
Gloss brings depth and a subtle glow – perfect for oil‑style canvases that already have rich, saturated tones. Matte tones down reflections, which works great for watercolor‑soft pieces in bright rooms. Satin sits in the middle, offering a gentle sheen without the high‑gloss drama.
Think about the lighting in the room where you’ll hang the art. Sun‑filled spaces benefit from matte or satin to avoid glare, while dimmer corners can handle a glossy finish that adds a little extra “wow”.
| Finish | Best For | Pros / Cons |
|---|---|---|
| Gloss | Oil‑style, high‑contrast images | Boosts colour depth; can create glare in bright light |
| Matte | Watercolor, pastel‑heavy scenes | Reduces reflections; may look less vibrant under low light |
| Satin | Hybrid or any style when you’re unsure | Balanced sheen; versatile in most lighting |
Pick the finish that matches the mood you want to convey, and you’ll instantly feel the difference.
Final touches that make it feel “real”
Now that the surface is sealed, think about how you’ll display it. Most print‑on‑demand services include key‑hole brackets, but adding a simple wooden hanger or a decorative metal hook can give the piece a more gallery‑like presence.
If you love the look of a framed canvas, you can slip a slim, pre‑finished frame over the edges – no nails, no hassle. A thin linen‑border wrap also adds a tactile edge that mimics a hand‑stretched painting.
Don’t forget to step back and check the alignment. A quick wall‑level test with a ruler helps you spot any tilt before you nail it up.
Quick finish checklist
- Canvas fully dry before varnish.
- Use acrylic spray varnish; two thin coats.
- Choose gloss, matte, or satin based on room lighting.
- Attach hanging hardware securely.
- Inspect for bubbles or uneven coverage; re‑spray if needed.
When you finally pull that cord and see your memory transformed into a painted masterpiece, you’ll know every tiny step was worth it. Enjoy the conversation starter you’ve created – it’s more than décor, it’s a story you get to live with every day.
FAQ
What exactly is a “photo to painting canvas” and how does it work?
A photo to painting canvas is a service that takes your digital snapshot, runs it through an algorithm that adds brush‑stroke textures, depth and colour tweaks, and then prints the result onto a high‑quality canvas. You don’t need any art skills – just upload, pick a style (oil, watercolor, impressionist), and the printer reproduces the effect with ink that mimics paint. The canvas is stretched, pre‑framed and ready to hang, so it feels like a real painting straight out of a studio.
How do I choose the right photo for the best canvas result?
Start with a clear, well‑lit image that has a strong focal point – think of a portrait looking straight at the camera or a landscape with a distinct horizon. Aim for at least 150 ppi at your desired size; you can check this in the file properties. Avoid cluttered backgrounds because the brush‑stroke effect can blur tiny details. A simple crop to 4:3 or 16:9 often gives the canvas a balanced look.
What painting styles are available and which one suits my space?
Most services offer watercolor for soft, pastel‑heavy scenes, oil‑style for rich, high‑contrast images, and impressionist for a lively, brushy feel. If your living room is bright and modern, a matte watercolor can keep the vibe breezy. For a cozy study with darker walls, an oil‑style with a glossy finish adds depth. Imagine the room’s mood and let the colour temperature of your photo guide you – warm tones pair well with oil, cool tones with watercolor.
Will the colours look the same as on my screen?
Screen colours can be deceptive because monitors emit light while canvas reflects it. Most printers use a wide‑gamut CMYK profile that reproduces most hues accurately, but expect a subtle shift toward warmer tones once the ink dries. To minimise surprises, view your photo in natural light before uploading and consider a UV‑protective coating; it helps the colours stay vibrant for years without fading.
How long does it take from upload to delivery?
Typical turnaround is 3‑5 business days for printing, plus 2‑4 days for standard shipping, though many providers offer expedited options if you’re in a hurry. The process includes a digital proof, so if you need a quick tweak, add an extra day. Most users find the whole experience fits nicely into a weekend gift‑planning schedule.
Can I add a frame or custom hardware?
Absolutely. While the canvas usually arrives with key‑hole brackets, you can upgrade to a wooden hanger, decorative metal hook, or a slim pre‑finished frame that slides over the edges. A linen‑border wrap gives a gallery‑ready edge without a bulky frame. Just make sure any added hardware can support the canvas weight – most standard 24" × 36" pieces weigh under 5 lb.
What if I’m not happy with the final canvas?
Most reputable print‑on‑demand shops offer a 30‑day replacement guarantee for defects or colour mismatches. If the image looks off, contact support with photos of the issue; they’ll usually reprint at no extra cost. Some services even let you swap the style – you could try an oil finish after a watercolor didn’t meet your expectations, all without having to start from scratch.
Conclusion
We've walked through every step, from picking the perfect shot to adding the final varnish, and you can now see how a simple photo to painting canvas turns a memory into a piece of art you actually want to show off.
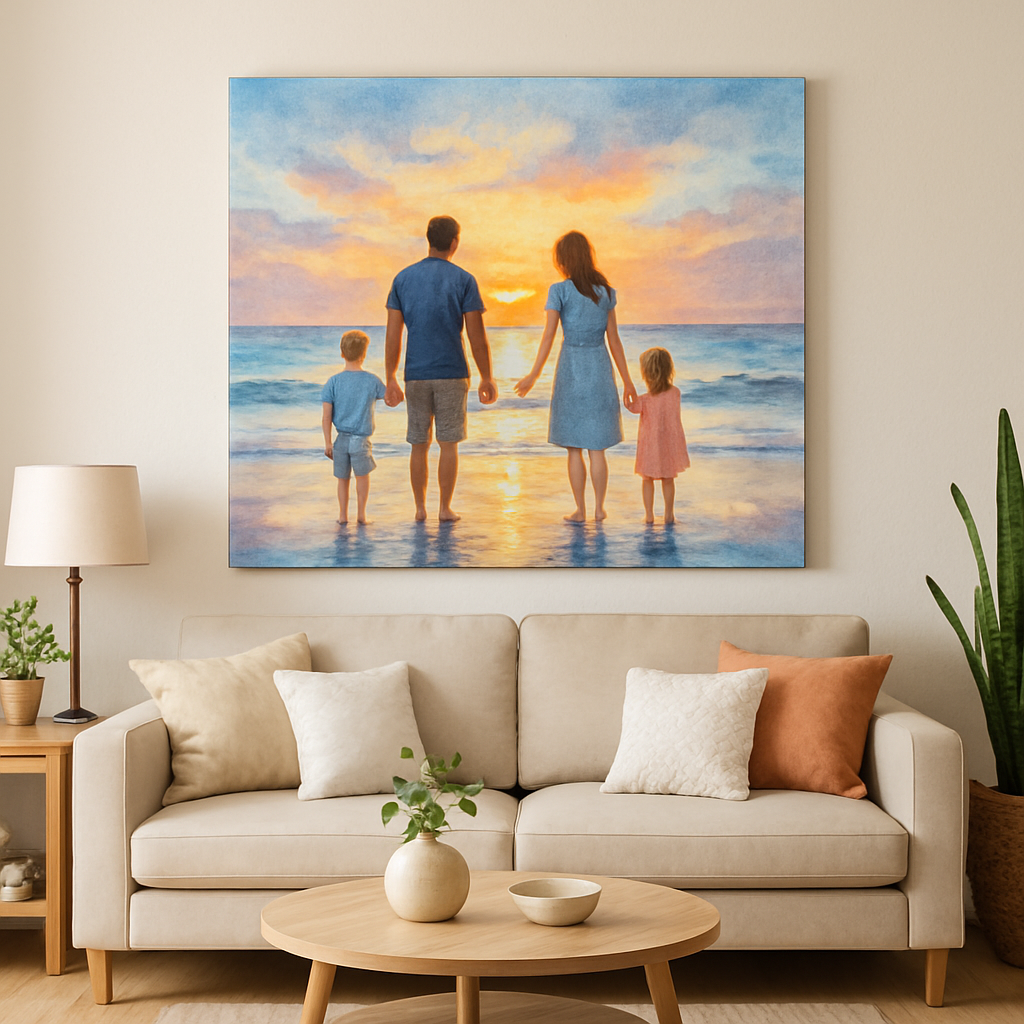
Think about the moment your partner spots that beach sunset hanging above the sofa, or how your kids light up when they see their own backyard turned into a watercolor masterpiece. That's the kind of everyday magic a custom canvas delivers.
So, what’s the next move? Grab that favorite photo, follow the quick checklist we laid out, and hit the order button on heartful.gifts. Remember, you can always tweak the style or add a protective coating if you change your mind later.
And if you’re still on the fence, ask yourself: would you rather keep a digital file on a hard drive, or have a tangible artwork that sparks conversation every time someone walks by? The answer usually feels pretty clear.
Take a breath, trust your gut, and let your walls tell the story. Your own photo to painting canvas is just a few clicks away.
Feel free to share your finished piece on social media – it’s a great way to inspire friends and maybe even start a little family tradition of custom canvas gifts.