
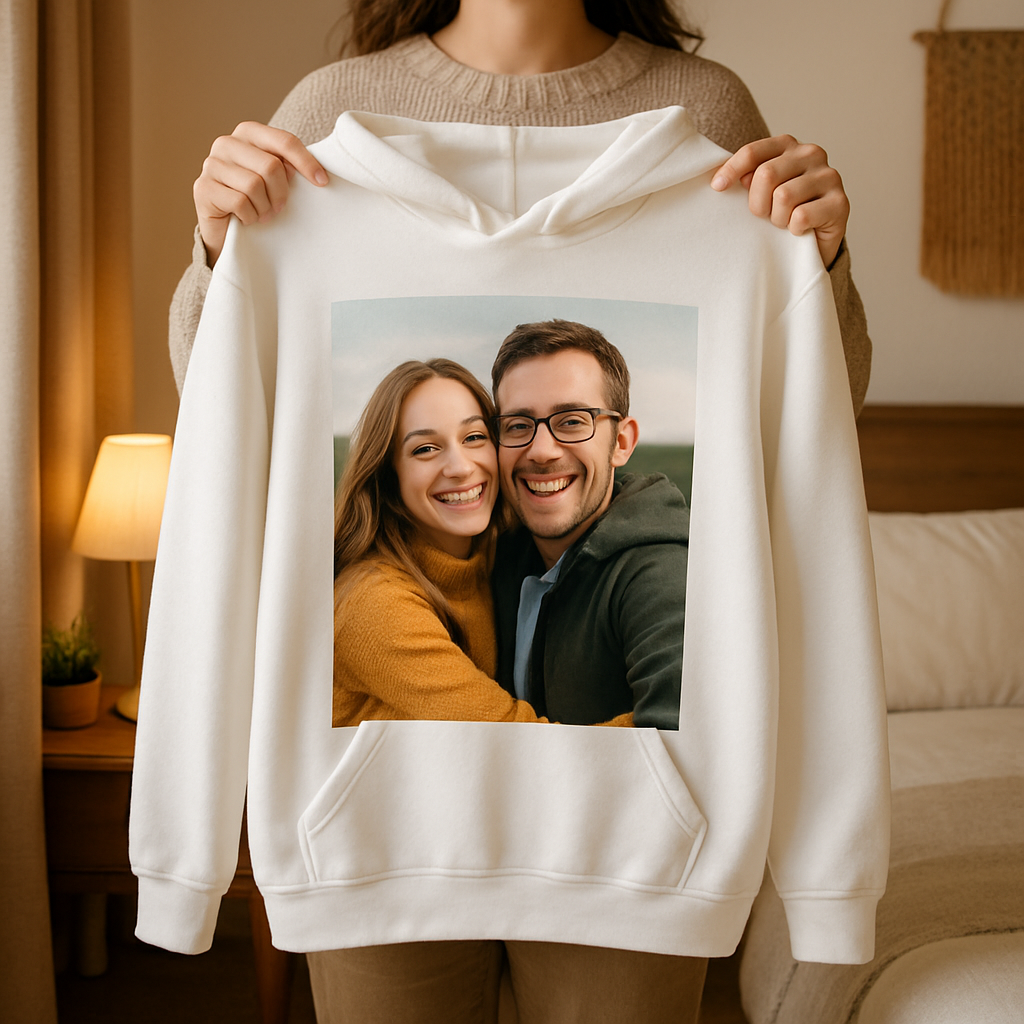
How to Design and Order a Custom Photo Hoodie: Step‑by‑Step Guide
Ever looked at a favorite photo and thought, “I wish I could wear this memory”? You’re not alone.
We all have that moment – maybe it’s a goofy beach snap from last summer, a newborn’s sleepy grin, or the night you danced under city lights. The idea of turning that picture into something you can actually pull over your head feels instantly magical.
But here’s the thing: a custom photo hoodie isn’t just a novelty. It’s a hug you can carry around, a conversation starter, and, for many of us, the perfect gift that says “I see you, I remember you, and I care enough to make it personal.”
So, what makes a custom photo hoodie worth the hype? First, the fabric. You want something soft enough for a cozy evening on the couch, yet sturdy enough to hold the printed image without fading after a few washes. Then, the printing process matters – a high‑resolution print that captures every smile line and sunrise hue.
Think about the joy on a parent’s face when they unwrap a hoodie featuring their child’s first steps. Or imagine the surprise on a spouse’s face when they discover a hoodie printed with the exact spot where you proposed. Those moments turn an ordinary piece of clothing into a keepsake.
And don’t worry about the tech side. Most print‑on‑demand shops handle everything from uploading the image to quality‑checking the final product, so you can focus on picking the perfect photo and maybe a short, heartfelt caption.
Now, you might be wondering: is it pricey? The truth is, you can find options that fit a range of budgets, especially when you compare the sentimental value to a generic sweater you’d buy elsewhere.
Ready to turn that beloved picture into wearable art? Let’s dive in and explore how you can create a custom photo hoodie that feels just right for you or the special someone in your life.
TL;DR
A custom photo hoodie turns your favorite snapshot into a cozy, wearable memory you can hug all day.
Choose a soft fabric, upload a high‑resolution image, add a short caption, and order—your unique keepsake arrives ready to warm hearts and spark conversations, plus a perfect gift for anyone you love.
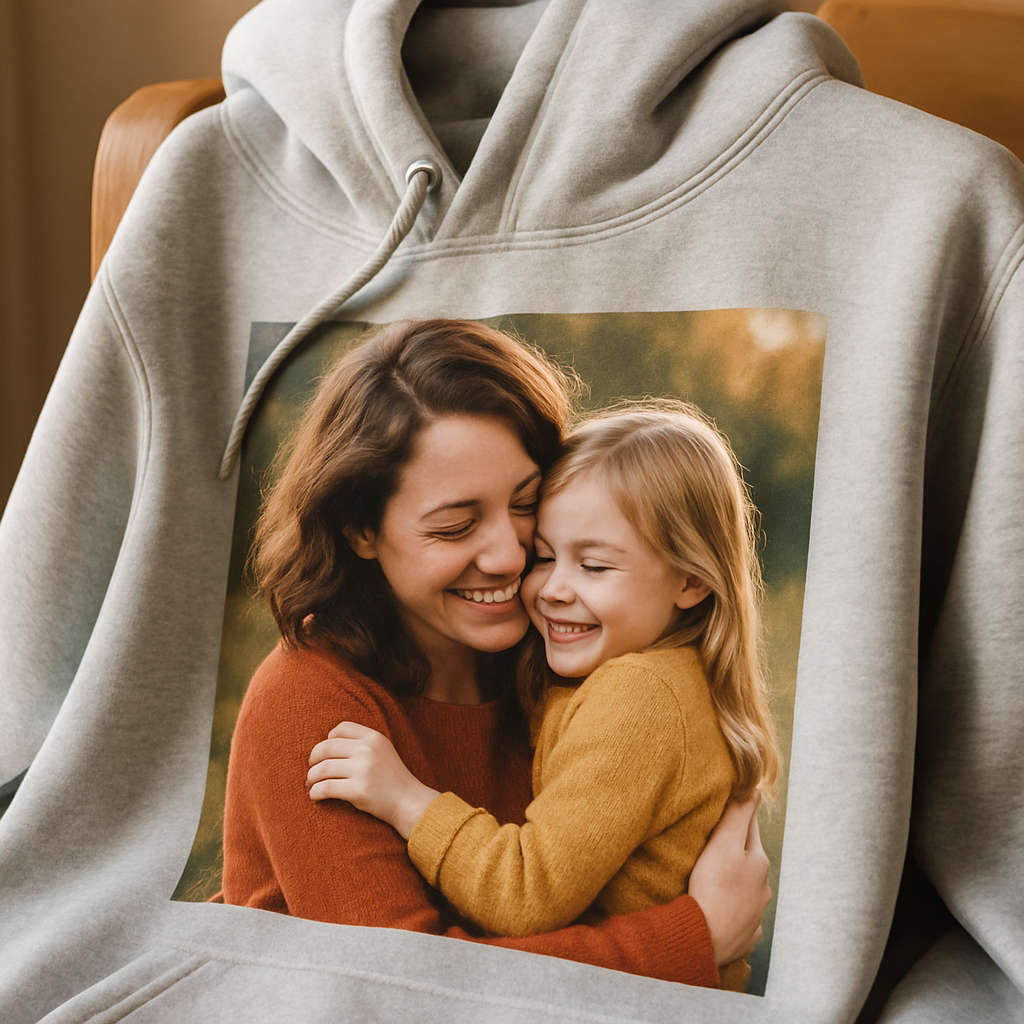
Step 1: Choose Your Photo and Hoodie Style
Alright, let’s start with the part that feels the most personal – the photo you’ll wear. Think about that one shot that still makes you smile when you scroll past it on your phone. It could be a candid laugh on a road trip, a newborn’s sleepy face, or even a goofy group selfie from last summer.
Pick the Perfect Photo
First, check the resolution. A crisp, high‑resolution image (at least 1500 px on the longest side) will keep the details sharp when it’s printed on fabric. If the picture looks fuzzy on your screen, it’ll look fuzzy on the hoodie too.
Second, consider the composition. Photos with a clear focal point and a simple background tend to translate best onto a shirt‑sized canvas. You want the eye to land on the main subject, not get lost in a busy background.
Pro tip: use a photo‑editing app to crop a little tighter around the subject and boost contrast just enough to make the colors pop. If you’re feeling adventurous, you can even try an AI‑powered tool like Get Road Trip AI to suggest the most eye‑catching frame.
Now that you’ve got a solid image, let’s talk style. The hoodie itself can dramatically affect how that photo looks when you wear it.
Decide on Hoodie Style
Do you love the classic pullover look, or do you prefer a zip‑up that lets you show off the design only when you want? Think about the occasion – a zip‑up can be layered for cooler evenings, while a pullover feels cozier for lazy weekends.
Color matters, too. A neutral grey or navy hoodie lets a vibrant photo really stand out, whereas a white hoodie can make pastel tones shine. If your photo already has strong colors, you might pick a darker hoodie to create contrast.
Fit is another hidden hero. A slightly relaxed fit will keep the print from stretching too much, while a more tailored cut can give a sleek, modern vibe. Most print‑on‑demand shops, including heartful.gifts, let you preview how the image wraps around the chest and back before you hit “order.”
When you’re unsure, ask yourself: “What’s the story I want this hoodie to tell?” If it’s a family memory, a softer fabric and muted hoodie color might feel right. If it’s a bold adventure shot, go big with a bright background and a snug fit.
Match Photo to Fabric & Print Method
Most services use either direct‑to‑garment (DTG) printing or sublimation. DTG works well on cotton blends and gives a soft‑touch feel, while sublimation shines on polyester blends and keeps colors vivid even after many washes.
Check the product description for the fabric weight – a 350 gsm hoodie feels substantial without being too heavy. If you’re ordering a gift for a parent, a slightly heavier fabric can feel extra “hug‑worthy.”
One more thing: think about placement. Center‑chest is classic, but a small logo‑size image over the left chest can be subtle and classy. Larger prints that span the back create a statement piece.
Finally, don’t forget the little details – ribbing color, drawstring material, and pocket style. These tiny choices can make your custom photo hoodie feel truly bespoke.
Once you’ve nailed the photo, style, and fabric, you’re ready to move on to adding any caption or text you want. Trust me, the right combination turns a simple snapshot into a wearable memory you’ll reach for again and again.
And there you have it – the foundation for a custom photo hoodie that looks great and feels personal.
Ready for more insider tips? Check out what industry experts say on Authority Echo about choosing the perfect print method for apparel.
Take a deep breath, pick that favorite photo, and let the hoodie bring that moment to life every time you pull it on.
Step 2: Upload and Position Your Photo
Okay, you’ve picked the perfect snap and decided on a cozy pull‑over. Now it’s time to get that image onto the hoodie without it looking like a blurry meme. Trust me, a few mindful tweaks at this stage make the difference between “wow, that’s gorgeous!” and “huh, why does it look fuzzy?”
1. Resize and check resolution
First thing’s first – make sure your file is at least 300 dpi. Most print‑on‑demand services, including the ones we love, will warn you if the resolution is too low. If you’re pulling a photo straight from your phone, open it in a simple editor (even the built‑in Photos app works) and verify the dimensions. A good rule of thumb: aim for a file that’s between 1 MB and 15 MB; anything smaller might lose detail, anything larger could stall the upload.
Need a quick sanity check? Shutterfly’s custom hoodies suggest keeping the image crisp by matching the print area (usually around 10" × 10" for a front‑center design). If your photo is larger than that, you’ll have room to crop without sacrificing quality.
2. Choose the right placement
Most shoppers go for a single, centered image on the chest, but the hoodie’s real estate offers more options. The front pocket, the back, even the sleeves can become mini‑gallery spots. Printful’s hoodie placement guide breaks down the exact canvas sizes – for example, a front‑print area can range from 10" × 10" up to 13" × 13" depending on the brand. Knowing those numbers helps you decide whether to go big with a landscape or keep it intimate with a portrait.
Real‑world example: Maya wanted to celebrate her dog’s birthday. She placed a small paw‑print logo on the left chest (4" × 4") and the main photo of her pup on the back (12" × 14"). The result was a balanced look that didn’t overwhelm the hoodie’s shape.
3. Upload and fine‑tune the preview
When you hit the upload button, most design studios show a live preview. Drag the image around, zoom in, and use the built‑in crop tool to center the most important part – whether that’s a smiling face or a sunset horizon. Don’t be afraid to use the “reset” button if you go too far; you can always start fresh.
Pro tip: keep an eye on the seam lines. If your picture straddles a shoulder seam, the image can look split after stitching. A quick way around this is to keep the focal point at least an inch away from any seam, especially on pull‑overs.
4. Test contrast and colour harmony
Dark hoodie, bright photo? Light hoodie, pastel image? Contrast matters because a low‑contrast combo can make details disappear after washing. Most platforms let you toggle a background colour behind the preview – use that to simulate how the print will sit on the actual fabric. If you’re unsure, grab a swatch of the hoodie colour from the product page and compare it side‑by‑side with your image on your phone.
One quick experiment: take a screenshot of the hoodie colour, open it in a photo editor, and place your image over it at 50% opacity. If the details still pop, you’re good to go.
5. Save a high‑res copy and double‑check
Before you click “order,” download the final mock‑up. This acts as a safety net – you can zoom in to confirm there’s no pixelation and that the image sits exactly where you want it. Keep that file handy; if the printer asks for a different format (PNG vs. JPEG), you won’t have to hunt for the original again.
And if you’re feeling extra cautious, revisit our full step‑by‑step guide for a quick checklist of file specs and colour tips.
6. Hit order with confidence
Once everything looks crisp, centered, and high‑contrast, go ahead and place the order. Most services will give you a production timeline (usually 3‑5 business days) and a tracking link once it ships. If you ordered a single hoodie to test the waters, you’ll have a perfect sample to decide whether to bulk‑order for gifts or a family reunion.
Bottom line: uploading isn’t just a drag‑and‑drop. It’s your chance to fine‑tune the memory you’re about to wear. Treat it like a mini‑photoshoot – adjust, check, and make sure the final print will make you smile every time you pull the hood up.
Step 3: Add Text & Design Elements
Now that your photo sits nicely on the hoodie, it’s time to give it a voice. Adding a short caption, a date, or a tiny graphic can turn a simple picture into a story you wear every day.
Pick a font that feels right
First, scroll through the font list and look for something that matches the mood of your image. A handwritten script works wonders for a newborn’s first smile, while a bold sans‑serif feels more sporty for a team‑spirit hoodie. Don’t overthink it—if the font makes you smile, you’re probably on the right track.
Mind the contrast
Even the prettiest script disappears if the colour blends into the fabric. Light‑grey hoodies love dark navy text; black hoodies need a pop of white, pastel pink, or even a bright orange accent. A quick trick: turn your preview into a grayscale image on your phone; if the letters still stand out, you’ve nailed the contrast.
Where to place the words
Think about where the eye naturally lands. The chest center is classic, but a tiny phrase tucked just above the pocket can feel like a secret. If you’ve got a family‑photo collage on the back, consider a date or a short quote along the lower hem—just keep it at least an inch away from the seam so the print doesn’t split.
Mixing text with images
Most design studios let you layer text over the photo or keep it separate. For a clean look, place the caption underneath the image with a subtle line break. If you want a more dynamic vibe, overlay the words in a semi‑transparent box so the picture still shows through. Play with spacing; a little extra line‑height can make a crowded design breathe.
Use templates or go fully custom
If you’re not a design whiz, start with a ready‑made template. Many platforms offer pre‑arranged layouts—just swap in your photo and type in your message. Feeling adventurous? Upload a small logo or a hand‑drawn doodle and position it on a sleeve. The key is to keep the overall composition balanced—not too busy, not too empty.
Preview, zoom, and tweak
Hit the preview button, then zoom in to 150 % and scroll around. Do the letters look crisp? Is any part of the photo cut off by a seam? If something feels off, drag it a millimeter left or right; the tool will update in real time. Don’t be shy about hitting “reset” and starting over—that’s how the best designs are born.
Check bleed and safe zones
Every print‑on‑demand service has a “safe zone” where nothing should cross the edge. Make sure your text stays well inside that area—otherwise you risk a trimmed letter or a missing word. A good rule of thumb is to keep all important details at least half an inch from the garment’s edge.
Final checklist before you order
✅ Font matches the vibe
✅ Text colour pops against the hoodie
✅ Placement respects seams and safe zones
✅ No spelling errors (double‑check!)
✅ Preview looks sharp at 150 % zoom
Once everything checks out, hit “order” with confidence. The same high‑definition printers that keep your photo sharp also render text with razor‑clear edges, thanks to the hoodie’s cotton‑poly blend and advanced printing tech. You’ll get a piece that feels as soft as a hug and looks as vivid as the memory it captures.
And there you have it—your custom photo hoodie now carries both image and words, turning a fleeting moment into a wearable keepsake. Ready to add that special line? Let’s make it happen.
Step 4: Compare Hoodie Materials & Pricing
Now that your photo and text are sitting nicely on the mock‑up, the next question is: will the hoodie feel as good as it looks? The secret lies in the fabric you choose and how that choice impacts the price.
Know your fabric weight
Fabric weight is the first litmus test. Light‑summer hoodies sit around 5.9‑7.4 oz/yd² (200‑250 g/m²), all‑year‑round options land in the 7.4‑8.9 oz/yd² range, and cozy winter pieces push up to 11.8 oz/yd² (400 g/m²) — the thicker the yarn, the warmer the wear.
Think about when you’ll wear it. A breezy evening on the balcony? Go light. A chilly weekend hike? Reach for the heavyweight.
Cotton‑poly blends: the sweet spot
Most of the hoodies we stock are cotton‑poly blends. A 50/50 mix gives you a soft, breathable feel while the polyester side locks in colour vibrancy and resists shrinkage. That balance is why the Printful material guide recommends it for everyday custom photo hoodies.
For a little extra plushness, a 65/35 blend adds more cotton, making the fleece feel like a warm hug, yet still holds up after dozens of washes. If you’re after maximum colour punch, a 80/20 ratio puts polyester front‑and‑center, so your photo stays vivid even after the third laundry cycle.
Tri‑blend & specialty fabrics
Looking for something ultra‑soft? Tri‑blends (cotton‑poly‑rayon or polyester‑cotton‑elastane) deliver a buttery texture that’s perfect for summer photo hoodies. The rayon‑rich blend breathes like cotton, while the elastane adds stretch, meaning the hoodie won’t sag over the print.
On the other side, 100 % cotton offers the ultimate natural feel and is hypoallergenic – great for kids with sensitive skin – but expect the print to fade a bit faster.
Pricing considerations
Now, the dollars and cents. Staples Promo notes that custom picture hoodies start at about $20 and can climb toward $60 depending on material, weight, and printing method. A lightweight 50/50 cotton‑poly blend usually lands near the low‑end, while a heavyweight tri‑blend or 100 % cotton premium option pushes the price upward.
Don’t forget the hidden costs: DTG printing on higher‑cotton fabrics tends to be a tad pricier than polyester‑dominant prints, but the result is sharper detail. If you’re ordering a single gift, the base price matters most; for bulk orders, look for volume discounts on the heavier styles.
Here’s a quick cheat‑sheet to help you decide.
| Material | Weight (oz/yd²) | Pros | Cons |
|---|---|---|---|
| 50/50 cotton‑poly blend | 7.4‑8.9 | Soft, breathable, vibrant prints, affordable | Mid‑range warmth |
| 65/35 cotton‑poly blend | 8.9‑11.8 | Cozy, extra cotton softness, good for winter | Higher price, slightly heavier |
| Tri‑blend (cotton‑poly‑rayon) | 5.9‑7.4 | Ultra‑soft, stretchy, great for summer | May require DTG, less shrink‑resistant |
So, which combo feels right for you? If you’re gifting a newborn’s first photo, the 65/35 blend gives that snuggly feel parents love. If you’re printing a bold landscape for yourself, the lightweight tri‑blend keeps the hoodie breathable while the colours pop.
And a final tip: order a single sample before you bulk‑order. Feel the fabric, check the print, then decide if the price matches the experience you want to deliver.
When you get that sample in the mail, try it on in natural light. Notice how the colors hold up when you move, and whether the fabric feels too stiff or just right. Those tiny observations save you a lot of regret later.
With the material and pricing side of things sorted, you’re ready to move on to the final quality check before you hit “order.”
Step 5: Place Order and Care Tips
Okay, you’ve double‑checked the photo, the text, the fabric – now it’s time to actually click that “order” button and think about how you’ll keep your new piece looking fresh.
First thing’s first – most print‑on‑demand sites give you a quick order summary: size, colour, quantity, and the total price. Take a breath, verify those details, then hit “confirm”.
If you’re ordering a single sample, treat it like a test drive. When the hoodie arrives, try it on in natural light – does the image sit where you expected? Does the colour pop against the fabric?
Now that you’re happy, you can scale up. Most services let you add the same design to a cart, adjust the quantity, and even apply bulk‑discount codes. Remember our earlier tip – ordering a few extra gives you spare hoodies for gifts or for swapping out after the first wash.
A quick sanity check before you finish: does the preview show any stray pixels near the seam? If the focal point sits too close, the stitch line can cut off a smile. Shift it an inch inward and you’ll avoid that awkward surprise.
Care instructions that keep your custom photo hoodie looking brand‑new
The fabric you chose (most of our hoodies are a cotton‑poly blend) likes gentle treatment. Wash cold, tumble dry low, and skip the bleach – that’s the recipe the manufacturers recommend, as shown on the AWDis hoodie care guide.
If you need to iron, do it on the reverse side with a cool setting. That way the heat doesn’t melt the print, and the hoodie stays soft.
Avoid dry‑cleaning – the chemicals can dull the colours and weaken the fibres. A quick spot‑clean with a damp cloth works fine for small stains.
For long‑term love, store your hoodie folded rather than hanging it by the hood. Heavy hangers can stretch the neckline and eventually tug at the printed area.
Pro tip: after the first wash, let the hoodie air‑dry for a few minutes before you fold it. This helps the fibres set and reduces any slight shrinking you might notice.
Got a question about caring for a specific colour? Dark greys tend to show lint more than lighter shades, so a quick lint‑roller swipe after each wear keeps them looking crisp.
Final checklist before you click “order”
- Design preview crisp at 150 % zoom
- Size, colour, and quantity correct
- Image at least an inch from seams
- Care instructions noted
When everything checks out, go ahead and place the order. You’ll get a production timeline (usually three to five business days) and a tracking link once it ships. Then just sit back and wait for that first unboxing moment – the one where you actually see your memory stitched onto a soft hoodie.
And there you have it – a simple, step‑by‑step path from a favorite photo to a custom photo hoodie you can wear, gift, and cherish for years. Enjoy wearing it wherever you go.
FAQ
How long does it take to get my custom photo hoodie after I place the order?
Usually the production window is three to five business days, then you get a tracking link for shipping. If you’re ordering during a holiday rush, add a couple of extra days just in case. We’ve seen most customers have the hoodie in their hands within a week of ordering, which is pretty quick for a made‑to‑order piece.
Can I wash my custom photo hoodie without ruining the picture?
Yes, you can. Wash it inside‑out on a gentle cycle with cold water, then tumble dry low or hang to dry. Skip bleach and high heat – they can fade the print. A quick spot‑clean with a damp cloth works for small stains, and the cotton‑poly blend holds up to many washes while keeping the image sharp.
What file format and resolution should I use for the best print?
Aim for a PNG or a high‑quality JPEG that’s at least 300 dpi. The file should be between 1 MB and 15 MB – big enough to stay crisp but not so huge it stalls the upload. If you’re pulling the photo from your phone, check the settings and export the original; a sharp, well‑lit image will translate into a vibrant hoodie.
Are there size or colour limitations for my custom photo hoodie design?
The printable area on most pull‑overs is roughly 10" × 10" to 13" × 13", so keep the main subject within that space. Light colours showcase bright photos best, while dark hoodies need a lighter or more saturated image for contrast. You can also add a small logo or text on the sleeve without worrying about the main canvas size.
How do I make sure the photo doesn’t get cut off at the seams?
Keep the focal point at least an inch away from any shoulder or side seam. Most design tools show a faint line where the seam runs – use it as a guide. If you notice the image drifting toward the edge, drag it back a little; a tiny adjustment now saves a big disappointment later when the hoodie arrives.
Is it possible to order a custom photo hoodie as a gift and have it shipped directly to someone else?
Absolutely. During checkout you can enter a different shipping address and even add a short gift note. The recipient gets the same high‑quality hoodie you designed, plus a personal message that makes the surprise feel extra thoughtful. Just double‑check the size and colour choices before you hit confirm.
Conclusion
Congratulations, you’ve made it to the finish line of the custom photo hoodie journey. By now you know how to pick the perfect snap, choose a fabric that feels right, position the image so seams don’t steal the smile, add just‑enough text, and care for the finished piece so it lasts.
Remember, the magic isn’t just in the print – it’s the story you’re wrapping around yourself or a loved one. A lightweight 50/50 cotton‑poly blend works for everyday wear, while a cozy 65/35 blend turns a newborn’s tiny hand into a warm hug. Keep the focal point an inch away from seams, use a 300 dpi PNG or high‑quality JPEG, and wash cold inside‑out to protect the colors.
So what’s the next step? Head over to heartful.gifts, upload your favorite memory, and hit order. Whether you’re treating yourself or sending a surprise to someone special, a custom photo hoodie turns a fleeting moment into a wearable keepsake you’ll reach for again and again.
We hope this guide gave you confidence to create something truly personal. Enjoy the process, have fun with the design, and most of all, wear your memory proudly. And when you slip it on, let the smile on the fabric remind you of why you started this creative adventure.