
How to Create Custom Photo Magnets for Fridge Gift Ideas
Ever found yourself staring at a blank fridge, wondering how to turn that cold, empty space into a tiny gallery of memories?
You’re not alone—most of us have that moment when a simple photo could make the kitchen feel a little warmer.
Enter custom photo magnets for fridge gift, the sweet spot between a heartfelt keepsake and a practical everyday reminder.
Imagine a sunny beach snap from last summer, or a candid grin of your toddler, right there on the door you open every morning—no frames, no fuss, just a magnet that says, “I thought of you.”
So why do they work so well as gifts? First, they’re personal without being over‑the‑top; second, they’re live where families gather; third, they’re cheap enough to send a smile without breaking the bank.
And the best part? You can design them in minutes on heartful.gifts, upload a photo, pick a size, and let the print‑on‑demand magic handle the rest.
Maybe you’re thinking, “Will it actually stick?” Trust me, the magnets are strong enough for a standard fridge door but gentle enough not to leave a mark when you take them down.
If you’ve ever tried a generic souvenir magnet and felt it was…well, bland, you’ll appreciate the extra love you add by choosing a photo that means something.
Think about the next birthday, anniversary, or just a random Tuesday when you want to say “I’m thinking of you.” A custom photo magnet lands on the fridge and instantly becomes a conversation starter.
And because they’re lightweight, you can swap them out whenever the mood changes—maybe a new family pic for the holidays, or a goofy selfie for a laugh.
So, if you’ve been hunting for a simple yet meaningful way to brighten someone’s day, custom photo magnets for fridge gift might just be the perfect answer.
Ready to turn those favorite moments into magnetic smiles? Let’s dive in and see how easy it is to create a gift that sticks—literally.
TL;DR
If you’re hunting for a quick, heartfelt way to brighten someone’s day, custom photo magnets for fridge gift let you turn favorite snapshots into magnetic smiles that stick literally and emotionally.
In just minutes on heartful.gifts you upload a pic, pick a size, and let print‑on‑demand magic handle the rest, so you can surprise loved ones with a personalized keepsake that’s cheap, charming, and endlessly swap‑able.
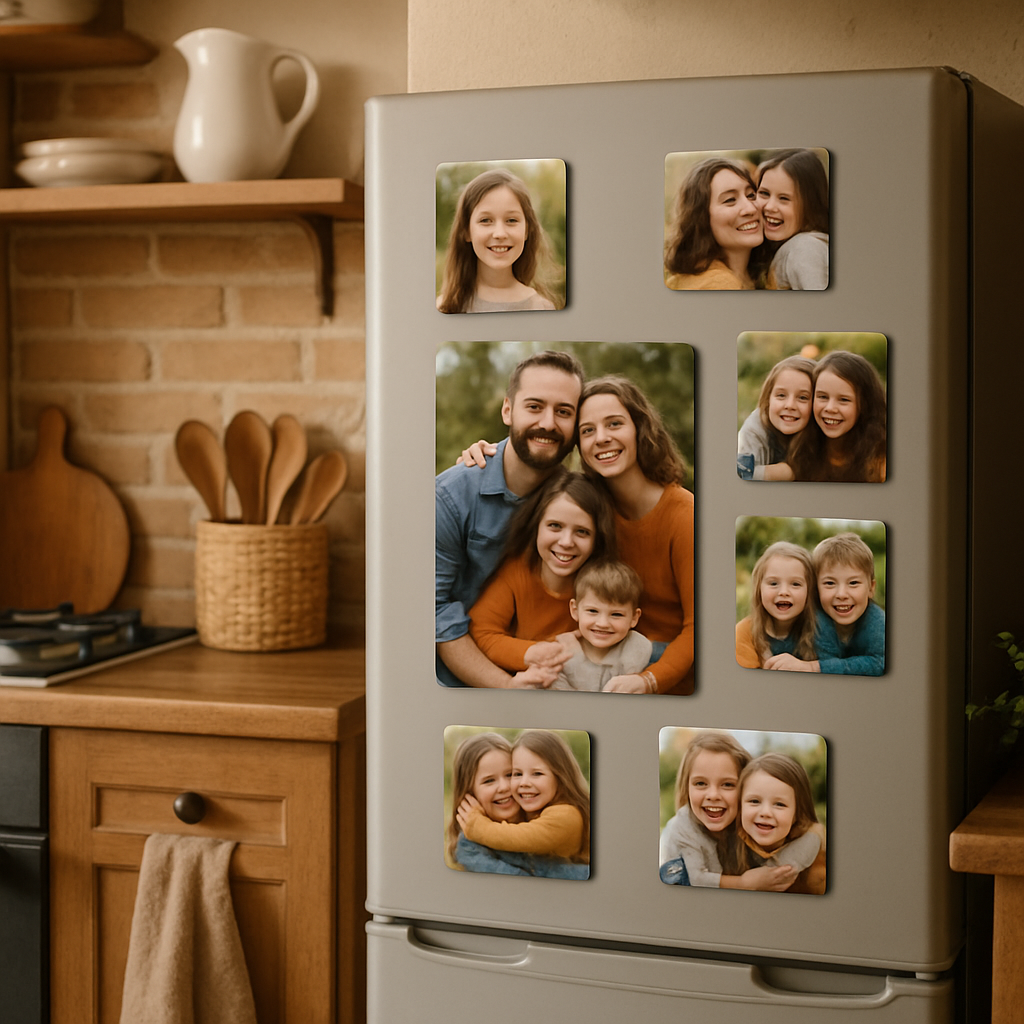
Step 1: Choose Your Photos and Theme
Before you click “print” on heartful.gifts, the most important decision is actually what you’re going to put on the magnet. It sounds simple, but picking the right photo and theme can turn a cute token into a memory that lives on the kitchen door for years.
So, how do you make that choice without overthinking?
Find the Moment That Matters
Think about the last time you walked past the fridge and smiled at a photo. Maybe it was a candid shot of your kids covered in frosting, or the goofy selfie you took on a rainy road trip. Those moments have two things in common: they’re genuine and they spark a feeling you want to revisit.
Grab a handful of your recent snaps and lay them out on a coffee table. Ask yourself, “Which one makes me laugh the most? Which one feels warm enough to share with a friend?” If you can answer that in a heartbeat, you’ve found your winner.
Here’s a quick tip: avoid photos that are too busy. A cluttered background competes with the magnet’s limited surface area and dilutes the impact. Home‑cooking moms often share before‑and‑after kitchen shots that illustrate how a clean, centered image stands out on a fridge.
Match the Mood to the Recipient
If you’re gifting a parent, a nostalgic family portrait works wonders. For a spouse, a playful “first date” pic can add a dash of romance. And for a friend who loves travel, a sunrise over the Grand Canyon will feel like a mini‑vacation every time they open the butter drawer.
Don’t forget the theme. Heartful.gifts lets you pick from matte, glossy, or even a subtle pastel frame. Choose glossy for vibrant colors, matte if you prefer a softer look that doesn’t reflect kitchen lights. The right finish can make a bright beach photo pop or keep a black‑and‑white portrait classy.
Need inspiration? A quick scroll through DIY magnet makers’ community shows how color palettes and seasonal motifs can tie your photo to holidays, birthdays, or just a “just because” vibe.
Now, take a moment to imagine the fridge door as a mini‑gallery. Which image will you want to see first thing in the morning? Which one will still feel fresh after a week of grocery trips?
Once you’ve settled on the perfect picture and finish, it’s time to upload it to heartful.gifts. The platform automatically scales the image to fit the magnet size you choose, so you don’t have to worry about cropping the smile off the edge.
Pro tip: keep a backup copy of the original high‑resolution file. If you ever want to reorder or create a matching set for other appliances, you’ll thank yourself later.
If you’re still unsure, try a quick test: print the photo on plain paper and tape it to the fridge. See how it looks in real life before committing.
And that’s the first step done. You’ve turned a simple photo into a purposeful design, ready to become a magnetic reminder of love, laughter, or that inside joke only you and your loved one share. Ready for the next move? Keep reading – the printing process is a breeze.
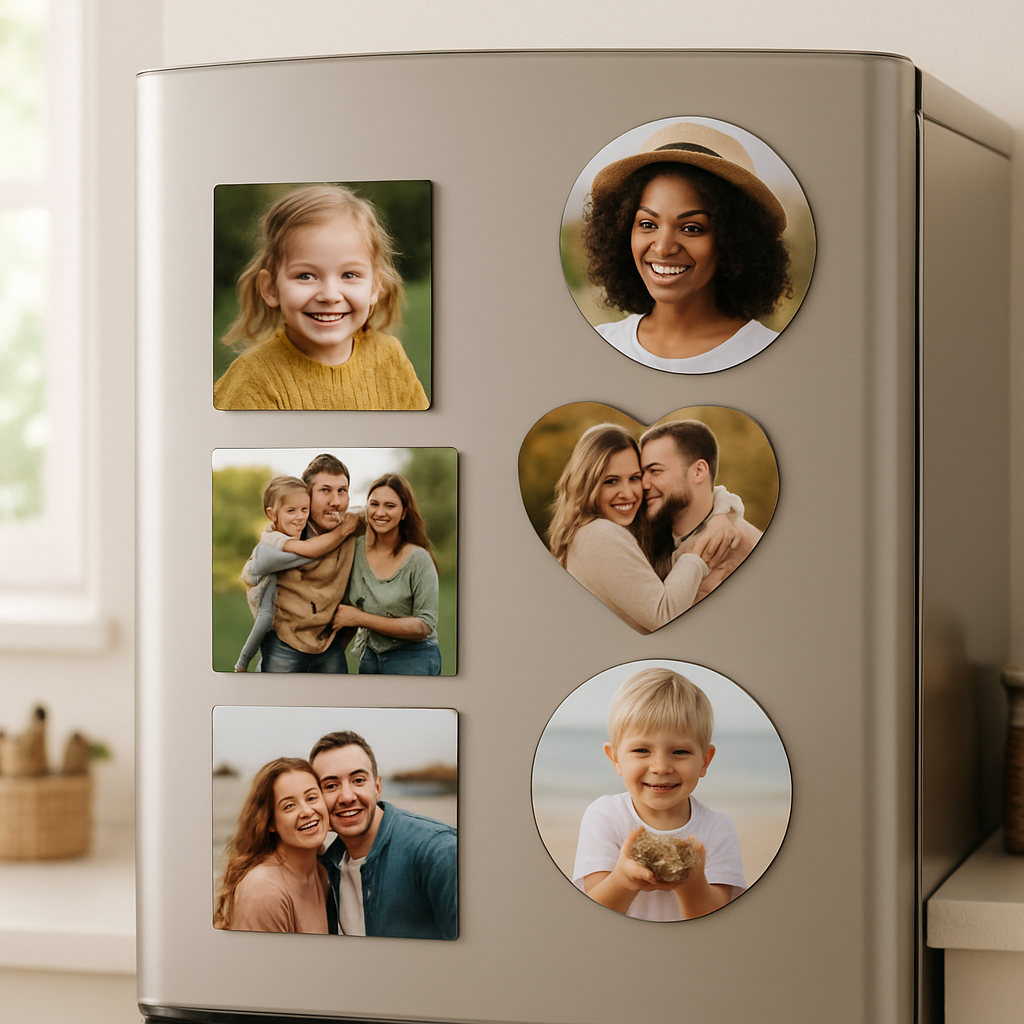
Step 2: Select Magnet Size and Shape
Now that your photo is uploaded, the next decision feels a bit like picking the perfect frame for a favorite painting. Size and shape will dictate how the image lives on your fridge—and how often you’ll actually look at it.
Start with the space you have
Take a quick glance at the real estate on your refrigerator door. Is it a sprawling side panel or a compact door on a dorm room fridge? A larger magnet (think 5″ × 7″) makes a bold statement on a big surface, while a tiny 2″ × 3″ rectangle slides neatly onto a crowded door without stealing the spotlight.
And here’s a little secret: the most popular size for a “photo‑magnet gift” is the classic 3″ × 3″ square. It’s big enough for detail, but small enough to fit a bunch on a single shelf. UPrinting’s guide to common refrigerator magnet sizes confirms that 2″ × 3″ works well for business‑card‑style magnets, while 5″ × 7″ is great for panoramic shots.
Shape matters more than you think
Square magnets give you a clean, gallery‑like look – perfect for family portraits or travel snaps. Round magnets add a soft, playful vibe; they’re ideal for cute pet photos or a single emoji‑style image. Heart‑shaped magnets? They scream “I love you” and work wonders for anniversaries or Valentine’s Day gifts.
CanvasChamp points out that you can also go for rectangular, metal, acrylic, or even wood options, each bringing its own texture to the kitchen scene. Explore the different shape options for photo magnets to see how a sleek metal rectangle feels different from a warm wooden heart.
Strength vs. thickness
Don’t get fooled by a thin magnet that looks sleek but barely clings. Magnet strength is more about thickness (measured in mils) than surface area. A 30‑mil thick 2″ × 3.5″ magnet will hold tighter than a flimsy 5″ × 7″ that’s only 20 mils. Aim for at least 30 mils if you want your magnet to survive daily grocery‑list chaos.
Practical checklist
- Measure the fridge door area you want to cover.
- Pick a shape that matches the photo’s composition (portrait vs. square).
- Choose a size that leaves room for other magnets or notes.
- Confirm thickness – 30 mils is a safe sweet spot.
Still unsure? Try a quick DIY test: print the image on regular paper, cut it to your desired size, tape it on the fridge, and live with it for a day. If it feels right, you’ve nailed the perfect combo.
Material matters
Heartful.gifts offers three material families: sleek metal (1 mm), glossy acrylic (2 mm), and warm wood (4 mm). Metal gives a modern, reflective feel—great for black‑and‑white photos. Acrylic pops color and adds a subtle shine, while wood brings a rustic charm that makes a family portrait feel like a cabin souvenir.
All three use UV‑cured inks, so the colors won’t fade even when the sun hits the fridge for hours. Plus, each magnet contains a powerful earth magnet on the back, so you won’t wake up to a magnet that slid down the door overnight.
- Choose metal for a minimalist, gallery‑like look.
- Select acrylic if you love vibrant, glossy finishes.
- Go wood for a cozy, farmhouse vibe.
- Make sure the magnet is at least 20‑30 mil thick for reliable grip.
If you’re gifting a set, think about mixing sizes—one big landscape for a vacation, plus a few small hearts for inside jokes. Ordering a batch is easy on heartful.gifts; just upload each photo and pick the same size or vary it for a playful collage.
Ready to see your fridge become a personal gallery?
| Shape | Typical Size | Best Use |
|---|---|---|
| Square | 3″ × 3″ (or 2″ × 2″) | Family portraits, travel shots |
| Round | 2.5″ diameter | Pet photos, cute icons |
| Heart | 2″ × 2″ | Romantic gifts, anniversaries |
When you’ve settled on the perfect combo, head back to heartful.gifts and lock in your choice. Need more inspiration for a heartfelt present? Check out our creative custom gift ideas for a splash of extra love.
With size and shape sorted, you’re one step closer to turning that snapshot into a magnetic memory that sticks around for years.
Step 3: Design and Layout Your Magnet
Alright, you’ve picked the shape, the material, the thickness—now comes the fun part: turning that raw photo into a design that actually looks great on your fridge.
Start with a clean canvas
Open your favorite editor—whether it’s Adobe Express or even a free tool you already have. The key is to work in the exact dimensions you chose earlier (for example, 3×3 inches for a square magnet). That way you won’t be guessing about scale later.
Pro tip: set a 0.125‑inch bleed around every edge. Without a bleed the printer might cut a few millimetres off your image and you’ll end up with a thin white border.
Mind the margins
Leave at least a quarter‑inch of “safe zone” inside the edge so no important faces or text get trimmed. Imagine you’re framing a family portrait—would you want a cheek cut off?
And if you’re adding a short message, keep it centered and away from the outer 0.2 inch; that’s the sweet spot most printers recommend.
Choose the right colour mode
Most custom photo magnets for fridge gift are printed digitally, so you can stay in RGB while you design. But if you ever hand the file to a professional print shop, switching to CMYK early prevents those surprise dull greens and blues that Adobe’s design tools warn you about.
Honestly, I’ve seen friends lose hours re‑editing because they forgot this step.
Typography that pops
If you want a tiny “Happy Birthday” or a witty quote, pick a font that stays legible at 2‑inch size. Avoid fancy scripts that look great on screen but turn into a blur once printed.
Outline the font or convert it to a shape before exporting—this sidesteps missing‑font issues that many designers run into, as highlighted in print design best practices.
Test with a mock‑up
Drop your finished PNG or PDF onto a fridge mock‑up template. Seeing it next to a coffee mug or a grocery list helps you spot whether the image feels too busy or the text competes with the photo.
Do you notice a lot of empty space? Add a subtle border or a soft drop shadow—just enough to give the magnet depth without drowning the picture.
Now, let’s bring a little movement into the process.
Watch the quick tutorial above; it walks you through positioning text, adding bleed, and exporting a print‑ready file in under three minutes.
Export and double‑check
When you hit “Export,” choose PDF‑Print or high‑resolution PNG at 300 dpi. Open the file on your computer and zoom in—do the edges look crisp? Are the colours still vibrant?
If anything looks fuzzy, go back to the original photo and replace it with a higher‑resolution version. Remember, a 1500‑pixel side is usually the sweet spot for a 3‑inch magnet.
Final checklist before you hit order
- Dimensions match the magnet size you selected.
- 0.125‑inch bleed on all sides.
- Safe zone margins kept clear of important details.
- Fonts outlined or converted to shapes.
- File saved at 300 dpi, CMYK or RGB as required.
Cross those boxes and you’re ready to upload to heartful.gifts. Your custom photo magnets for fridge gift will look polished, stick strong, and most importantly, make the recipient smile every time they open the fridge.
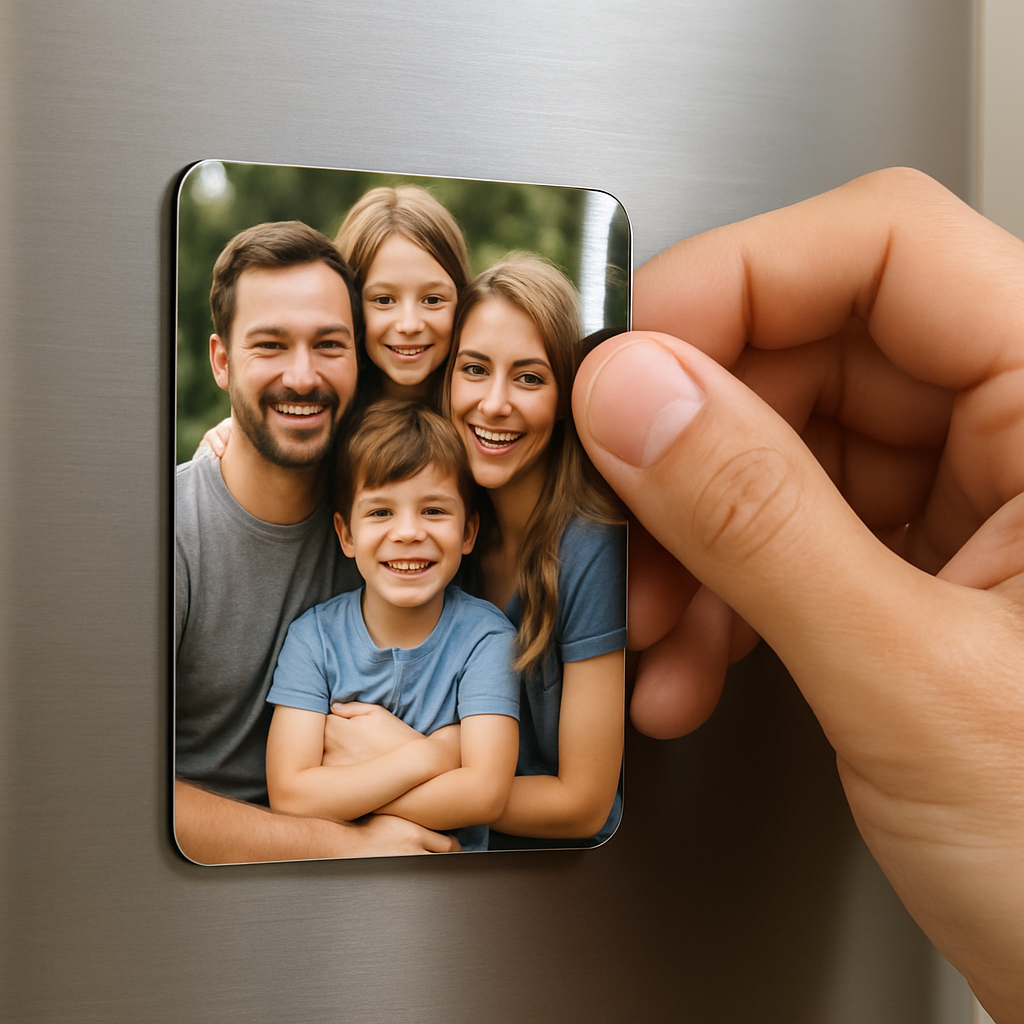
Step 4: Choose Materials and Printing Options
Now that your design is export‑ready, let’s talk about the magnet itself—because a beautiful photo won’t stick if the magnet can’t hold on.
Magnet manufacturers group their products into five families, each with a different pull strength. In order of increasing power they are: flexible, ceramic (also called ferrite), alnico, samarium‑cobalt, and neodymium. MagnetShop breaks down the properties of each type, so you can match the material to the gift you have in mind.
Flexible magnets are essentially ferrite or rare‑earth powders bound in a vinyl‑like carrier. They’re thin, bendable, and perfect for lightweight, low‑budget fridge décor. Think of them as the “paper‑clip” of magnet families—good enough for a single photo, but not the strongest hold.
Ceramic magnets, made from barium or strontium ferrite, are the workhorse of the industry. They’re inexpensive, fairly strong, and resist corrosion, which makes them a solid default for most custom photo magnets for fridge gift projects.
Alnico magnets contain aluminum, nickel, and cobalt. They’re prized for temperature stability rather than raw pull, so you’ll mostly see them in specialty gadgets—not the everyday fridge gift.
Samarium‑cobalt belongs to the rare‑earth group and keeps its magnetism even at higher temperatures (up to about 200 °C). If you expect the magnet to sit near a stove or in a sunny kitchen, this material gives you peace of mind.
Neodymium (NdFeB) magnets are the heavyweight champions. They deliver the highest magnetic flux for a given size, which means a small square can cling as firmly as a much larger ceramic piece. For a sleek 2‑inch square that still stays put on a busy refrigerator, neodymium is the go‑to.
So, which material should you pick? Ask yourself two questions: Do I need maximum hold in a tiny footprint, or am I okay with a slightly larger magnet that’s easier on the budget? If you’re gifting a single family portrait that will be handled often, neodymium or a strong ceramic works best. If you’re creating a set of playful fridge stickers for a child’s room, flexible or ceramic keeps costs low while still looking great.
Here’s a quick tip: bigger magnets are generally stronger. When you compare a 2‑inch neodymium square to a 3‑inch ceramic one, the neodymium may still out‑pull the larger piece. Use the size‑vs‑strength rule of thumb to decide whether you need a “big‑and‑soft” or “small‑and‑powerful” magnet.
Printing finishes that matter
heartful.gifts offers four finish options: gloss, rainbow gloss, soft‑touch matte, and metallic acetate. Pure Buttons explains that their glossy finish makes colors pop, while matte softens glare—perfect for photos taken in bright sunlight. The metallic acetate adds a subtle shimmer, which can make a black‑and‑white portrait feel like a modern art piece.
When you upload your design, make sure the file is 300 dpi and set to CMYK if you want the most accurate color match. A common mistake is to leave the file in RGB; the printed result can look washed out, especially on a glossy finish.
Pro tip: run a small test print on a cheap stock before ordering a batch. Seeing how the colors translate onto the magnet surface can save you from a surprise when the final order arrives.
- Pick material based on hold strength vs. budget.
- Choose a finish that matches the photo’s lighting.
- Confirm 300 dpi, CMYK, and include a 0.125‑inch bleed.
- Order a single‑piece sample if you’re unsure.
Take a moment now to compare the material chart on MagnetShop, then head back to heartful.gifts and select the finish that makes your photo pop. Once you’ve checked those boxes, you’re ready to add the magnets to your cart and send a gift that literally sticks in the mind.
Step 5: Order or DIY Production
Alright, you've picked the perfect photo, double‑checked the bleed, and you're staring at the final preview. Now comes the moment that actually gets the magnet onto the fridge: you either place an order through heartful.gifts or you roll up your sleeves and print it yourself.
If you choose the hassle‑free route, heartful.gifts handles everything—from printing on high‑grade magnetic stock to shipping it right to your doorstep. All you have to do is hit “Add to Cart,” confirm your finish (glossy, matte, or even a soft‑touch option), and let the team do the heavy lifting.
Sounds easy, but what if you love the idea of a hands‑on project and want to control every ink droplet? That’s where the DIY path steps in, and it can be surprisingly rewarding.
Option 1: Order through heartful.gifts
Step 1 – Review your design one last time. Make sure the file is 300 dpi, CMYK, and includes that 0.125‑inch bleed we talked about.
Step 2 – Choose your magnet size and finish. For a fridge gift, 2 × 3 inches is a sweet spot: big enough to showcase a memory, small enough to fit any door.
Step 3 – Add a single‑piece sample to your cart to your cart. This costs a few dollars but saves you from a batch that doesn’t pop.
Step 4 – Enter shipping details and apply any promo code you have. heartful.gifts usually ships within 3–5 business days.
Step 5 – Wait for the package, then stick the first magnet on your fridge and watch the smile unfold.
Pro tip: If you’ve ever used VistaPrint's online design tools, you’ll notice a similar “preview‑and‑order” flow, which means you’re already familiar with the process.
Option 2: DIY Production at Home
First, gather a magnet sheet that’s compatible with your printer. You can find printable magnetic paper at most craft stores or online retailers.
Second, set your printer to the highest quality setting and use glossy photo paper if you want that extra shine. Run a test strip to make sure the colors look right before you print the full image.
Third, once the sheet is printed, use a sharp craft knife or a guillotine cutter to trim to the exact dimensions. A steady hand helps, but don’t worry if the edges aren’t perfectly straight—those little imperfections add personality.
Fourth, apply a thin layer of clear spray sealant if you chose a matte finish and want extra durability. Let it dry for at least 30 minutes.
Finally, stick the magnet to your fridge. If you notice any air bubbles, gently lift the edge and smooth it out with a soft cloth.
Need proof that DIY can work? A user on the magnet DIY kit review on the Troy Grady forum shared a step‑by‑step video that walks through each stage, and the results look just as polished as a professional print.
So, which path feels right for you? If time is tight or you want a flawless finish, the heartful.gifts order is the safest bet. If you love crafting and want to save a few bucks, the DIY route gives you control and a fun story to tell.
Whichever route you pick, remember the core goal: a custom photo magnet that captures a memory and sticks around—literally. Add it to your cart or your workspace, and soon you’ll have a fridge‑worthy gift that says, “I thought of you.”
Step 6: Wrap, Gift, and Care Tips
Okay, you’ve got that gorgeous custom photo magnet ready to go. Now comes the part that feels a bit like wrapping a present for a close friend – you want it to look thoughtful without turning into a craft‑project nightmare.
Wrap it like a pro
First, grab some tissue paper or a lightweight kraft sheet. I like the soft, slightly translucent feel because it lets a hint of the magnet peek through, hinting at the surprise inside.
Lay the magnet face‑up, then fold the paper around it like you’re tucking a tiny pillow into a cozy blanket. A little piece of double‑sided tape on the back keeps everything snug, but don’t overdo it – you don’t want to damage the finish.
Do you remember that moment when you tried to wrap a birthday cake and the frosting spilled everywhere? Yeah, we don’t need that drama here. Keep the edges crisp, and if a corner sticks out, just give it a gentle press.
Choosing the right gift bag or box
A simple clear poly bag works fine, but if you’re aiming for that “wow” factor, consider a small corrugated box with a window. It shows off the magnet while protecting it from scratches.
Tip: Slip a small dried flower or a sprig of rosemary between the magnet and the box lid. It adds a sensory detail that says, “I really thought about you.”
And if you’re feeling extra fancy, attach a handwritten note. Something like, “Saw this and thought of our beach day – hope it brightens your kitchen as much as it brightened my day.”
Care tips to keep the magnet shining
Now, let’s talk longevity. Magnets can collect kitchen grease, dust, or even a faint water ring if they sit near the dishwasher’s splash zone.
Here’s a quick, low‑effort cleaning routine: wipe the surface with a damp microfiber cloth, then give it a quick dry with a lint‑free towel. For stubborn grime, a dab of mild dish soap works wonders – just rinse with a barely‑damp cloth afterward.
If you want a more thorough approach, the magnet cleaning guide recommends using a soft brush and a gentle, non‑abrasive cleaner. It’s basically the same trick you use for kitchen appliances, but with a softer touch.
Store any extra magnets flat in a drawer lined with tissue paper. Avoid stacking heavy items on top, because pressure can warp the flexible backing over time.
Presentation matters
When you hand over the gift, think about the setting. A coffee table, a kitchen counter, or even a bedside nightstand – each spot creates a different vibe. If you’re gifting to a parent, placing the magnet on the fridge door while they’re making breakfast adds a sweet, spontaneous moment.
Do you ever notice how a small, well‑presented gift can turn an ordinary day into a memory? That’s the power of the little details.
Final checklist
- Wrap in tissue or kraft, secure with tape.
- Choose a clear bag or box with a window.
- Add a personal note or tiny decorative element.
- Clean with a damp cloth; for deeper grime, follow the magnet cleaning guide.
- Store flat, avoid heavy pressure.
And there you have it – a simple, heartfelt way to present your custom photo magnets for fridge gift that looks polished and lasts.
FAQ
Got questions about turning your favorite photo into a fridge‑friendly keepsake? You’re not alone. Below we answer the most common curiosities we hear from folks who want their custom photo magnets for fridge gift to look perfect and last.
We know the idea of a tiny magnet can feel simple, but there’s a lot that goes into making it feel personal and durable. From choosing the right image resolution to figuring out how to package it for a surprise, the details matter. So we’ve pulled together the top queries we get from gift‑givers, parents, and partners – all the little things that turn a nice gesture into a memory that sticks around, literally.
Let’s dive into the answers.
What makes custom photo magnets for fridge gift special?
They’re tiny, personal snapshots that turn an ordinary fridge door into a gallery of moments. Because you can print any picture—your kid’s first drawing, a vacation selfie, or a love note—it feels like you’re handing over a piece of your heart, not just a piece of metal.
How durable are the magnets?
Good question. You’re using a flexible backing that resists warping, and the printed surface is coated to repel moisture and light scratches. In everyday use—whether it’s a kitchen splash zone or a bedroom door—they’ll stay bright for years, as long as you avoid extreme heat.
Can I order a small batch for a single occasion?
Absolutely. You don’t need to order a dozen to get a high‑quality set. Our print‑on‑demand process lets you order just one or a handful, so you can surprise a parent on Mother’s Day or a spouse on an anniversary without leftover stock.
What’s the best way to clean and care for them?
Think of it like cleaning a phone screen. A soft, damp cloth does the trick for everyday dust. If you see stubborn grime, a tiny dab of mild dish soap mixed with water works fine—just avoid abrasive scrubbers or harsh chemicals, or you’ll dull the finish.
Do the magnets stick to all fridge surfaces?
Most standard refrigerators have a steel interior that the magnet will cling to without trouble. If you have a glass‑door fridge or a stainless‑steel exterior, you might need a thin metal sheet or a magnetic paint primer underneath the magnet to create a solid bond.
How long does shipping take?
Because we print on demand, most orders ship within 2–3 business days. From there, standard US delivery usually arrives in 4‑6 days. If you’re planning a last‑minute surprise, we also offer an expedited option that gets the package to your door in 2 days.
Can I add a personal note or extra packaging?
Yes! When you check out, you can type a short message that we’ll print on a tiny card tucked inside the clear bag. You can also choose a kraft‑paper wrap or a custom‑printed box—perfect for making the gift feel even more thoughtful.
And if you still have a question that isn’t listed, feel free to reach out – we love helping you make the perfect fridge gift.
Conclusion
So, you’ve made it to the end of our little fridge‑mag adventure.
By now you know that a custom photo magnet for fridge gift can turn an everyday kitchen into a personal gallery that makes a spouse smile or reminds a kid of a family trip.
The best part? You don’t need a fancy design studio; heartful.gifts handles printing, packaging, and fast shipping so the only thing you have to worry about is picking the perfect picture.
Remember the quick cleaning tip we shared? A dab of mild dish soap and a soft cloth keep your magnet looking crisp without scratching the fridge.
If your fridge has a glass door or stainless steel finish, just add a thin metal sheet behind the magnet and you’re good to go.
And because everything is printed on demand, you can order a single piece for a surprise birthday or bulk‑order for a wedding shower without worrying about excess inventory.
So, what’s the next step? Grab that favorite photo, hop onto heartful.gifts, and let the magic happen.
If you’re still on the fence, try the optional personalized note – it adds that extra sprinkle of love that turns a simple magnet into a keepsake.
Finally, keep an eye on the fridge door; a happy family habit is to swap out the magnet with new memories every few weeks.