
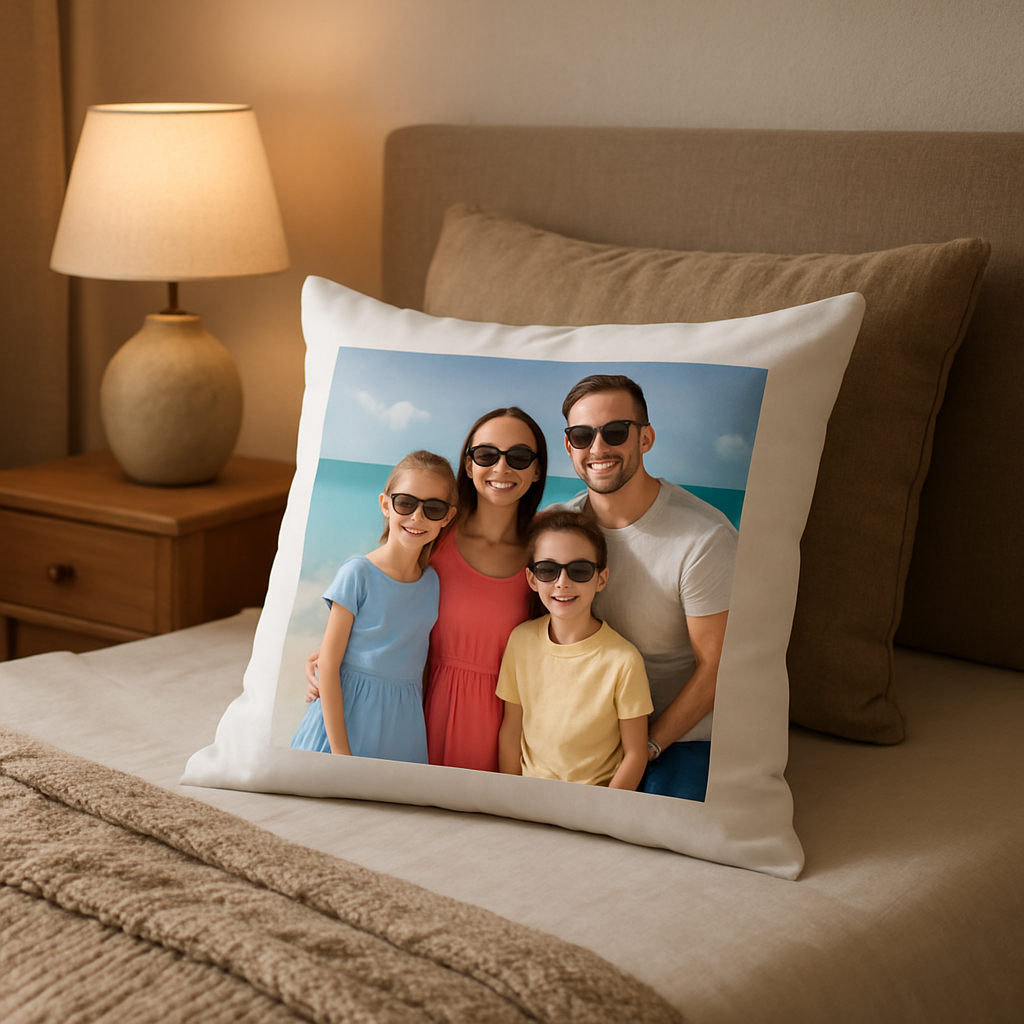
How to Create a Personalized Photo Pillow Cover Gift Your Loved Ones Will Treasure
Ever stared at a plain sofa and thought, “What if this could hold a memory instead of just a cushion?”
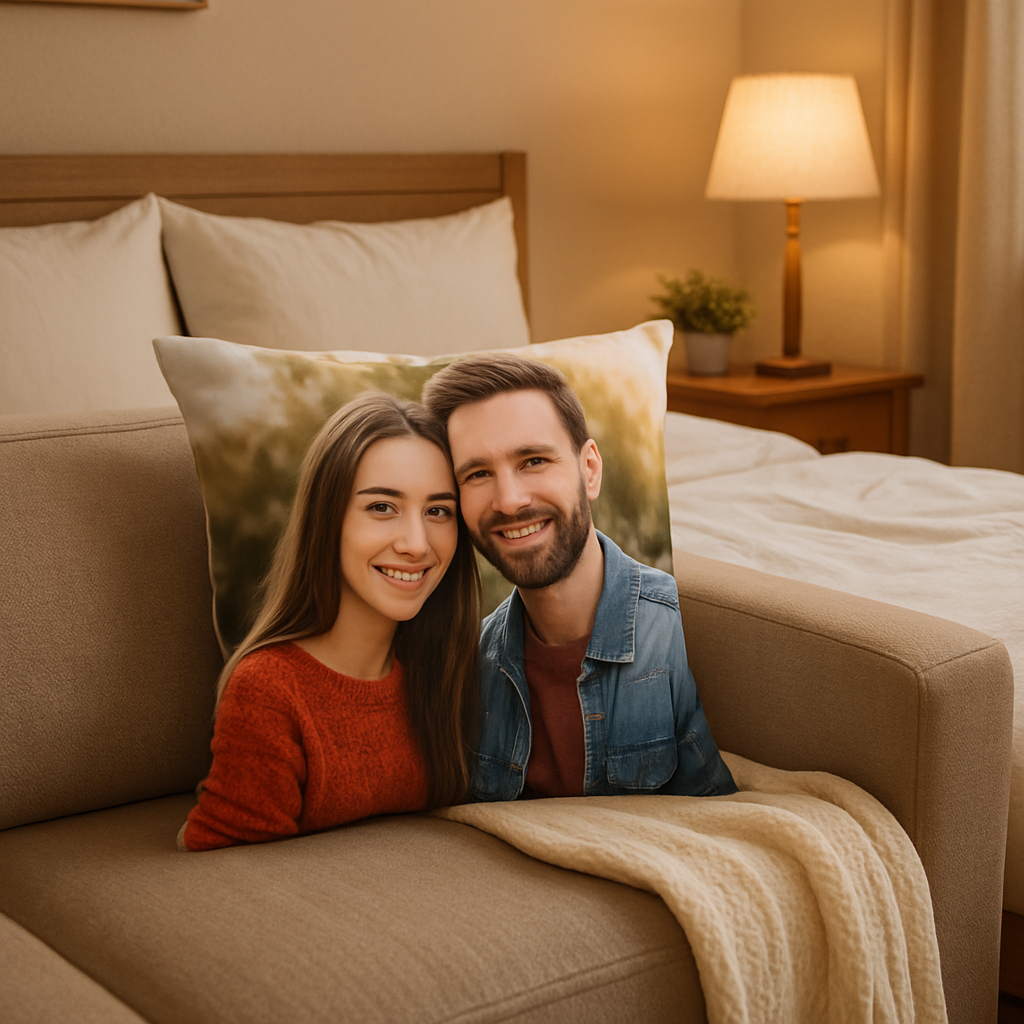
That little spark of “what if” is exactly why a personalized photo pillow cover gift feels so magical. It’s not just a decorative throw; it’s a snapshot you can hug, a laugh you can rest your head on, and a story you can share over coffee.
Imagine gifting a mom a pillow printed with the first family beach photo, or surprising your partner with a collage of your favorite travel moments. The moment they pull it out, their eyes light up, and you’ve turned a simple house‑warming into a heart‑warming moment.
But why choose a pillow over, say, a framed print? For one, pillows live in the everyday—on a couch, a bed, even a favorite reading nook. That means your photo gets seen, touched, and cherished day after day, not just hung on a wall once a year.
And let’s be honest: picking the perfect gift can feel overwhelming. You’re juggling budgets, tastes, and the fear of ending up with something generic. A personalized photo pillow cover gift sidesteps all that because it’s instantly personal and universally useful.
Here’s a quick sanity check: Does the recipient love snuggling up with a good book? Do they have a spot where a splash of color would brighten the room? If you answered “yes,” you’ve probably found a winner.
Creating your custom pillow is easier than you think. Upload a high‑resolution photo, choose a size that fits the intended space, and add a short line of text if you like. Within days, heartful.gifts will ship a soft, high‑quality cover that looks just as vivid as the original snap.
Want more inspiration? Check out our guide on personalized pillow gift ideas for creative twists you might not have considered.
So, what’s the next step? Grab that favorite photo, imagine it on a plush pillow, and picture the smile it will bring. Let’s turn that feeling into a gift that literally wraps love in fabric.
TL;DR
If you’re hunting for a gift that feels personal, a personalized photo pillow cover gift lets you turn a favorite snap into a cozy reminder of love.
Upload a high‑resolution image, pick the size, and heartful.gifts ships a soft, vivid pillow that quickly makes them smile every time they cuddle.
Step 1: Choose Your Photo and Pillow Size
You’ve probably stared at a stack of photos and thought, “What if I could turn this smile into something you can actually hug?” That tiny “what if” is the spark behind a personalized photo pillow cover gift.
The first step is surprisingly simple: pick the image that makes your heart skip a beat, then decide how big you want the pillow to be.
But not every snap works out of the box. A blurry selfie or a low‑resolution snapshot will look fuzzy once it’s stretched over fabric, and you’ll end up with a pillow that feels more “meh” than memorable.
Pick the perfect photo
Start with a high‑resolution printing technology file—ideally 300 dpi or higher. That’s the sweet spot that printers recommend for vibrant, fade‑proof results.
Look for photos with good lighting and minimal background clutter—think of a candid family picnic, a goofy pet moment, or a sunrise you’ve been bragging about on Instagram.
If you only have a phone picture, zoom in and check the details. Can you still see the eyes? If the answer is yes, you’re probably safe. If it looks pixelated, consider upscaling with a tool like Photoshop or a free AI enhancer before you upload.
Match the pillow size to the moment
Personalized photo pillow cover gifts come in a handful of standard dimensions—most people choose 16 × 16 in, 18 × 18 in, or the larger 20 × 20 in for a statement piece.
Think about where the pillow will live. A 16‑inch square is perfect for a bedroom nightstand or a couch arm, while an 18‑inch size adds a little extra canvas for a group shot. The 20‑inch version works beautifully as a focal point on a sofa or as a decorative accent in a hallway.
Here’s a quick checklist to keep you from second‑guessing:
- Is the photo at least 2000 px on the longest side?
- Does the image have good contrast and color depth?
- Will the chosen size fit the intended space?
- Do you want a single‑sided or double‑sided print? (double‑sided is great for a panoramic view)
If you’re still on the fence about size, a good rule of thumb is to measure the spot where you’ll place the pillow, then add a half‑inch buffer so the pillow doesn’t look cramped.
And don’t forget the back of the pillow. Some people love a double‑sided design—your vacation panorama on the front, a matching quote on the back. If a single‑sided print is all you need, you’ll save a few dollars and keep the look sleek.
For a deeper dive into exact dimensions, check out this custom pillow sizing guide.
Pro tip: choose satin for a classic look or plush for extra cuddle factor. Both options are machine‑washable, so you won’t have to fear spills during movie night. And because heartful.gifts uses water‑based, odorless inks, the pillow stays safe for kids, pets, and even grandma’s allergies.
Once you’ve locked in the photo and size, you’re ready to move to step two—uploading the image and picking the finish. The whole process takes under ten minutes, and you’ll get a preview that shows exactly how the final pillow will look on your couch.
Step 2: Design Your Layout and Add Personal Touches
Okay, you’ve got the perfect photo and you’ve measured the pillow. Now the fun part begins: turning that snapshot into a design that feels like a hug.
Pick a focal point that tells a story
Look at your picture and ask yourself, “What’s the moment I want people to see first?” Maybe it’s a smiling face, a sunrise, or a tiny paw print. Crop or zoom just enough to make that element pop, but leave a little breathing room. A cramped image feels stressful; a little space feels inviting.
Pro tip: most designers recommend keeping the main subject at least 1/3 of the pillow’s width. Creative Bloq explains why the rule of thirds works for gifts, and it’s super easy to apply in the heartful.gifts editor.
So, what should you do next? Grab the editing tool, drag the crop handles, and watch the magic happen.
Play with text and colors
If you want a quote, a name, or a date, choose a font that matches the vibe. Hand‑written scripts feel intimate, while clean sans‑serifs read like a friendly note. Keep contrast high—dark text on a light background or vice‑versa—so it stays readable even from the couch.
Don’t over‑load the pillow. One line of text is usually enough; think “Home Sweet Home” or “Our First Adventure – 2023”. If you’re feeling bold, add a tiny accent color that pulls from the photo (maybe the blue of the sky or the red of a flower).
Here’s a quick checklist:
- One‑line message max.
- Font size big enough to read from a few feet away.
- Contrast that passes WCAG accessibility guidelines.
Does this really work? Absolutely—people notice the little details, and those details become the reason they smile every time they see the pillow.
Add personal touches that make it yours
Think about the little things that only you and the recipient share. Maybe a tiny doodle of your favorite coffee mug, a subtle heart in the corner, or the exact coordinates of where you first met. These micro‑elements turn a nice gift into a memory capsule.
Because heartful.gifts uses water‑based, odorless inks, you can experiment with metallic accents or pastel washes without worrying about allergies or strong smells. It’s safe for kids, pets, and grandma alike.
And don’t forget the back of the pillow. A simple “Made with love on [date]” printed on the reverse side feels like a secret handshake—only the two of you know it’s there.
Ready to hit “preview”? Take a moment to zoom in on the mock‑up. Does the text look crisp? Is the focal point still centered? If something feels off, adjust—this is the only time you can make changes without sewing.
When you’re happy, click “add to cart” and let heartful.gifts handle the rest. In under ten minutes, your design will be on its way to the printer, ready to ship and become the coziest part of any room.
Bottom line: design isn’t about perfection, it’s about personality. Keep it simple, keep it meaningful, and let the pillow tell your story.
Step 3: Upload and Print Your Photo Pillow Cover
Alright, you’ve just spent a few minutes tweaking the design, adding that tiny coffee‑cup doodle and the date you first met. Now it’s time to get that vision onto fabric.
Pick the right file format
Heartful.gifts wants a high‑resolution PNG or JPEG – think 300 dpi or higher. If you export from Photoshop, choose “Save for Web” and avoid any compression that makes the image look fuzzy. A quick test? Zoom in to 100 % on your screen; the edges should still look crisp.
Not sure about resolution? CanvasChamp explains why 300 dpi matters for photo pillows, and it’s the same rule of thumb we follow.
Upload with confidence
Click the “Upload Image” button, drag your file into the box, and watch the progress bar. The tool will automatically snap your picture to the pillow template, but keep an eye on the alignment guide. If the focal point drifts toward a seam, use the rotate knob to nudge it back.
Pro tip: upload a version with a transparent background if you want the edges of the pillow to show the fabric color instead of a white box.
Preview, tweak, repeat
Heartful.gifts gives you a live preview – spin the pillow, flip it, and zoom in. Does the text stay legible when you look at it from the side? Is the smile on your dog still visible after the fabric stretches?
If something feels off, hit “Edit”. You can resize, crop, or even add a second image on the reverse side. Remember, the back of the pillow can also carry a secret note – a little “Made with love on [date]” that only you and the recipient will notice.
Check the colors
Our inks are water‑based and odorless, which means they reproduce colors faithfully and stay safe for kids, pets, and grandma. Still, monitors can be deceptive. Compare the on‑screen hue to a printed photo you already have – if the printed version looks a shade darker, lower the saturation a touch before you finalize.
For a deeper dive on how ink types affect pillow prints, see PB Backdrops’ guide on custom fabric printing. It’s a quick read and confirms why we stick with pigment‑based inks for durability.
Finalize and add to cart
When you’re satisfied, click “Add to Cart”. Heartful.gifts will bundle your design with a protective zip‑cover, so you can toss it in the wash without worrying about the print fading.
Shipping usually takes 3–5 business days, and you’ll get a tracking link the moment the order leaves the printer. If you need it for a birthday or anniversary, consider the “express” option at checkout – a small extra fee that guarantees delivery before the big day.
Quick checklist before you hit “Place Order”
- File is PNG or JPEG, 300 dpi or higher.
- Design is centered and no important element sits on a seam.
- Text is at least 12 pt when viewed at 100 %.
- Colors look right on a printed reference.
- Optional back‑side note added.
And that’s it – you’ve turned a digital memory into a huggable, personalized photo pillow cover gift. Sit back, watch the confirmation email arrive, and start dreaming about the moment your loved one pulls that pillow onto the couch.
Feel free to repeat the process for a set of matching pillows, or experiment with metallic accents now that you know the upload workflow inside out.
Step 4: Review, Customize Materials, and Compare Options
Alright, you’ve got your design uploaded and the cart is humming. Before you hit “Place Order,” let’s hit pause and give your personalized photo pillow cover gift a quick once‑over.
First thing’s first: does the image look crisp at 100 %? Zoom in. If the edges look jagged, you might need a higher‑resolution file. Trust me, a fuzzy pillow isn’t the “wow” moment you imagined.
Now, think about the fabric. Most of us default to cotton because it feels soft, but polyester can hold colors a tad longer, especially if you’re planning to wash it often. Industry insights on material durability suggest synthetic blends often out‑last natural fibers in high‑traffic households.
So, what should you do next?
Check the basics
- File type: PNG or JPEG, 300 dpi minimum.
- Color mode: RGB for digital, but preview the CMYK conversion if you can.
- Text size: at least 12 pt when viewed at actual size.
And don’t forget the back side. A short note like “Love you, Mom” can turn a nice gift into a keepsake.
Got the basics down? Great. Let’s dive into customization options.
Material & Print Choices
Heartful.gifts offers two main fabric families: 100 % cotton and a cotton‑poly blend. Cotton gives that lived‑in feel, while the blend resists fading after multiple washes. If you’re leaning toward a vibrant holiday scene, the blend might be your safety net.
Print type matters, too. Pigment‑based inks are the default because they sit on top of the fabric and stay vivid. Some shops also offer dye‑sublimation, which infuses color into the fibers for a smoother feel—though it’s usually pricier.
Here’s a quick comparison to help you decide:
| Feature | Option | Notes |
|---|---|---|
| Material | Cotton vs. Cotton‑Poly Blend | Cotton feels softer; blend holds color longer. |
| Print Type | Pigment Ink vs. Dye‑Sublimation | Pigment = bright, cheaper; Sublimation = smoother, higher cost. |
| Finish | Matte vs. Glossy | Matte for a subtle look; glossy for a photo‑like shine. |
Does this really work? Absolutely—most of our customers pick the blend and pigment combo for a balance of feel and longevity.
Side‑by‑side option check
Grab a pen (or open a note on your phone) and write down the three things that matter most to the person you’re gifting. Is it softness? Durability? A glossy “wow” factor? Then match those priorities to the table above.
One tip many overlook: ordering a single sample swatch can save you a costly redo. Heartful.gifts will send a tiny fabric piece with the print so you can feel it before committing to the full pillow.
And remember, if you’re on a timeline—maybe a birthday in a week—choose the faster‑shipping option at checkout. The “express” upgrade adds a small fee but guarantees arrival before the big day.
So, are you ready to lock in your choices?
Take a final glance at your design, confirm the material and print settings you just reviewed, and then click “Add to Cart.” The rest is handled by heartful.gifts: a zip‑cover to protect the print, a tracking link, and a promise that your personalized photo pillow cover gift will arrive ready for the moment you hand it over.
Enjoy the anticipation—there’s something magical about waiting for that “wow” when the pillow is finally unwrapped.
Step 5: Gift Wrapping Ideas and Delivery Tips
Okay, you’ve nailed the design, you’ve clicked “Add to Cart,” and now the real fun begins: getting that personalized photo pillow cover gift into the hands of the person you love without a single crease.
Think outside the box—literally
Ever tried to wrap a pillow and ended up with a paper monster that looks like it survived a tornado? Yeah, me too. The trick is to ditch the standard rectangle and go for a pillow‑shaped box. A DIY pillow box tutorial shows you how to cut and fold a simple cardstock template that hugs the curve of the pillow perfectly.
Grab an 8½×11″ sheet, score the fold lines, and you’ve got a sleek, curved package that feels as cozy as the gift inside. You can even tint the cardstock to match the room décor or the color palette of your photo.
So, what’s the next step? Add a little extra cushioning.
Protect the print with the right foam
Even though the pillow cover is soft, the printed image can be surprisingly delicate. A thin layer of custom‑cut foam from a supplier like custom packaging foam options slides right into the box and keeps the print from rubbing against the cardboard.
Charcoal foam works great because it’s dark, won’t stain, and can be trimmed to the exact dimensions of your pillow. If you’re sending the gift across town, consider a firmer sheet for added shock absorption.
Does this feel overkill? Not really—most people never notice the foam, but they do notice a smudge on their photo.
Adding the personal touch
Wrap isn’t the only place to sprinkle personality. Slip a handwritten note that references a specific memory captured in the photo. A short line like “Remember that sunrise on our first hike?” makes the moment feel lived‑in.
And don’t forget a simple ribbon or twine. A piece of natural jute ties the whole thing together and hints at the earthy vibe of a home‑made pillow.
Delivery tips that guarantee a wow
First, choose the “express” shipping tier if the birthday or anniversary is looming. Heartful.gifts adds a tracking link automatically, so you can watch the journey in real time.
Second, double‑check the address format—especially for older relatives who might still use “Apt.” instead of “Unit.” A quick phone call can save a day‑long detour.
Third, think about the unboxing moment. If you’re sending the gift directly to the recipient, include a small “Do not open until…” sticker. It builds anticipation and makes the reveal feel like a ceremony.
Finally, consider a backup plan. Pack a second, smaller pillow box inside the first, just in case the outer box gets crushed. It’s a tiny extra step, but it eliminates the dreaded “folded‑over‑print” disaster.
Quick checklist
- Print and cut a DIY pillow box template.
- Trim custom foam to fit the pillow’s dimensions.
- Wrap with ribbon or twine and add a handwritten note.
- Select express shipping and verify the address.
- Include a “Do not open until…” sticker for drama.
- Pack a spare inner box for extra protection.
There you have it—simple, tactile steps that turn a beautiful personalized photo pillow cover gift into an unforgettable experience from the moment it leaves the warehouse to the instant it lands on a loved one’s couch.
Conclusion
So, there you are, holding the finished personalized photo pillow cover gift, and you can almost feel the smile it'll spark.
We've walked through picking the right photo, choosing the perfect fabric, and even the little unboxing tricks that turn a simple pillow into a memory capsule.
Remember: the magic isn't just in the print—it's in the thought you stitch into every step.
Do you ever wonder if the effort matters? Absolutely. A handful of extra minutes on the address check or the "Do not open until…" sticker can mean the difference between a fleeting glance and a cherished keepsake.
Here's a quick mental checklist before you click "order": is the image high‑resolution? Have you added a personal note? Did you set express shipping?
If you answered "yes" to most, you’re set. If not, go back and tweak—there's no rush, and the result will feel that much more genuine.
When the pillow lands on the couch, imagine the moment someone pulls it out, reads your note, and feels that warm wave of connection.
That feeling? It’s exactly why a personalized photo pillow cover gift beats any generic present.
Ready to make that happen? Head over to heartful.gifts, choose your design, and let the love travel straight to the recipient's arms.
FAQ
What makes a personalized photo pillow cover gift different from a regular pillow?
It’s not just fabric and stuffing – it’s a snapshot you can actually lean on. When you grab a pillow that carries a family photo, a vacation memory, or a goofy pet snap, you’re hugging a feeling, not just a cushion.
That emotional shortcut is why a personalized photo pillow cover gift feels more thoughtful than a store‑bought throw.
How do I choose the right photo for my pillow?
First, pick an image that’s sharp enough to stay clear when it’s printed on fabric – 300 dpi is a good rule of thumb. Then ask yourself: does this picture spark a smile right away?
If the answer is “yes,” you’re probably set. If you have to squint, try a different shot. A high‑resolution family portrait or a candid laugh works best.
Can I add a custom message or note?
Absolutely. Most print‑on‑demand shops, including heartful.gifts, let you layer a short line of text over the photo or on the back of the pillow. A simple “Happy Birthday, Mom!” or a tiny inside joke can turn the gift from nice to unforgettable.
Just keep it under 30 characters so it stays legible.
What fabrics are best for durability and comfort?
Look for a cotton‑blend or a soft polyester‑cotton mix. They’re gentle on skin, hold colour well, and survive a few washes without the image fading.
If you want a luxe feel, a brushed microfiber option adds a velvety touch, but it can be a bit pricier.
How long does it take to receive a personalized photo pillow cover gift?
Production usually runs 2‑4 business days, then you add the shipping time you choose. Many shops offer express shipping that gets the pillow to the doorstep in 3‑5 days total.
Planning ahead for birthdays or holidays? Order at least a week early to avoid the last‑minute rush.
Is the pillow cover machine‑washable?
Yes – most covers are designed for a gentle cycle on low heat. Turn the pillow inside out, use a mild detergent, and skip the dryer if you can; air‑drying helps keep the print crisp.
If you’re nervous, spot‑test a small corner first – that’s a habit I’ve picked up after a few laundry mishaps.
What if the photo looks off after printing?
Most services have a satisfaction guarantee. If the colours are dramatically off or the image is blurry, reach out to customer support within 7 days and they’ll re‑print or refund.
It’s a good idea to double‑check the preview before you hit “order.” That tiny extra step saves a lot of disappointment later.