
How to Create a Custom Photo Blanket That Keeps Memories Cozy
Ever caught yourself scrolling through endless gift ideas, feeling that knot in your stomach because nothing seems personal enough?
We’ve all been there – the pressure to find something that says “I really see you” without sounding generic. That’s exactly why a custom photo blanket can feel like a warm hug wrapped in memories.
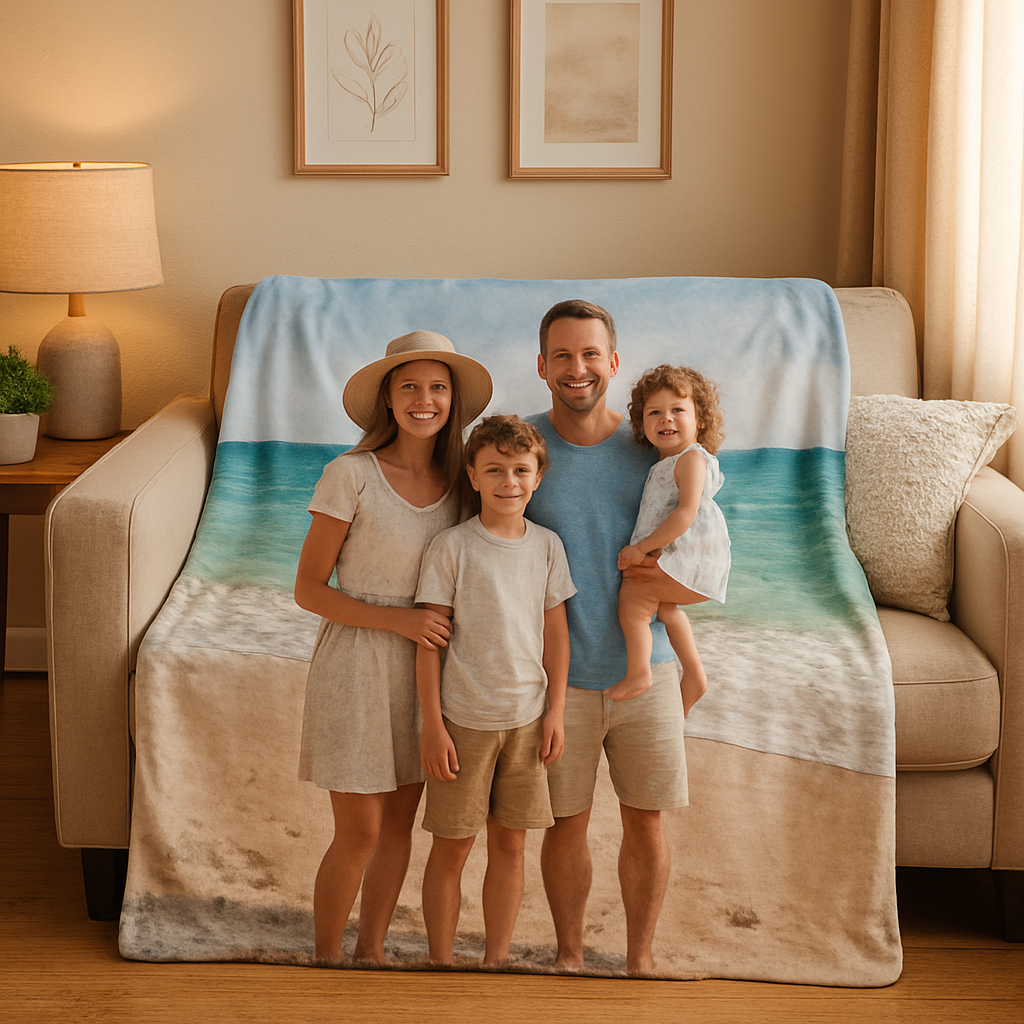
Imagine snuggling up on a chilly evening and seeing a snapshot of your baby’s first smile, a vacation sunset, or that goofy group selfie printed across a soft fleece. It’s not just a blanket; it’s a story you can touch.
So, why does this simple piece of fabric get such a reaction? Because it turns a flat image into a tactile reminder, and research shows we remember visual moments better when we can physically interact with them.
But here’s the thing – not every photo blanket is created equal. The quality of the print, the material, and how the image is positioned all matter. A blurry, low‑resolution picture will look fuzzy, while a high‑resolution file brings every detail to life.
Think about the last time you gifted a photo album. It was nice, but you had to flip pages. A custom photo blanket lets the recipient wrap themselves in that memory, making it part of daily life.
And if you’re wondering about care, most reputable print‑on‑demand shops use fade‑resistant inks and machine‑washable fabrics, so the colors stay vibrant even after dozens of washes.
Now, picture the moment you hand over that blanket at a baby shower or a wedding anniversary. You’ll see eyes light up, a quiet “wow,” and maybe even a tear because you gave something truly personal.
Does that sound like the kind of gift you’d love to give? If yes, stick around – we’ll walk through how to pick the perfect photo, choose the right material, and avoid common pitfalls so your custom photo blanket feels just right.
Let’s dive in and make your next gift unforgettable.
TL;DR
A custom photo blanket transforms a cherished memory into a cozy, touch‑able keepsake that brightens any home and makes gifting unforgettable for you.
Follow our quick guide to pick the perfect image, choose the right fabric, and care for it so the colors stay vibrant wash after wash for you and family.
Step 1: Choose the Perfect Photo and Layout
Okay, picture this: you’ve found that perfect snap – maybe it’s your toddler’s first bite of a strawberry, a sun‑kissed beach at golden hour, or that goofy selfie from last summer’s road trip. It feels like a memory you could hug, right? That’s the moment we want to capture on a custom photo blanket.
First things first, quality matters. If the file is blurry or low‑resolution, the blanket will look like a faded postcard. Aim for at least 300 dpi and a file size of 2 MB or more. Most smartphones today shoot in 12 MP or higher, so you’re usually good – just avoid screenshots taken from social media, because they’re already compressed.
Pick the right orientation
Do you want the image to stretch across the whole surface, or would a centered square feel more balanced? Horizontal landscapes look gorgeous on a full‑size blanket, while portrait‑oriented portraits sit nicely in the middle, leaving a soft border around them. If you’re unsure, try a quick mock‑up in a free editor – drag the picture onto a blank canvas the size of your blanket and see how it sits.
And here’s a tip that saves you from a later “oops”: leave a little breathing room at the edges. A 2‑inch margin ensures nothing gets cut off during printing.
Think about the layout
Do you love a clean, minimalist look or a collage of moments? For a collage, choose 3‑4 photos that share a common color palette – maybe all warm tones from a fall family hike. Arrange them in a grid or a gentle overlap. If you’re going solo, consider adding a subtle texture overlay (like linen or watercolor) to give depth without stealing the spotlight.
Sometimes a simple caption adds that extra “wow.” A short phrase like “Our First Summer” in a delicate script can turn a picture into a story. Just keep the font legible; bold sans‑serif fonts usually work best on fabric.
So, what should you do next?
Grab the image, check its resolution, decide on orientation, and sketch a quick layout on paper or in a design tool. When you’re happy, save the file as a high‑quality JPEG or PNG.
Now, let’s talk about how the blanket will look in a real home. Imagine it draped over a cozy couch in a farmhouse‑style living room – the soft colors of the blanket echo the warm wood and muted walls. If you’re into that aesthetic, you might find inspiration from Australian farmhouse kitchen renovation ideas that blend natural textures with personal touches.
Take a moment to watch the video – it walks you through a live design session, showing how to line up the image, adjust colors, and preview the final blanket before you hit order.
Once you’ve settled on the layout, think about the fabric. Fleece feels like a hug, while a smooth microfiber gives a more refined look. Both handle print ink well, but fleece tends to hide minor imperfections a bit better.
And if you’re still debating where the blanket will live, consider how it fits into the overall décor. A neutral‑tone blanket with a vibrant photo can become a focal point without clashing with existing patterns. For a more understated vibe, choose a photo with muted hues that blend with the room’s palette.
Finally, double‑check the preview. Most print‑on‑demand sites let you zoom in and see how the edges line up. If anything looks off, go back and tweak the margin or orientation. It’s easier to fix now than to receive a blanket that feels “just a little askew.”
Ready to hit “order”? You’ve got the perfect photo, a layout that tells a story, and a clear vision of how it’ll look in your space. The next step is choosing the right material and placing your order – but that’s a whole other adventure.
Need more inspiration for home styling? Check out LGF Modern Home for ideas on integrating personalized pieces into contemporary interiors.
Step 2: Compare Materials and Sizes
Alright, you’ve picked the perfect photo – now it’s time to decide what fabric will hug that memory and how big the blanket should be. The choice feels huge, but breaking it into two simple questions makes it painless: What feels right on the couch, and how will it fit the space you’ve got?
1️⃣ Pick the right material
Most custom photo blankets come in two fan‑favorites: classic fleece and plush sherpa fleece. Both are polyester‑based, but they behave differently under a blanket‑level microscope.
Fleece is smooth on both sides, lightweight, and lets the ink sit on a flat surface. That means your sunset or baby grin stays crisp, vibrant, and true to color – ideal for designs that need detail.
Sherpa fleece adds a fluffy, wool‑like side. It’s thicker, cozier, and perfect for winter snuggles, but the fuzzy texture can soften the sharpness of a photo ever so slightly. If you love the idea of a luxe, “extra‑soft” feel for a holiday gift, sherpa might win.
Here’s a quick way to decide:
- Do you want a blanket you’ll use year‑round, maybe even toss in a suitcase? Go fleece.
- Is the blanket a seasonal treat for chilly evenings or a special‑occasion present? Sherpa’s extra warmth pays off.
- Is photo clarity your top priority (think intricate patterns or text overlays)? Choose fleece.
Both fabrics are hypoallergenic and machine‑washable, but sherpa prefers a gentle cycle and air‑dry to keep its fluff from flattening.
For the nitty‑gritty, CanvasChamp breaks down the texture, warmth, and print surface differences in a side‑by‑side chart you can skim in seconds.
2️⃣ Figure out the perfect size
Size feels personal, too. A blanket that’s too small looks like a decorative throw; too big can swamp a small sofa. The trick is to measure the furniture you’ll drape it over and apply a simple “golden rule.”
Measure the width of your couch or chair, then aim for a blanket that’s roughly 60‑75 % of that width. If your couch is 84 inches wide, a blanket between 50‑63 inches will sit nicely without hanging off the edge.
Height matters less than width, but you still want the blanket to cover the seat comfortably. A good rule of thumb: the blanket’s length should be at least the distance from the back of the couch to the floor, minus a couple of inches for a tidy look.
The Nations Photo Lab size guide uses the same principle for wall art and works perfectly for blankets – think of your blanket as a piece of soft wall décor you’ll actually sit on.
Now, let’s turn those measurements into actionable steps:
- Grab a tape measure and note the width of the seating piece you’ll use most.
- Multiply that width by 0.65‑0.75. That’s your target blanket width range.
- Check the depth of the seat (usually 20‑24 inches). Add a few inches for a relaxed drape.
- Choose a standard blanket size that falls inside those numbers – most shops offer 50 × 60, 60 × 80, and 70 × 90 inches.
- Preview the layout in the builder tool; make sure the focal point of your photo lands in the central 40‑% of the fabric.
If you live in a chilly mountain cabin, a 70 × 90‑inch sherpa blanket will feel like a personal heater. If you’re gifting a college student for dorm life, a 50 × 60‑inch fleece keeps things light enough to toss in a backpack.
Quick comparison table
| Feature | Fleece | Sherpa Fleece |
|---|---|---|
| Texture | Smooth, flat on both sides | Smooth one side, fluffy “wool‑like” on the other |
| Warmth | Light‑to‑medium, breathable | Very warm, thick insulation |
| Print clarity | Sharp, vibrant details | Slightly muted due to texture, still good for portraits |
| Care | Cold wash, tumble low | Gentle wash, air‑dry to keep fluff |
Take a moment now to pull out your tape measure, jot down those numbers, and match them with the fabric vibe you’re after. Once you’ve checked the box for material and size, the next step is all about finishing touches – borders, captions, and the final preview before you click “order.”
Remember, the goal is a blanket that feels as personal as the photo it carries. Pick a fabric that matches the room’s climate, and size it so the blanket becomes a centerpiece, not a stray rug. You’ve got the toolkit – now let’s make that memory snug.
Step 3: Upload Your Image and Customize Options
Pick the file and watch it appear
When you click the “Upload” button, the builder lets you drag a JPEG or PNG straight from your phone, laptop, or cloud drive.
Tip: pick the highest‑resolution version you have – the same file you’d use for a large print.
Once it loads, you’ll see a gray placeholder that turns into your photo, ready for tweaks.
Make sure the file is under 25 MB – most platforms reject anything larger, and a smaller file can still look great if the resolution is high.
Crop, rotate, and lock the focal point
Most tools give you a simple square or rectangle crop handle; drag the corners until the main subject sits comfortably in the center.
If the image is a bit crooked, a quick rotate fixes it – think of it like straightening a picture on the fridge.
And here’s a little secret: many builders let you lock the “safe zone,” so no matter how the blanket is folded, the key part stays visible.
For collages, the tool often provides preset grids (2×2, 3×3, or a free‑form circle). Drag each photo into a slot and the software automatically balances spacing.
Play with borders, text, and extra photos
Want a thin white frame to make colors pop? Just toggle the border slider and watch the edge sharpen.
A short caption adds a personal touch – “Our first hike, 2023” works wonders on a family throw.
If you have a collage in mind, upload up to 20 pictures and let the grid layout arrange them; the same Walmart’s online design tool even supports a Circle Grid for a fun look.
Common decorative tweaks you can play with:
- Thin white or black edge for a gallery‑frame feel.
- Drop shadow that gives a subtle 3‑D lift.
- Rounded corners – perfect for a softer look on kids’ rooms.
- Optional monogram or date in a corner.
Preview on different devices
Before you click “order,” hit the preview button and zoom in on both desktop and mobile views.
Look for any pixelation around edges and make sure text isn’t too tiny – you don’t want a blurry name on a cozy night.
Zoom in to at least 100 % to see how fine details like text or tiny patterns will appear after the dye‑sublimation inks fuse into the fabric.
Remember, the dye‑sublimation process prints directly into the fabric, so what you see on screen will be what you feel on the couch — no separate layer that can peel off.
Finalize your settings
Choose the fabric you settled on in Step 2 – fleece for everyday use or sherpa for extra warmth.
Select the size that matches your measurements, then double‑check the delivery estimate; ordering before the recommended cutoff (usually 12 p.m. PST) helps you get the blanket in time for holidays.
If you’re sending the blanket as a gift, many services let you add a gift note and even choose gift‑wrap packaging – a nice touch that saves you a trip to the post office.
After you place the order, you’ll receive an email with a tracking link, so you can watch the blanket travel from the printer to your doorstep.
When everything looks right, hit “Place Order.” The company will print, pack, and ship your custom photo blanket straight to your door.
Does that feel doable? Great – you’ve just turned a memory into a snuggly keepsake.
If you’re looking for more inspiration, check out Walmart’s online design tool for an easy, step‑by‑step experience.
Step 4: Review Proofs and Place Your Order
Alright, you’ve just spent a few minutes fine‑tuning the photo, fabric, and size. Now it’s time for the moment that feels a little like double‑checking a travel itinerary – you want everything to look perfect before you click “order.”
1️⃣ Scan the digital proof like you’d inspect a passport photo
When the builder shows you the final proof, zoom in to 100 % on both desktop and mobile. Look for any stray pixels, off‑center crops, or text that’s too tiny to read from a couch. If the caption reads “Our First Hike, 2023” but the letters are blurry, hit the edit button and adjust the font size or contrast.
Pro tip: most services let you toggle a “safe zone” that guarantees the core of your image stays visible even if the blanket folds. Lock that zone before you move on.
2️⃣ Confirm material and size choices – the “fit‑check”
Take a quick mental picture of the space where the blanket will live. Is it a 70‑inch sofa that could handle a sherpa‑rich 70 × 90‑inch throw, or a dorm‑sized 50 × 60‑inch fleece that can slip into a backpack? If you’re still unsure, grab a ruler or tape measure, jot down the width of your favorite armchair, and compare it to the size options you selected.
Remember, sherpa adds extra fluff but can soften fine details, while fleece keeps the image razor‑sharp. Choose the fabric that matches the vibe you’re aiming for – cozy holiday gift versus year‑round everyday use.
3️⃣ Double‑check the shipping details
Enter the correct delivery address, then glance at the estimated arrival window. Many print‑on‑demand shops promise “Super Fast Fulfillment & Delivery” – they typically ship within 24 hours on business days, with options for next‑day air if you’re in a pinch according to their shipping policy. If you need the blanket for a specific date (like a birthday on June 12), add a few extra days for possible carrier delays.
Tip: if the checkout lets you choose a gift note or gift‑wrap, add a short, heartfelt line now. It saves you a trip to the post office later and makes the package feel extra personal.
4️⃣ Review the price breakdown
Take a minute to scan the final price. Look for hidden fees like “rush processing” or “premium packaging.” If something feels off, go back a step and adjust the options – maybe a smaller size saves $10, or swapping sherpa for fleece drops the cost without sacrificing the memory.
Most sites show a transparent breakdown, so you’ll see exactly how much you’re paying for the print, the fabric, and any add‑ons.
5️⃣ Place the order with confidence
When everything lines up – the photo is crisp, the fabric feels right, the shipping date works, and the price is clear – hit that big “Place Order” button. You’ll get an instant confirmation email with a tracking link, so you can watch the blanket travel from the printer to your doorstep.
Does it feel a little scary? That’s normal. Think of it like sending a handwritten postcard: you’ve poured thought into the design, you’ve double‑checked the address, and now you trust the postal service to deliver your sentiment.
Quick checklist before you click “order”
- Zoomed in proof shows no pixelation or mis‑alignment.
- Safe zone locked for the main subject.
- Fabric (fleece vs. sherpa) matches the intended use.
- Size fits the intended furniture or gifting scenario.
- Shipping address and delivery window are correct.
- Price breakdown matches your budget.
- Any gift note or wrapping selected.
Tick each box, and you’ll walk away feeling sure that your custom photo blanket will arrive just as you imagined – a warm, visual hug ready to drape over a couch, a favorite armchair, or a gift‑wrapped surprise.
Now that you’ve placed the order, the real magic begins: watching the printer weave your memory into fabric, then unboxing that soft, vibrant piece of nostalgia. Enjoy the anticipation – it’s part of the gift‑giving experience.
Step 5: Care, Cleaning, and Long‑Term Preservation
So your custom photo blanket has finally landed on the couch – the colors are vivid, the fabric feels just right, and you can already picture it becoming a family heirloom. But a gorgeous blanket is only as lasting as the care you give it. Let’s walk through the everyday habits that keep the print looking fresh for years.
1️⃣ Wash it like you would a favorite sweater – but smarter
First thing’s first: most modern photo blankets are printed with dye‑sublimation inks that fuse directly into the polyester fibers. That means you can toss them in the machine, but you still need to treat them gently.
Here’s a step‑by‑step routine that works for both fleece and sherpa:
- Turn the blanket inside out to protect the printed side.
- Use a mild, bleach‑free detergent made for colors.
- Select a cool wash (30 °C/86 °F) for fleece; a cold wash for plush sherpa.
- Do NOT add fabric softener – it can coat the fibers and dull the ink.
- Run the cycle on a gentle or delicate setting.
- When it’s done, skip the dryer. Hang the blanket on a clothesline or lay it flat to air‑dry.
These exact steps come straight from the pros at CanvasDiscount’s blanket‑care guide, which notes that following the simple rules can keep colors vivid for years.
2️⃣ Spot‑clean stains before they set
Imagine a spill from a mug of cocoa during movie night. Don’t wait for the stain to dry – it’ll bond with the fibers and become harder to lift.
Mix a tablespoon of liquid dish soap with warm water, dab a soft cloth, and gently blot the area. Avoid rubbing, because you don’t want to abrade the printed surface. For tougher marks like ink or wine, test a tiny hidden corner first with a mild enzyme cleaner that’s safe for polyester.
Pro tip: keep a small spray bottle of the soap‑water mix handy in the laundry room. A quick mist and a blot can save you a full wash later.
3️⃣ Store it wisely when it’s not in use
When the blanket isn’t draped over the couch, think about how you fold it. A loose roll or a flat fold with plenty of breathing room prevents creases from forming in the print area.
If you’re stacking it with other linens, separate it with a light sheet or a breathable cotton bag. That way the polyester won’t pick up lint, and the colors stay bright.
And if you love rotating décor, consider swapping the blanket with a different throw every few months. This not only gives each piece a break from sunlight but also spreads the visual love across your home.
4️⃣ Guard against sun and heat
Direct sunlight can fade even the most fade‑resistant inks over time. If your living room gets a lot of morning sun, try hanging a sheer curtain or placing the blanket where the light hits at an angle.
Similarly, avoid placing the blanket near radiators or heating vents. Excess heat can cause the fibers to soften and the print to warp.
Speaking of curtains, you might want to coordinate your window treatments for a cohesive look. Learn how to measure curtains accurately so you can match the blanket’s color palette and create a unified style.
5️⃣ Keep an eye on the care label
Every blanket ships with a small tag that spells out the manufacturer’s recommended settings. Treat that tag like a cheat sheet – it’s the safest bet for preserving the print quality.
If the tag suggests “hand wash only,” it’s usually because the blanket’s texture (like extra‑fluffy sherpa) can get crushed in a machine. In those cases, a gentle hand wash with the same mild detergent works just as well.
6️⃣ Real‑world success stories
Take Maya, a new mom who ordered a baby‑smile blanket for her nursery. She follows the cool‑wash routine, air‑dries it, and rolls it up each night. After 18 months, the image is still as sharp as day one, and the fleece hasn’t pilled.
Then there’s Carlos, who gifted a wedding‑anniversary blanket to his parents. He stored it in a breathable cotton bag during the off‑season and swapped it with a summer‑weight throw in July. The colors stayed vibrant, and his parents still rave about the “photo that never fades.”
These anecdotes show that a little attention now pays off in lasting memories later.
Quick care checklist
- Turn inside‑out before washing.
- Use mild, bleach‑free detergent.
- Cool wash for fleece; cold wash for sherpa.
- Avoid fabric softener and dryer heat.
- Spot‑clean stains ASAP.
- Store loosely, away from direct sun.
- Follow the care label for special fabrics.
Following these steps means your custom photo blanket will stay a vibrant, huggable memory for many seasons to come.

Conclusion
We've taken you from picking that perfect photo to caring for the blanket so it lasts years. If you’ve ever dreamed of turning a memory into a hug, you’re now equipped.
Remember Maya’s baby‑smile blanket and Carlos’s anniversary surprise? Those stories show a tiny habit – gentle washes, proper storage – can keep colors vivid forever. It’s that little extra love that turns a custom photo blanket from a one‑time gift into a family heirloom.
So, what’s the next step? Grab your favorite snapshot, check the resolution, choose fleece for crisp detail or sherpa for extra coziness, and follow the quick checklist we laid out. A few minutes now saves regret later.
And don’t forget the simple care routine: turn it inside‑out, use a mild detergent, cool wash, air‑dry, and store loosely away from harsh sunlight. Treat it like you would a beloved sweater, and it’ll stay soft and vibrant season after season.
Ready to make a memory you can literally wrap yourself in? Head over to heartful.gifts, design your custom photo blanket, and let the first snuggle be the start of a new tradition.
Whether it lands on a couch, a dorm room, or a nursery, that soft piece of fabric will keep the story alive every time you curl up. Enjoy the warmth and the smiles.
FAQ
How do I know which photo resolution is good enough for a custom photo blanket?
First, check the pixel dimensions – you’ll want at least 300 dpi at the final size. That usually means a photo around 3000 × 2000 pixels for a medium‑sized throw. If you’re not sure, open the file on your computer, right‑click > Properties > Details, and look for the width and height. A quick test is to zoom in to 100 % on your screen; if it still looks sharp, you’re probably fine.
Can I use a collage instead of a single photo on my blanket?
Absolutely! Most print‑on‑demand sites let you drop 2‑6 images into a grid or even a free‑form circle. Just keep the layout airy – too many pictures crowd the space and the details get lost. Pick one or two focal shots, give each a little breathing room, and preview on both desktop and mobile. The collage looks best when the main moments sit near the center, where the eye naturally lands.
What’s the difference between fleece and sherpa for a custom photo blanket?
Fleece is smooth on both sides, lightweight, and lets the ink stay razor‑sharp – perfect for detailed portraits or vibrant landscapes. Sherpa adds a fluffy, wool‑like side that feels extra cozy, but the texture can soften fine details just a tad. Think of fleece for everyday use or a bright‑colored image, and sherpa for a winter‑time gift where warmth outweighs absolute crispness.
How should I wash and care for my custom photo blanket to keep colors vibrant?
Turn the blanket inside‑out, use a mild, bleach‑free detergent, and wash on a cool or cold gentle cycle. Skip fabric softener – it can coat the fibers and mute the print. Air‑dry flat or on a line; the dryer’s heat can flatten sherpa’s plush side. Spot‑clean spills right away with a dab of dish‑soap and water to avoid set‑in stains. Following these steps keeps the image looking fresh for years.
Is it safe to gift a custom photo blanket to someone with allergies?
Most blankets are made from 100 % polyester, which is hypoallergenic and resistant to dust mites. If the recipient is extremely sensitive, choose the smooth fleece option – it’s less likely to trap allergens than the fluffy sherpa side. You can also wash the blanket before gifting to remove any residual chemicals from the printing process.
How long does it usually take to receive a custom photo blanket after ordering?
Print‑on‑demand shops typically print and ship within 1‑3 business days, then the carrier takes another 2‑5 days depending on your location. If you need the blanket for a specific date, add a few extra days for possible delays and consider upgrading to expedited shipping at checkout. Planning ahead ensures the gift arrives right on time.
What if I’m not happy with the print quality when my blanket arrives?
Most reputable sellers offer a satisfaction guarantee – you can request a replacement or a refund if the image is blurry, misaligned, or has noticeable color shift. Contact customer support within the return window, attach photos of the issue, and they’ll usually send a fresh print at no extra cost. Keeping the original packaging and proof screenshots speeds up the process.