
How to Create a Beautiful Custom Photo Slate for Home and Gifts
Ever walked into a room and felt that one piece of décor just gets you, like a warm memory tucked into a stone?
That’s the magic of a custom photo slate – a thin slice of natural stone printed with your favorite snapshot, turning a simple photo into a lasting keepsake that feels both rustic and personal.
Imagine a new parent hanging a tiny slate of their baby’s first grin above the crib. Or a grandparent gifting a slate of a family reunion to a sibling’s living‑room wall. The stone’s cool texture makes the image pop, and every time they glance at it, they’re reminded of that exact moment.
Because slates are lightweight yet durable, they work in kitchens as a backsplash reminder of a holiday dinner, in home offices as a motivation boost, or even in outdoor patios protected by a sealant. The versatility means you can match the gift to any space without worrying about breakage.
Here’s a quick checklist to make sure your custom photo slate looks professional: pick a high‑resolution image (at least 300 dpi), crop it to the exact dimensions you need, choose a stone color that complements the room’s palette, and add a short, meaningful caption if you like. Once you’ve uploaded the file, most services will let you preview the final product before you hit “order”.
If you’re already thinking about building a coordinated gift set, consider pairing the slate with a few handcrafted wooden toys for a nursery that feels both cozy and thoughtfully curated.
And if you want to expand the visual story, you can create a stunning custom canvas photo collage that hangs alongside the slate, giving the space a layered, gallery‑like feel.
So, grab that favorite photo, follow the simple steps, and let a custom photo slate become the heartfelt centerpiece you’ve been looking for.
TL;DR
A custom photo slate turns any cherished picture into a durable, stone‑finished keepsake that instantly adds personality to a kitchen, office, or nursery. Just upload a high‑resolution image, choose a stone colour that matches your décor, and order—your unique slab arrives ready to hang, giving loved ones a timeless reminder of that special moment.
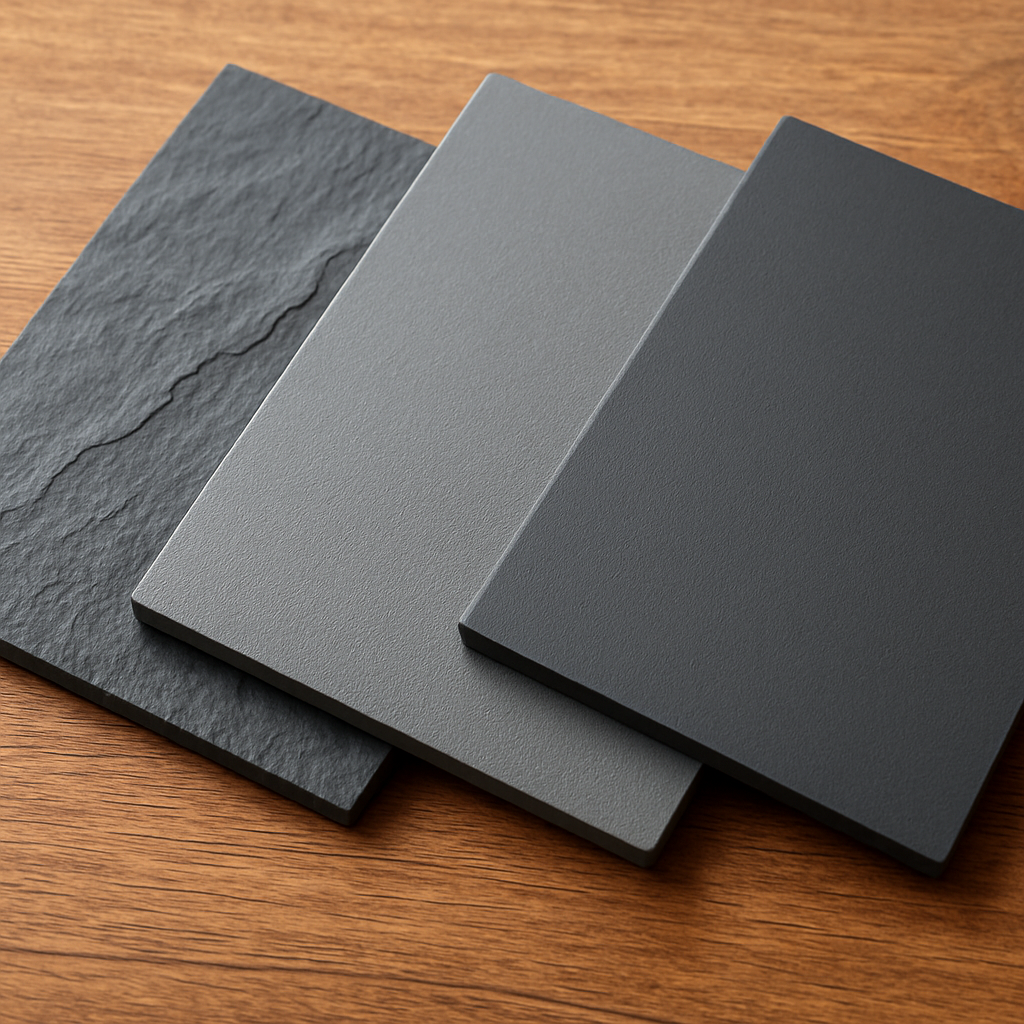
Step 1: Choose the Right Slate Material
When you first glance at a custom photo slate, the material itself does most of the talking. It’s not just a flat board; it’s a slice of nature that can set the mood of a room.
The good news is you don’t need a geology degree to pick the right one. Most providers offer three main families: natural slate, engineered stone, and polymer‑coated composites. Each has its own personality, and the choice hinges on where you’ll hang it and how you want it to age.
Natural Slate – rugged charm
Natural slate is harvested from quarries, so you get authentic veining and a tactile coldness that feels almost sculptural. It’s perfect for a kitchen backsplash where you want the stone to echo countertops, or for a hallway where the rugged look adds a touch of industrial chic.
One thing to watch: natural slate is porous. If you plan to place it in a high‑humidity space—think bathroom or outdoor patio—make sure the seller offers a sealant, or you’ll see spots over time.
Engineered Stone – consistency meets durability
Engineered stone is basically crushed stone bound with resin. The result is a uniform colour and pattern, which is great when you need the photo to stand out without competing textures. Because the surface is non‑porous, you can skip the extra sealing step and it tolerates occasional splashes.
If you’re gifting a photo of a newborn, the smooth finish feels gentle against a nursery wall, and you won’t have to worry about a tiny water‑bottle spill ruining the look.
Polymer‑Coated Composite – budget‑friendly flexibility
These composites mimic the look of slate but are lighter and usually cheaper. They work well for temporary displays—like a graduation announcement you might want to swap out next year. Just remember they can scratch more easily, so handle with care.
Now, here’s a quick checklist to keep in your back pocket while you’re scrolling through material options:
- Location: indoor vs outdoor, exposure to moisture.
- Weight tolerance: heavy natural slate needs sturdy mounting hardware.
- Finish preference: matte, polished, or brushed.
- Budget: natural slate > engineered stone > composite.
Does any of that sound like your situation? Let’s say you’re setting up a cozy reading nook. You might lean toward engineered stone because it won’t distract from the books, yet it still feels premium.
On the other hand, if you’re decorating a modern farmhouse kitchen, a piece of natural slate with its earthy veins can become a conversation starter—especially when you pair it with a handcrafted wooden toy from Poppas Wooden Creations on the countertop.
And if you’re looking for a complementary scent experience while the slate settles on the wall, consider placing a small jar of cold‑brew from Chilled Iguana Coffee Co. nearby. The aroma won’t affect the stone, but it adds a cozy vibe to the whole setup.
Finally, for those who love a touch of greenery, a nearby window shade made by Monroe Plantation Shutter Pros can frame the slate beautifully, letting natural light dance across the image without glare.
Here’s a short video that walks you through the visual differences between these materials so you can see the texture and colour in action:
Take a moment after the video to compare the samples side by side. Feel the weight, run your fingers over the surface, and picture the final placement in your space before you click “order”.
Once you’ve settled on the material that feels right, move on to the next step: selecting the perfect stone colour that complements your décor. With the right slate under your photo, the final piece will look like it was carved just for that moment.
Step 2: Design & Personalize Your Photo
Alright, you’ve picked the perfect slab – now it’s time to give it a face. This is where the magic really happens, because a great photo can turn a piece of stone into a memory you’ll reach for every day.
First thing’s first: do you have a high‑resolution picture? Aim for at least 300 dpi; anything lower will look fuzzy once the ink fuses into the stone. If your phone shot feels a bit grainy, try pulling the original file from the cloud or ask the photographer for the raw version.
Choose the Right Image
Pick a moment that tells a story. A baby’s grin, a sunset over the family cabin, or that goofy pose from a birthday party – these are the shots that feel alive on a slate.
And remember, the stone itself adds texture, so look for images with clear contrast. A dark background against a bright subject usually pops nicely on a light‑grey or black slate.
Crop & Align for Slate
Most custom photo slates come in square or rectangular blanks. Measure the blank you ordered (you should have that from Step 1) and then set your canvas size accordingly in your editing software.
Use the rule of thirds: place the key element off‑center to give the piece breathing room. If you’re working in a square, try a 1‑inch margin on each side – it prevents the image from feeling cramped.
But what if the photo is landscape and your blank is square? No worries – you can add a subtle border of a complementary colour or let a little stone show around the edges for a framed effect.
Add Text or Details
Do you want a short caption? Keep it under 15 words so it doesn’t compete with the picture. Choose a font that matches the vibe: a clean sans‑serif for modern homes, or a hand‑written script for a cozy nursery.
And a tip: use a colour that contrasts enough to read but still blends with the slate’s hue. A soft white on a dark slate or a muted charcoal on a light stone works well.
Some services, like those on Personalization Mall, let you preview the text directly on the mock‑up, so you can tweak spacing before you click “order”.
Preview & Adjust
Most platforms give you a live preview. Zoom in – can you still see the baby’s eyelashes? If the preview looks washed out, try boosting the contrast a notch or swapping the colour of the stone background.
And don’t forget about lighting. The stone will reflect a soft glow, so a photo with harsh shadows might look even darker once printed.
Take a screenshot of the preview and compare it side‑by‑side with the original on your phone. Does it feel balanced? If something feels off, go back and adjust the crop or text placement.
Final Checklist
- High‑resolution (≥300 dpi) image selected.
- Cropped to match the blank’s dimensions with a comfortable margin.
- Contrast checked – subject should stand out against the stone.
- Caption (if any) limited to 15 words, legible font, complementary colour.
- Preview reviewed on both light and dark backgrounds.
- All changes saved before submitting the order.
Once you’ve ticked every box, hit that “order” button and imagine the moment you’ll hang the finished slab. You’ll have a piece that feels less like décor and more like a little slice of memory, right where you need it.
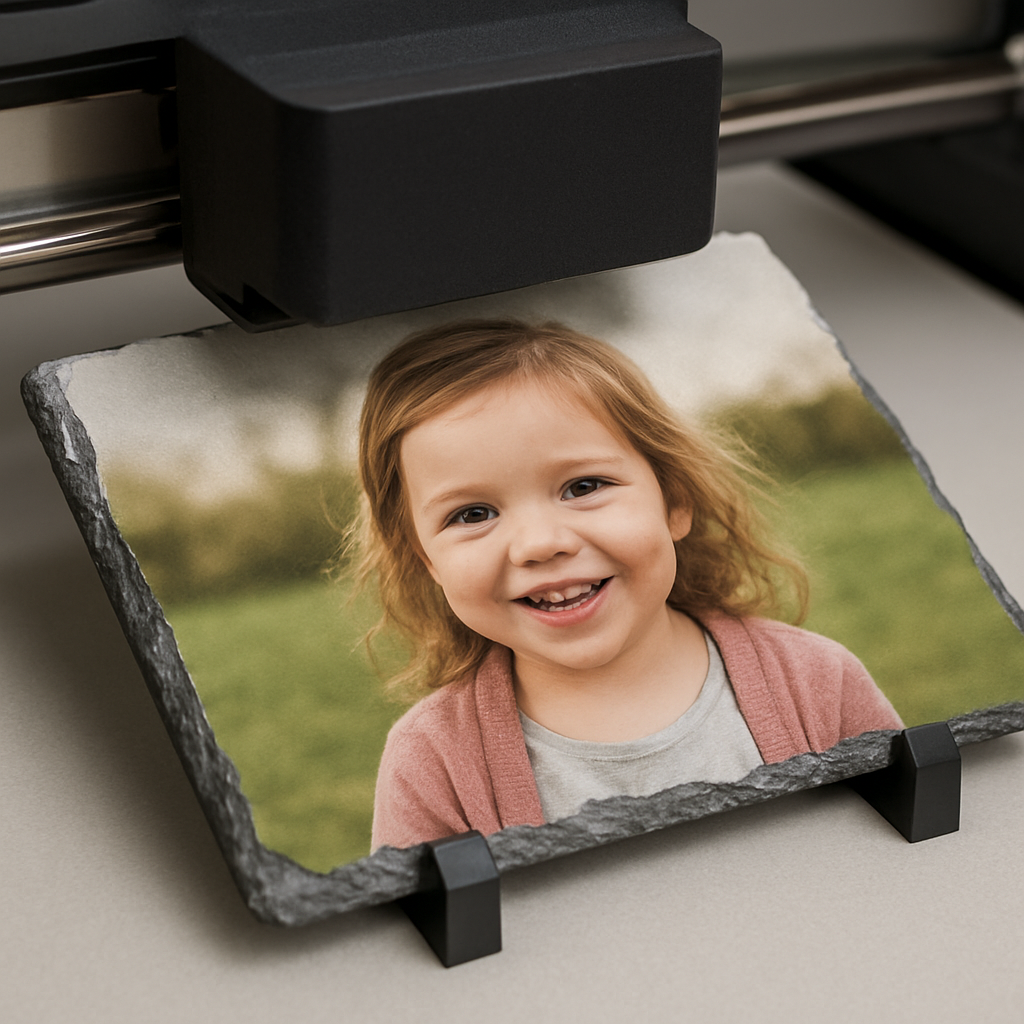
Step 3: Prepare and Print Your Photo
Now that your slate is chosen and the image is perfectly cropped, it’s time to get the file ready for the printer.
First, double-check the resolution. Even if you saved the picture as a JPEG, open it in a photo editor and verify that it’s at least 300 dpi at the final size. Anything lower will look soft once the ink fuses into stone.
Save in the Right Format
Most print‑on‑demand services accept PNG or high‑quality JPEG. PNG keeps all the colour data intact, which is handy if you added a transparent border or a subtle overlay.
When you export, use “sRGB” colour space – that’s the standard web profile and matches what most sublimation printers expect.
Colour‑Proof Your Image
Because stone can mute certain shades, it’s a good idea to run a quick colour‑proof. In your editor, create a duplicate layer, set it to “Multiply”, and lower the opacity to about 70 %. This mimics how the ink will sit on a slightly textured surface.
If the skin tones still look washed out, boost the contrast just a notch or add a warm tint. You’ll be surprised how a tiny tweak can make a baby’s smile pop on a dark slate.
And remember: many services let you upload a proof image that they’ll print on a small test piece. If you have the budget, ordering one test can save a costly re‑print.
Upload and Review the Online Mock‑up
When you drop the file into the custom‑photo‑slate builder, watch the live preview closely. Zoom in until you can see individual pixels – can you still read the eyelashes?
If the preview shows any banding or pixelation, go back to the source file and re‑export at a higher quality setting.
Some sites, like Harold’s Photo, even ship the slate with a two‑piece standing base so you can display it right out of the box according to the product description. Knowing that you’ll have a ready‑to‑show base can influence how you frame the final image.
Final Checklist Before Hitting “Print”
- Resolution ≥ 300 dpi at final dimensions.
- File saved as PNG or high‑quality JPEG in sRGB.
- Contrast and colour‑proofed for stone surface.
- Live preview looks sharp at 100 % zoom.
- All text (if any) is under 15 words and legible.
- Backup copy of the file stored locally.
Give that checklist one last glance, then press “order”. The moment you click, imagine the slab arriving – the stone’s cool heft in your hands, the image crisp as a memory, the base ready to sit on a mantle or desk.
After it’s printed, let the slate rest for a few hours before handling. The ink needs a brief cure period, and a gentle wipe with a dry microfiber cloth will keep the surface dust‑free without scratching the stone.
Now you have a finished custom photo slate that’s not just décor, but a tangible story you can touch every day.
Pro tip: store the slate away from direct sunlight and extreme humidity. A sunny windowsill can fade the colours over months, while a damp bathroom might cause the stone to develop a faint sheen. Keeping it in a stable environment preserves the vibrancy for years.
Step 4: Assemble and Seal the Slate
Alright, you’ve just unwrapped that fresh‑printed slab and you can already feel the cool weight of the stone. The next move is where the magic becomes permanent – you’ll attach any backing you want and then seal the whole thing so the image stays vivid for years.
What you’ll need
- Clear, non‑yellowing silicone sealant or a thin‑film epoxy (both work well on stone).
- Soft‑foam mounting pads or a pre‑cut wooden backing (optional but great for wall‑mounts).
- Microfiber cloth, isopropyl alcohol, and a gentle lint‑free brush.
- Masking tape, a small ruler, and a steady hand.
Do you ever feel a little nervous about messing up the finish? Don’t worry – a few careful steps keep the surface pristine.
Step 1: Test the surface
Wipe the slate with a cloth dampened in isopropyl alcohol. This removes dust and any leftover curing residue. Let it air‑dry for a minute. If a water droplet beads on the stone, you’re good to go; if it spreads, give the surface another gentle wipe.
Step 2: Attach a backing (optional)
Many people prefer a thin wooden or cork pad on the back so the slab sits flush against a wall and isn’t prone to slipping. Apply a thin line of clear silicone along the edges of the backing, then press it onto the stone. Hold for 30 seconds, wipe away any excess, and let the seal cure for at least 2 hours.
For a completely frameless look, skip the backing and go straight to sealing the edges.
Step 3: Seal the edges
Edge sealing is the real guardian against moisture and UV fade. Run a bead of silicone along the perimeter, using a disposable brush to smooth it into an even film. Make sure the bead is thin enough to stay invisible but thick enough to fill any micro‑gaps.
Some DIY‑ers wonder whether a glossy acrylic sealer would look prettier. The consensus among stone‑working forums is that silicone remains the most flexible and UV‑stable choice, especially for pieces that might experience temperature swings according to roof‑slate experts.
Real‑world example
Take Jenna, a new‑homeowner who printed a family‑vacation photo on a 12 × 12 inch dark slate for her kitchen island. She used a reclaimed‑pine backing, applied silicone, and let it cure overnight. The next morning she noticed a faint ring of sealant around the edges – exactly what she wanted to protect the stone from steam. After three months of daily coffee splashes, the image still looks as crisp as day one.
Tips for lasting brilliance
- Avoid direct sunlight for the first 24 hours; the ink needs time to fully set.
- Re‑apply a thin silicone coat once a year if the stone sits in a humid bathroom.
- When cleaning, use only a dry microfiber cloth – no harsh chemicals that could break down the seal.
Want a quick visual reference? Here’s a compact comparison of the most common sealants for custom photo slate projects.
| Sealant Type | Flexibility | UV Resistance | Typical Use |
|---|---|---|---|
| Clear silicone | High | Excellent | Edge sealing, backing adhesion |
| Thin‑film epoxy | Medium | Good | Full‑surface coating (requires careful masking) |
| Acrylic spray | Low | Moderate | Gloss finish only; not recommended for high‑moisture areas |
Quick checklist before you step away
- Surface wiped clean with isopropyl alcohol.
- Backing attached (if using) and seal cured 2 + hours.
- Edge silicone bead applied and smoothed.
- Seal cured at least 24 hours before hanging or handling.
- Store away from direct sun and extreme humidity.
And that’s it – your custom photo slate is now assembled, sealed, and ready to become the centerpiece of any room. Remember, a little patience during sealing pays off with a piece that looks fresh for years to come.
Step 5: Care, Display, and Gift Ideas
Now that your custom photo slate is sealed and ready to go, the real fun begins – figuring out how to keep it looking fresh and how to turn it into a gift that feels personal without sounding generic.
Everyday care routine
First thing’s first: treat the surface like you would a favorite coffee mug – gentle, regular, and with a soft touch. A dry microfiber cloth is your best friend; it lifts dust without scratching the stone. If you notice a smudge, a barely‑dampened cloth (just a whisper of water) works fine, but never reach for harsh chemicals or abrasive sponges.
And what about the seal? The silicone bead you applied in Step 4 will keep moisture out, but it’s not a set‑it‑and‑forget‑it shield. In humid bathrooms or kitchens, give the edges a thin top‑up once a year – a quick squeeze of clear silicone, smooth it with a fingertip, and let it cure for 24 hours. That tiny habit can add years to the vibrancy of the ink.
Does sunlight worry you? Direct sun can fade colors over time, even on a sealed slab. If you love the sunny spot near the window, consider rotating the slate every few months or using a low‑UV glass frame to filter the harsh rays.
Showcasing your slate
Where you hang the piece can turn a simple photo into a conversation starter. In a living‑room, a 12 × 12 inch slate looks striking above a mantle – just use two small picture‑hanging strips to keep the weight even. In a nursery, a lighter 8 × 6 inch slab can sit on a floating shelf at eye level, letting the tiny hands of a newborn reach up and “touch” the memory.
Think about lighting. A soft LED strip behind a shallow ledge creates a gentle glow that accentuates the stone’s natural texture. If you’re worried about glare, angle the slab a few degrees away from the main light source; the stone’s matte finish will diffuse the light nicely.
Here’s a quick checklist for display:
- Choose a spot with indirect natural light or use dimmable LED.
- Mount with two hanging strips or a sturdy picture hook rated for the slab’s weight.
- Leave a 1‑inch border around the image so the stone frame can breathe.
- Periodically dust with a microfiber cloth; avoid vacuuming directly on the surface.
And if you want a “frame‑free” look, simply lean the slate on a decorative ledge or coffee table. The stone’s weight keeps it stable, and you can swap it out for a new memory whenever the mood strikes.
Gift‑giving ideas that wow
Custom photo slates make gifts that feel curated, not mass‑produced. One popular approach is to pair the slate with a matching theme – think a set of three slates that tell a story: a newborn’s first smile, the first family vacation, and the first birthday cake. The progression reads like a visual diary and fits perfectly on a hallway wall.
Another idea is to bundle the slate with something tactile, like a hand‑stitched blanket or a wooden photo frame from heartful.gifts. The contrast between cold stone and warm fabric adds depth to the gift, and the recipient gets two usable keepsakes in one package.
Real‑world example: Maya, a new mom, ordered a light‑grey slate of her baby’s tiny hand, then added a soft, pastel‑coloured throw pillow that featured the same photo. When she handed the gift to her sister, the duo became the centerpiece of the nursery, and the sister said it felt “like a hug you can see and touch.”
If you’re aiming for a holiday surprise, take advantage of seasonal promotions – many sites run “up to 85 % off” deals around Cyber Monday, making it easy to splurge on a premium slab without breaking the bank (Printerpix’s holiday sale page). Just be sure to check the “order in time for Christmas” deadline so the gift arrives before the festivities.
Finally, add a personal touch with a short handwritten note tucked behind the slab or etched onto a small wooden tag. It turns a beautiful object into a story you both share.
Quick care & gifting checklist
- Dust weekly with a dry microfiber cloth.
- Re‑apply a thin silicone edge coat annually in humid areas.
- Avoid direct sun for the first 24 hours; then consider UV‑filtering glass if exposure is constant.
- Mount using picture‑hanging strips or a sturdy hook rated for the slab’s weight.
- When gifting, pair with a complementary item (blanket, pillow, wooden tag) for added warmth.
By treating your custom photo slate with a little TLC and thinking creatively about where it lives or who receives it, you turn a simple print into a lasting memory that brightens a wall and a heart alike.
FAQ
What size custom photo slate should I choose for a small space?
When you’re working with a cozy nook, a 6 × 6 inch slab often feels just right. It’s big enough to showcase the image without overwhelming the wall, and the lighter weight makes hanging a breeze. If you have a rectangular spot, an 8 × 10 inch piece can stretch the visual impact while still fitting on a shelf or above a bedside table. Measure the area, leave a one‑inch breathing room, and let the stone’s natural edge frame the memory.
Can I print a portrait on a natural slate, or do I need engineered material?
Both work, but natural slate adds a subtle, uneven grain that can give a portrait a warm, rustic vibe. Engineered slate is smoother and often lighter, which helps if the image has fine details you don’t want to lose in the texture. If you’re printing a baby’s smile or a delicate facial expression, test a small swatch or preview the mock‑up to see how the stone’s surface interacts with the contrast. Either way, aim for at least 300 dpi so the image stays crisp.
How do I hang a custom photo slate safely without damaging my wall?
Start with two picture‑hanging strips that are rated for the slab’s weight – most 0.4‑inch slates weigh under five pounds, so standard strips work fine. For thicker, heavier pieces, a sturdy hook or a French cleat gives extra security. Level the slab with a small bubble level, press the strips firmly, and give the adhesive a minute to set before letting go. This method leaves no holes and makes swapping out the slab later a simple pop‑off.
Is it okay to place a custom photo slate in a humid bathroom?
Yes, but add a thin silicone bead around the edges after you attach any backing. The seal keeps moisture from seeping into the stone and protects the sublimation ink. Keep the slab away from direct steam jets, and consider a matte‑finished, engineered slate that resists warping. A quick yearly top‑up of the silicone seal will keep the colors vibrant for years, even in a steamy environment.
Can I add text or a short quote to my custom photo slate?
Absolutely – a caption under 15 words works best. Choose a font that matches the room’s style: a clean sans‑serif for modern décor or a hand‑written script for a nursery feel. Make sure the text colour contrasts with the stone – white on dark slate or charcoal on light grey. Most design tools let you preview the text directly on the mock‑up, so you can tweak size and placement before you order.
How do I care for my custom photo slate after it’s been hung?
Dust it weekly with a dry microfiber cloth; it lifts particles without scratching the surface. If you notice a fingerprint, a barely damp cloth (just a whisper of water) will do the trick – never use harsh chemicals. After the first 24 hours, you can expose the slab to indirect sunlight; for long‑term protection, consider UV‑filtering glass if the piece sits near a bright window. A gentle cleaning routine keeps the stone looking fresh and the image vivid.
Conclusion
By now you’ve seen how a custom photo slate can turn a single snapshot into a stone‑finished memory you actually touch.
If you’re still wondering whether it’s worth the effort, think about the moment you’ll feel when you walk into a room and that familiar smile greets you.
We’ve walked through picking the right slate, designing the image, prepping the file, sealing the edges and caring for the finished piece. Each step is simple enough that you don’t need a workshop—just a few minutes and a bit of curiosity.
So, what’s the next move? Grab that favorite photo, head over to heartful.gifts, select the slate size that fits your space, and hit order. While you wait, sketch a tiny caption or picture where it will live; that little extra makes the piece feel personal.
Remember, a little silicone touch‑up once a year and a quick dust‑off keep the colors vivid for years, so your investment stays fresh.
Ready to give a gift that feels like a hug you can see? Let your custom photo slate become the centerpiece of a story you’ll share again and again.
Start designing today and watch a memory solidify on stone. It’s easier than you think, and the result is priceless.