
Custom Photo LED Lamp Ideas: 5 Creative Ways to Light Up Your Memories
Ever walked into a room and felt that something was missing, like the perfect memory was just out of reach? That's the moment a custom photo LED lamp can turn an ordinary space into a personal gallery that glows.
Imagine the smile on your partner's face when they switch on a lamp that projects the photo from your wedding day, or the way your kids' eyes widen as their favorite bedtime story cover lights up the night. It's not just a light; it's a mood, a reminder, a tiny piece of home.
In our experience at heartful.gifts, we've seen couples use these lamps as anniversary surprises, parents create night‑light keepsakes for newborns, and friends gift them for housewarmings. The magic is that each lamp is made just for you, using your own photo and a soft LED that lasts for years.
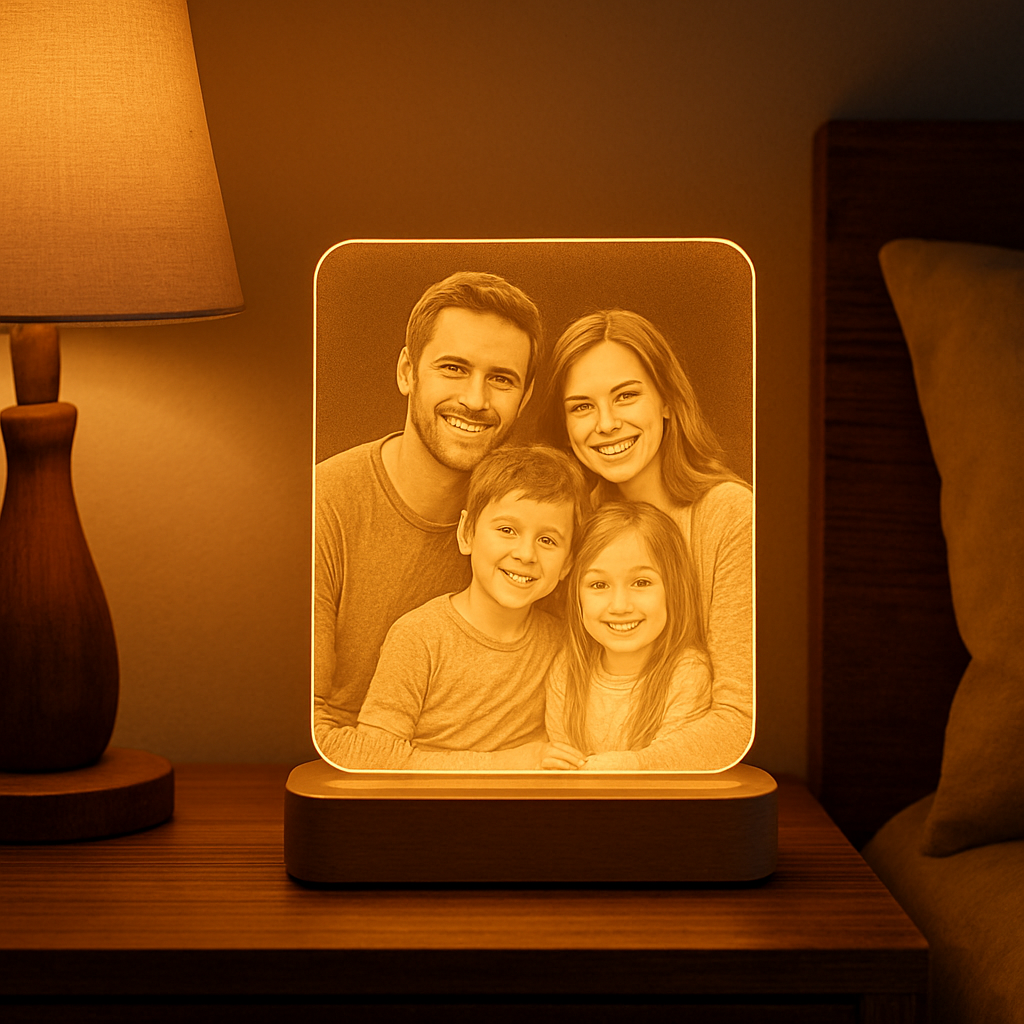
But you might wonder, how does a simple photo become a glowing centerpiece? The process starts with a high‑resolution image, which is printed onto a thin, translucent material that wraps around a circular LED base. The light diffuses through the picture, making every detail pop without harsh glare.
Here's what I mean when I say 'effortless': you upload the picture, pick a size, and in a few clicks you’ve designed a lamp that fits your décor. No need for fancy tools or design skills—just a memory you want to shine.
Think about it this way: a regular night light is functional, but a custom photo LED lamp is emotional. It turns a practical object into a conversation starter, a way to share a story without saying a word.
And because the LED uses low energy, you can leave it on overnight without worrying about the electricity bill. That's a win for the planet and for those late‑night cuddle sessions.
So, what should you do next? Start by digging through your photo library for that one picture that makes you feel warm inside—maybe a beach sunrise, a family portrait, or a goofy pet snap. When you see it, you’ll know it belongs on a lamp.
From there, consider where you’ll place it. A bedside table, a living‑room shelf, or even a hallway nook can become a spotlight for that memory. The right spot makes the glow feel natural, not forced.
If you're a gift buyer, think about the recipient’s style. A modern, minimalist lamp pairs well with sleek décor, while a larger, rounder version can add a cozy vibe to a rustic space.
Finally, remember that a custom photo LED lamp isn’t just a one‑time purchase. It’s a keepsake that can grow with your family—swap out the image for a new milestone whenever you like. That flexibility keeps the gift fresh year after year.
Ready to turn your favorite photo into a glowing reminder? Let’s dive in and explore how you can create a custom photo LED lamp that lights up more than just a room.
TL;DR
A custom photo LED lamp turns any cherished memory into a warm, low‑energy night light that brightens rooms and hearts alike for you.
Pick today your favorite picture, choose a size, and let heartful.gifts handle the rest—so you can gift, decorate, or relax with a personal glow easily in minutes.
1. Choose the Right Size for Your Space
Ever stood in front of a blank wall wondering if the lamp will look too tiny or swallow the room? That's the feeling we all get when we try to picture a custom photo LED lamp in our home.
1. Know Your Surface
Start by measuring the surface where you plan to put the lamp. A bedside table? Measure the tabletop width and depth. A floating shelf? Check the bracket spacing. Jot those numbers down – it feels oddly satisfying, like planning a tiny art exhibit.
2. Match the Lamp Diameter to the Space
We usually recommend a 6‑inch lamp for narrow side tables and an 8‑inch version for larger shelves or a mantelpiece. If the lamp looks like a tiny coin on a big wall, it'll get lost. And if it’s a hulking disc on a tiny nightstand, well, you’ll be constantly bumping into it.
Here's a quick cheat sheet:
- 4‑5" – perfect for kids' night‑light spots or cramped desk corners.
- 6‑7" – ideal for bedroom tables, hallway niches.
- 8‑10" – works great on living‑room consoles, larger wall shelves.
In our experience, couples who use the lamp as a wedding table centerpiece love the 8‑inch size – it makes the photo pop without stealing the spotlight from the cake.
Speaking of weddings, if you’re planning a celebration, you might also browse Adelaide wedding venues for inspiration on décor. A custom photo LED lamp can double as a sweet table accent or a memorable gift for the newlyweds.
3. Consider the Lamp’s Height
The lamp’s base is usually about 2‑3 inches tall. If you’re placing it on a low shelf, make sure the overall height won’t block other decorative items. A good rule of thumb: leave at least an inch of breathing room above the lamp.
And if you’re thinking about pairing it with other personalized gifts, check out the One Day at a Time necklace guide. A matching necklace can turn a simple lamp into a heartfelt gift set for a spouse or parent.
Now that you’ve got the dimensions sorted, let’s see the lamp in action.
Below is a short video that shows how the light diffuses through different photo sizes, so you can visualise the glow before you order.
Notice how the larger image fills the lamp’s surface, creating a richer, more immersive glow. If you’re still unsure which size to pick, try printing a test strip of your photo at the intended diameter and hold it up to a lamp.
One final tip: when you’re ready to order, our design tool walks you through each size option. If you want a deeper dive into how to craft the perfect personalized light, check out How to Design Your Own Custom Photo Moon Lamp: A Step‑by‑Step Guide. It walks you through choosing the right dimensions, uploading high‑resolution images, and previewing the final look.
So, grab that measuring tape, pick the size that feels just right, and let your favorite memory shine in the perfect proportion.
2. Pick Your Favorite Photo and Design
Alright, you’ve measured the space and you know the lamp will fit. The next magic step is picking the picture that’ll actually make you want to turn the light on every night. It feels a bit like choosing a favorite song, doesn’t it? Let’s walk through it together.
-
Find the memory that makes you smile
Scroll through your phone until you hit that moment – maybe it’s the goofy grin of your toddler at the beach, the candle‑lit kiss from your wedding, or your dog’s head‑tilt that always gets a laugh. When you see it, notice how your chest relaxes. That’s the photo that belongs on your custom photo LED lamp.
-
Check the resolution – clarity matters
LED lamps need a crisp image, otherwise the glow turns into a fuzzy mess. Aim for at least 300 dpi at the final lamp size. If you’re unsure, the photo size guidelines can give you a quick sanity check – they break down what “high‑resolution” really looks like.
-
Crop with intention
Don’t just slap the whole picture on the lamp. Think about what you want to highlight. A close‑up of a smiling face works wonders on a 6‑inch lamp, while a wide‑angle landscape needs a bigger 10‑inch canvas. Crop so the main subject sits in the centre; the LED will diffuse light evenly and your memory stays the star.
-
Choose a style that fits the room
Do you love a sleek, monochrome look or a warm, vintage feel? Some folks add a subtle border in a soft pastel; others keep it bare for a modern vibe. If you’re gifting a parent, a gentle pastel can soften a nursery night‑light. For a spouse, a bold black‑backed lamp might echo a contemporary bedroom aesthetic.
-
Test the look on screen
Before you click “order,” upload the image to the preview tool on heartful.gifts (or simply view it full‑screen on your computer). Dim your lights and see how the picture glows. Does it still read well when the room is dark? If anything looks washed out, go back and adjust brightness or contrast in your photo editor.
Once you’ve nailed the perfect shot, you’re almost ready to bring it to life. The design phase is where you decide on the final shape, the LED brightness, and any extra touches like a custom frame colour.
That video walks you through the actual upload process, so you’ll see exactly where to drop your file and how the preview updates in real time. It’s quick, it’s visual, and it takes the guesswork out of the whole thing.
After the video, take a moment to double‑check your checklist: favorite memory selected? high‑resolution image? proper crop? style locked in? If you can answer “yes” to all of those, you’re set. Hit “order,” and in a few days you’ll have a custom photo LED lamp that feels like it was always meant to be there – a little glow of love on your nightstand, a conversation starter on the living‑room shelf, or a heartfelt keepsake for a new parent.
3. Select the Ideal Brightness and Color Settings
-
Know why brightness matters
When you first turn on a custom photo LED lamp, the first thing you notice is how much light it throws. Too bright and the image looks washed out; too dim and the details disappear into a soft haze. Think about where you’ll put the lamp – a bedside table for a gentle night‑light, or a living‑room shelf where it doubles as ambient décor. The right brightness makes the memory shine without stealing the room’s mood.
-
Pick a brightness level that matches the room
Most heartful.gifts lamps offer three LED intensity settings: low, medium, high. For a nursery, we usually recommend the low setting – it’s bright enough to see the smile on a baby’s face but calm enough to let little ones drift off. In a lounge where you want a conversation starter, the medium or high mode creates a warm glow that highlights the photo while still feeling cozy.
-
Consider colour temperature – warm vs cool
Colour temperature is measured in kelvins. A 2700K setting gives a buttery warm‑white that feels like a sunset, perfect for romantic bedroom vibes. A 4000K cool‑white mimics daylight and works well for kitchen counters or work‑spaces where you still want the image visible without it feeling like a night‑light. Ask yourself: do you want the lamp to feel like a soft hug or a crisp spotlight?
-
Use the dimmer for flexibility
If your lamp has a built‑in dimmer, treat it like a mood‑ring. Start low, then slide up until the picture looks just right. You’ll notice the colours pop a bit more as you increase intensity, but the background stays subtle. The best part? You can change the setting whenever the time of day changes – bright for a morning coffee, dim for a bedtime story.
-
Match the lamp’s colour to your décor
The LED itself can be tinted in a few shades – classic white, amber, or a subtle pastel. Amber works wonders in rustic settings, while white blends with modern minimalism. If you’re gifting a spouse who loves sleek lines, a pure white LED keeps the focus on the photo. For parents who want a cozy nursery, a soft amber tint adds that extra layer of warmth.
-
Test the settings before you order
Before you hit “order,” use the preview tool on heartful.gifts. Turn the virtual lamp on, switch between low, medium, and high, and toggle warm vs cool. Dim the screen on your laptop or phone to simulate a dark room – does the image still read? If anything looks fuzzy, tweak the brightness or colour temperature in the preview until it feels right.
-
Future‑proof your choice
Remember, you can always swap the picture later, but the hardware stays the same. Choose a brightness and colour setting you’ll love for years, not just for the current season. A medium‑bright, warm‑white lamp tends to age gracefully – it’s bright enough for daytime admiration and soft enough for night‑time comfort.
Bottom line: play with the three knobs – intensity, temperature, and tint – until the lamp feels like a natural extension of the space. When the light just “gets” the memory, you’ve nailed the perfect custom photo LED lamp.
4. Compare Top Custom Photo LED Lamps
Now that you’ve picked the perfect picture, it’s time to decide which custom photo LED lamp actually fits your life. Not all lamps are created equal – some shine bright enough for a living‑room showcase, while others whisper softly on a nightstand. Below is a quick‑hit list of the three models we see our gift‑buyers, parents, and spouses reaching for most often.
1. Classic Round Lamp
This is the workhorse you’ll find on most bedside tables. It’s a solid 6‑inch circle with a single‑color LED that you can toggle between warm‑white and cool‑white. The brightness dial has three steps, so you can go from a gentle night‑light to a bold accent.
What we love about it is the simplicity – no extra frills, just a crisp photo that looks great in any décor. Parents appreciate the low‑energy draw (under 2 W) and the fact that the lamp’s base is stable enough for a toddler’s curious hands.
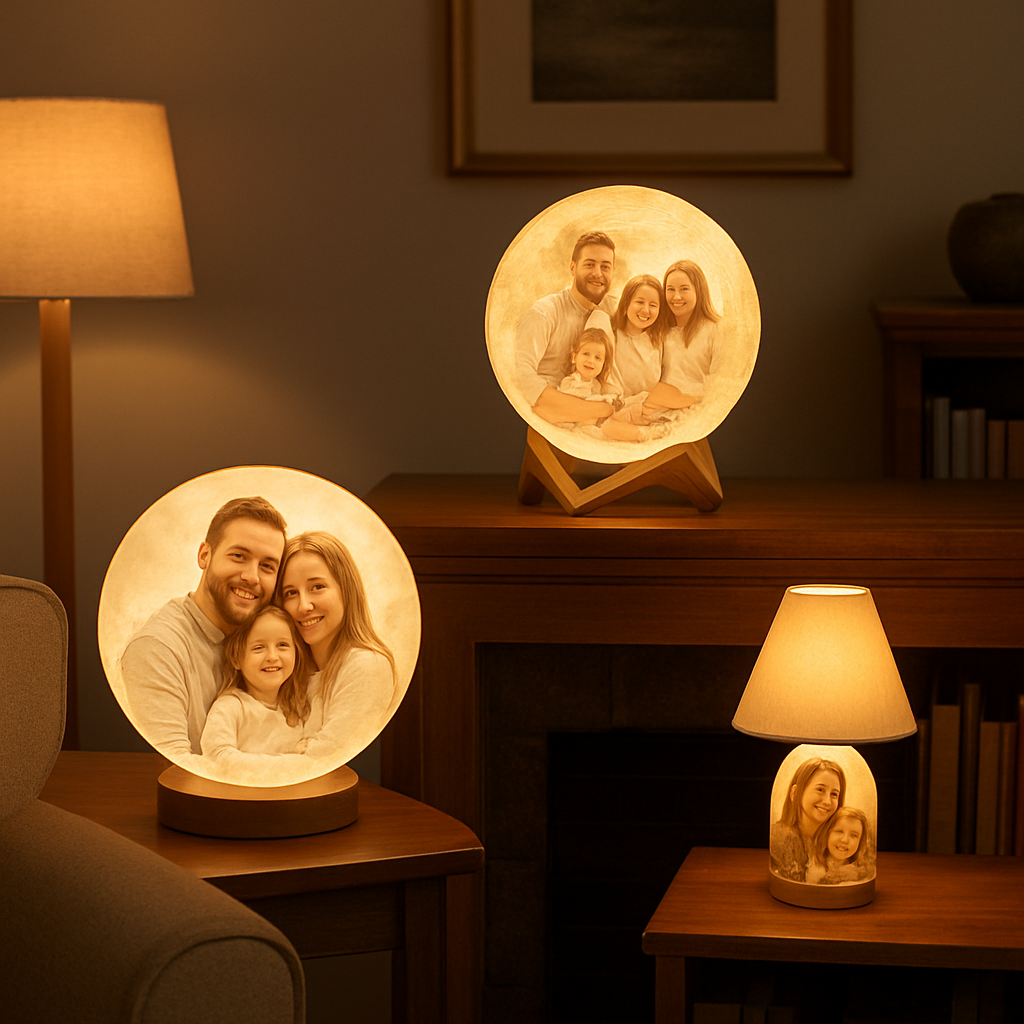
2. Moon‑Shaped Lamp
If you’re after a wow‑factor, the moon lamp is the go‑to. Shaped like a slice of the moon, it’s larger (10‑inch diameter) and comes with a built‑in dimmer that slides smoothly from a candle‑like glow to a bright reading light. The LED can be set to three colour temperatures, giving you that sunrise‑feel or a cool‑day vibe.
Spouses often pick this one for a romantic bedroom because the curved surface spreads the light evenly, making the photo look almost three‑dimensional. The only trade‑off is the higher price tag and a slightly heavier base – but the impact is worth it for a special occasion.
3. Mini Table Lamp
Think of this as the portable sidekick. It’s a compact 4‑inch square that fits perfectly on a desk or a shelf. The LED strip runs along the back, offering a uniform wash of light. It only has two brightness levels (low and medium) but includes a fun “soft amber” tint that’s perfect for a nursery or a cozy reading nook.
Gift‑buyers love the mini version because it’s easy to wrap, cheap to ship, and still feels personal. If you’re looking for a budget‑friendly option that still delivers that warm‑glow feeling, this is the one.
So, which one matches your vibe? Do you need a sturdy bedside companion, a dramatic moon‑lit centerpiece, or a tiny night‑light for the kids? Take a moment to picture where each would sit in your home – the right fit will make the lamp feel like it was always meant to be there.
Below is a handy table that sums up the key specs. Use it like a quick checklist before you hit “order.”
| Model | Size (diameter) | Brightness Levels | Colour Temp Options | Price Range (USD) |
|---|---|---|---|---|
| Classic Round | 6 in | Low / Medium / High | Warm‑white, Cool‑white | $35–$45 |
| Moon‑Shaped | 10 in | 3‑step dimmer | Warm, Neutral, Cool | $70–$90 |
| Mini Table | 4 in | Low / Medium | Warm‑white, Soft amber | $25–$35 |
In our experience, the best choice often comes down to the room’s purpose. A nursery or kids’ bedroom benefits from the soft amber tint of the mini lamp, while a master suite gets an instant romance boost from the moon lamp. And if you’re just after a reliable, everyday memory keeper, the classic round lamp never disappoints.
Remember, you can always swap the image later – the hardware stays the same. So pick the style that feels right now, knowing you’ll be able to update the photo as your family grows or your décor evolves.
Ready to pick one? Grab the lamp that matches your space, upload your favorite photo on heartful.gifts, and let the glow do the talking.
5. Install and Maintain Your Lamp
Alright, you’ve finally got your custom photo LED lamp in the box – now what? The excitement of that first glow can turn into a headache if you skip the basics. Let’s walk through the installation and upkeep so the lamp stays a beloved memory keeper for years.
1. Pick the perfect spot
First, think about where you’ll place it. A bedside table needs a stable, flat surface; a shelf works best with a little extra clearance so the light isn’t blocked. Avoid direct sunlight because prolonged UV exposure can fade the printed image over time.
Does the spot have an outlet nearby? Most of our lamps plug into a standard USB‑C or wall adapter, so keep the cord short enough to stay tidy but long enough to reach the socket.
2. Unbox with care
Gently remove the lamp base, LED panel, and any mounting hardware. You’ll notice a soft silicone pad under the base – that’s there to protect both the lamp and your furniture from scratches.
If you see any dust or protective film on the translucent photo layer, peel it off with a dry microfiber cloth. Don’t use chemicals; they can damage the printed image.
3. Connect the power
Plug the adapter into the lamp’s hidden port, then into the outlet. Most custom photo LED lamps have a power‑on switch on the base; flip it and watch the memory come to life.
Quick tip: If you’re using a USB outlet, a surge‑protected power strip adds an extra layer of safety, especially in households with kids.
4. Adjust brightness and colour
Many of our models feature a three‑step dimmer and a warm‑white/cool‑white toggle. Start low, then slide up until the photo reads clearly without washing out. For a nursery, the warm‑white low setting is usually perfect; for a living‑room showcase, the medium or high bright‑white works well.
5. Secure the lamp
If you’ve chosen a wall‑mountable version, use the included mounting bracket. Mark the drill holes with a pencil, drill pilot holes, and then screw the bracket into a stud or wall anchor. Hang the lamp, plug it in, and double‑check that it’s level.
For tabletop lamps, make sure the base sits flush; a wobble can shorten the LED’s lifespan.
6. Clean it right
Dust the outer surface weekly with a soft, dry cloth. If the photo side gets fingerprints, lightly dampen the cloth with water‑only (no cleaners) and wipe gently. Let it air‑dry before turning the lamp back on.
Never submerge the lamp or spray liquids directly – the LED and electronics aren’t waterproof.
7. Keep an eye on the LED lifespan
LEDs are long‑lasting, typically 20,000‑30,000 hours, but heat can shave off years. Make sure the lamp has adequate airflow; don’t tuck it behind books or heavy curtains.
For peace of mind, TCP Lighting recommends checking the manufacturer’s specifications on maximum operating temperature and following their energy‑efficiency guidelines. If you notice flickering after several months, it may be a sign the LED is overheating or the driver needs replacement.
8. Swap the photo when you’re ready
One of the best parts about a custom photo LED lamp is that the image isn’t permanent. When a new milestone arrives – a birthday, a graduation, a family vacation – simply follow the same unboxing steps in reverse: unscrew the back panel, replace the printed film, and snap everything back together.
Because the electronics stay the same, you’re only paying for fresh memories, not new hardware.
Bottom line: a little upfront care goes a long way. By choosing the right spot, handling the lamp gently, and keeping it clean and cool, you’ll enjoy that personal glow for many years to come.
Conclusion
So there you have it – a custom photo LED lamp isn’t just a light, it’s a living memory you can move around the house.
Remember the three things we kept coming back to: pick the right spot, protect the LED from heat, and swap the image whenever life hands you a new milestone. In our experience, families who treat the lamp like a photo frame – rotating pictures for birthdays, graduations, or a newborn’s first smile – get the most joy out of it.
What’s the easiest next step? Grab that favorite snapshot you’ve been scrolling past, head to heartful.gifts and let the simple design tool turn it into a glow‑ready keepsake. It only takes a few clicks, and the lamp arrives ready to light up your nightstand or living‑room shelf.
And if you ever notice a flicker or the lamp feels warm, just give it a quick breath of air and wipe the surface with a dry cloth – the LED will keep shining for thousands of hours.
A quick check of the driver’s temperature gauge can save you a future repair.
Bottom line: a little care now means years of personalized ambiance later. Ready to make your memories shine? Let’s get that custom photo LED lamp glowing today.
FAQ
Can I use any photo for a custom photo LED lamp?
Yes, you can use virtually any digital image, but a few details matter. Choose a high‑resolution photo – at least 300 dpi when scaled to the lamp size – so the picture stays crisp under the glow. Avoid images that are heavily grainy or low‑contrast; they can look washed out once the LED diffuses the light. JPG or PNG formats work fine, and we recommend cropping the picture so the main subject sits in the centre of the lamp’s circular surface.
How long does a custom photo LED lamp typically last?
Custom photo LED lamps are built to last for years. The LEDs themselves are rated for 20,000–30,000 hours of operation, which translates to roughly 5–10 years of nightly use before brightness noticeably fades. As long as you keep the lamp in a well‑ventilated spot and avoid covering the diffuser with cloth or paper, the printed photo layer remains vibrant for the lamp’s lifetime. Simple maintenance like dusting with a dry microfiber cloth helps preserve both the light and the image.
Can I swap the image on my custom photo LED lamp later?
Absolutely – swapping images is one of the biggest perks. Most of our models feature a removable back panel that snaps open without tools. You simply slide out the printed film, replace it with a new one you’ve prepared, and snap the panel back in place. Because the LED hardware stays the same, you only pay for the new photo print, not a whole new lamp. Just be gentle with the thin film to avoid creasing.
What power source does a custom photo LED lamp use?
The majority of custom photo LED lamps plug into a standard USB‑C or micro‑USB power adapter that you can connect to any wall outlet or a spare USB port on a laptop or power strip. Some newer models even include a built‑in rechargeable battery for cordless use on night‑stands. When you buy from heartful.gifts, we ship the appropriate adapter, so you won’t need to hunt for a compatible charger.
Is the light from a custom photo LED lamp safe for children’s rooms?
Yes, the LEDs operate at low voltage and generate very little heat, making them safe for nurseries and kids’ bedrooms. The diffuser panel keeps the surface cool to the touch, and most models are UL‑listed for residential use. Just place the lamp on a stable surface away from the edge of a table, and avoid covering the vent holes; that way the lamp stays cool and the photo stays bright.
How do I clean the printed photo on my custom photo LED lamp without damaging it?
Cleaning is simple but you should avoid harsh chemicals. First, turn the lamp off and unplug it. Use a soft, lint‑free microfiber cloth to wipe away dust. If you notice fingerprints, dampen the cloth with just water—no soap or alcohol—and gently pat the surface. Let it air dry completely before you power the lamp back on. This routine keeps the colors vivid and the LED working efficiently.
Do custom photo LED lamps come with a warranty?
All of our custom photo LED lamps come with a one‑year limited warranty that covers any manufacturing defects in the LED driver, diffuser panel, or printed image. If you experience flickering, dead LEDs, or a peeling photo layer within that period, simply contact our support team and we’ll arrange a replacement or repair at no extra cost. Keep your purchase receipt handy—it speeds up the claim process.