
Creating a Stunning Square Photo Canvas: A Step‑by‑Step Guide
Picture this: you just got home after a long day, coffee in hand, and you glance at the empty wall above the sofa.
You know that feeling when a favorite photo is stuck on your phone, but it never quite makes the room feel *yours*?
What if you could turn that digital snap into a square photo canvas that looks like it belongs there, right from the start?
I’ve been there – scrolling through endless options, worrying about size, orientation, and whether the colors will stay vibrant once they’re stretched over a wooden frame.
Turns out, a square format is a sweet spot: it frames faces and landscapes alike without feeling cramped, and it plays nicely with most living‑room layouts.
And the best part? You don’t need an art degree to pick the right image – just a moment that makes you smile, a decent resolution, and a trusted print‑on‑demand service that handles the heavy lifting.
So, how do you go from a phone photo to a gallery‑ready square photo canvas without the hassle?
First, choose a picture that tells a story – maybe a candid of the kids playing, a pet’s goofy grin, or that sunset you captured on vacation.
Next, make sure the file is at least 150 dpi at the final size; most services recommend 12 × 12 inches for a balanced look, but you can go larger if the resolution holds up.
Finally, upload it to a site like heartful.gifts, pick the square canvas option, and let them stretch it over a pine frame – you’ll get a crisp, color‑saturated piece that feels like a museum print, but with your personal touch.
Ready to give your walls a hug? Let’s dive in and explore how to pick the perfect photo, size, and finishing details so your square photo canvas becomes the centerpiece you’ve been dreaming of.
TL;DR
A square photo canvas turns your favorite snapshot into a ready‑to‑hang, museum‑style artwork that fits any wall and instantly brightens the space with personal vibe.
Just choose a 150 dpi image, upload it to heartful.gifts, select the 12×12‑inch option, and receive a crisp, color‑saturated canvas that feels custom‑made for home today.
Step 1: Choose the Right Size and Orientation
Okay, you’ve picked the photo that makes you smile – now it’s time to decide how big that moment should sit on your wall.
Why size matters more than you think
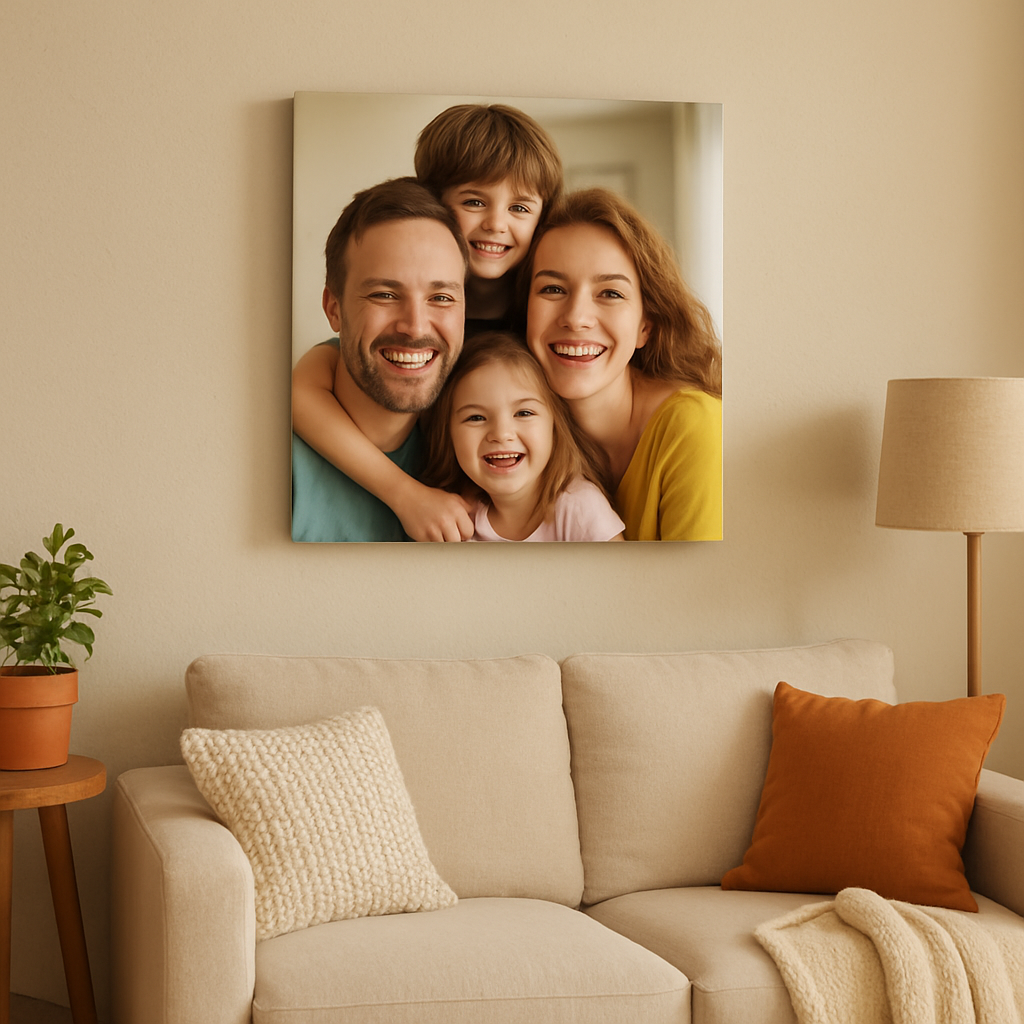
Imagine a family portrait that’s 8×8 inches on a sprawling living‑room wall. It’ll look like a tiny postcard, right? On the flip side, a 24×24 inch canvas in a tiny hallway can feel overwhelming and block traffic flow. The sweet spot for most rooms is the classic 12×12 inch square, which gives the image room to breathe without stealing the spotlight.
Here’s a quick rule of thumb: measure the wall space you have, then leave about 6‑12 inches of breathing room on each side. If your wall is 6 feet wide, a 12‑inch canvas will sit nicely in the center, leaving space for a lamp or a small shelf.
Orientation: square is the default, but landscape and portrait can work too
Square photo canvases feel balanced because they treat height and width equally. That’s why a candid of kids playing in the backyard looks instantly harmonious. But sometimes the story you’re telling is wider – think a panoramic beach sunset – or taller – like a full‑body portrait of your dog.
In those cases, you can still stick with a square canvas by cropping carefully, or you can choose a “portrait‑style” square where you let a bit of the top and bottom wrap around the frame. Most print‑on‑demand services, including heartful.gifts, let you preview how the image will wrap before you hit “order”.
Step‑by‑step checklist
- Measure the wall: use a tape measure, note width and height.
- Decide the visual weight: larger rooms can handle 16×16 inches or even 20×20 inches; cozier spaces stay comfortable with 10×10 to 12×12 inches.
- Check your photo’s resolution: at least 150 dpi at the final size. For a 12×12 inch canvas you need roughly 1800 × 1800 pixels.
- Choose orientation: keep the original aspect if it tells the story, or crop to a perfect square using a simple editor.
- Preview the wrap: most sites show a mock‑up of the image wrapping around the frame – look for any important details that might disappear on the edges.
- Confirm the size and orientation, then add to cart.
Real‑world examples
Family reunion photo: The original shot is 4000 × 3000 pixels, landscape. By cropping to a square, you keep the smiling faces front and center, and the extra sky or background wraps nicely around the canvas edges. The result feels intimate and fits a 12×12 inch spot above the sofa.
Pet portrait: Your golden retriever is mid‑run, captured in a tall portrait. Instead of forcing a square crop that cuts off the tail, you can select a 16×16 inch canvas. The extra height lets the whole body stay visible, while the square shape still offers that balanced feel on a narrow hallway wall.
Travel memory: A panoramic shot of the Grand Canyon is 6000 × 2000 pixels. If you love the sweep, you could either order a panoramic canvas (outside the scope of this guide) or create a square collage of three smaller squares, each 12×12 inches, to showcase different sections of the view.
Pro tip from the pros
When you’re unsure, print a cheap 8×8 inch test on regular paper first. Hold it up on the wall and live with it for a day. If you still feel the image is too small or too large, you’ll know which direction to adjust before committing to the final canvas.
And remember, the canvas will wrap around a pine wood frame, so the very edges of your photo become part of the visual story. Choose a composition where the outer pixels aren’t essential details – think of them as a subtle border rather than a focal point.
Take a breath, grab that tape measure, and pick the size that feels just right. Your square photo canvas will soon be the quiet hero of the room, turning a simple snapshot into a piece of personal art.
Step 2: Select Materials and Finish
Now that you’ve nailed the size, it’s time to think about what the canvas actually feels like under your fingertips.
What’s the canvas made of?
The typical square photo canvas uses a cotton‑poly blend that’s about 0.017 inch thick. The material gets a printable gesso coating so the ink sticks evenly and you end up with a matte surface that looks a little like a fine‑art painting. Walgreens explains that this blend weighs roughly 320‑340 gsm, which gives it enough heft to stay flat on the wall without sagging.
Choosing the right finish
Most services, including heartful.gifts, stretch the canvas over a pine wood frame. The frame is solid enough to keep the canvas taut, yet light enough that you can hang it with a single picture hook.
Do you prefer the image to wrap around the sides? Many printers let you extend the photo a few inches onto the frame, creating a “borderless” look. That way the outer pixels become part of the composition, which works beautifully for landscapes where the sky can flow onto the edge.
Texture vs. smoothness
If your photo is a family portrait with soft skin tones, a slightly textured canvas can add a gentle depth that makes the faces pop. On the other hand, a sleek, smooth finish works best for graphic‑style prints or bold color blocks.
Most print‑on‑demand sites let you preview both textures before you buy, so take a moment to toggle the view.
Real‑world examples
- Kids’ backyard birthday – The original shot is bright and busy. Choosing a matte, textured canvas softens the harsh sunlight and lets the kids’ smiles stay the focus. A 12×12 inch square with a wrapped edge lets the garden background bleed into the frame, adding a playful border.
- Grandma’s vintage kitchen – The photo is a warm, sepia‑toned still life. A smooth, fine‑art finish preserves the subtle grain of the original film, while a thin pine frame keeps the vintage vibe without looking too modern.
- Pet adventure – A golden retriever mid‑run looks dynamic. A high‑contrast matte canvas with a solid‑wood frame captures the motion, and the wrap‑around edge shows a hint of the green yard, making the dog feel like he could leap out of the wall.
Step‑by‑step checklist
- Decide if you want the image to wrap. If yes, add 2–3 inches of “bleed” around the edges in your editor.
- Choose texture: matte‑woven for portraits, smooth‑fine‑art for graphics.
- Select frame type: solid pine for a classic look, or a colored edge if you want a pop of contrast.
- Check the material specs – look for 320‑340 gsm weight and gesso coating for durability.
- Review the preview on the site; zoom in on the sides to make sure no important detail gets cut off.
- Order a small test print (8×8 inches) if you’re unsure about texture or color fidelity.
Expert tip
Because canvas absorbs ink differently than glossy photo paper, colors can appear a shade softer once stretched. If you love vivid reds or electric blues, bump the saturation up by about 5 % in your editing software before you upload. The result will look just as lively on the canvas as it does on your screen.
And remember, a square photo canvas is more than a picture – it’s a little piece of décor that you can touch, move, and re‑hang whenever your style changes.
Step 3: Prepare Your Photo for Print
Alright, you’ve settled on size, material, and finish – now it’s time to get the image itself ready so the square photo canvas looks as good in person as it does on your phone.
Pick the right file format and resolution
Most print‑on‑demand services, including heartful.gifts, accept JPEG, PNG, or TIFF. JPEG keeps file size manageable while preserving enough detail for a crisp canvas. If you have a RAW file, export a high‑quality JPEG (maximum 12‑bit) before you upload.
Resolution is the secret sauce. Aim for at least 300 PPI (pixels per inch) at the final dimensions; that translates to roughly 1800 × 1800 pixels for a 12‑inch square. The Stackhouse guide confirms that 300 DPI is the sweet spot for archival‑quality prints according to professional printers. Anything lower and you’ll start to see softness once the canvas is stretched.
Crop to a perfect 1:1 ratio and add bleed
Square canvases need a 1:1 aspect ratio, so open your photo in any editor (Photoshop, GIMP, even a phone app) and crop the image. Don’t rush – look for a composition where the subject sits comfortably away from the very edges. Remember, the canvas will wrap around the frame, and the outer 2‑3 inches will appear on the sides.
To avoid losing important details, add a “bleed” margin. In practice, extend the canvas background by 2 inches on each side before you crop. That way, when the image is mirrored onto the frame edges (the “gallery wrap” effect), nothing vital gets sliced off. CanvasDiscount explains how the margins are mirrored or blurred on the sides when a canvas is wrapped when a canvas is wrapped.
Color profile, saturation, and final tweaks
Most online printers work in the RGB color space, so keep your file in sRGB unless the service explicitly asks for CMYK. Before you hit upload, double‑check brightness and contrast – a canvas can look a touch softer than a screen, especially on matte fabric.
One handy trick: bump the saturation of bold colors by 5 % in your editor. That tiny nudge counters the natural ink absorption of canvas and keeps reds, blues, and greens vivid after stretching (see the expert tip from the previous section). If you’re worried about skin tones, use the “shadows/highlights” sliders rather than a global saturation boost.
Real‑world walk‑throughs
Imagine you’ve got a candid of your kids splashing in a backyard sprinkler. You crop to a square, keep the kids’ faces 1 inch away from the edge, add a 2‑inch bleed of the green lawn, and boost the sky’s blue saturation by 5 %. When the canvas arrives, the wrap shows a subtle strip of grass on the sides, giving the scene a three‑dimensional feel.
Or picture a black‑and‑white portrait of grandma. Because you’re working with muted tones, you skip the saturation bump but increase the contrast by 10 % to ensure the details pop on the matte weave. The bleed in this case can be a simple white margin, so the frame’s edges stay clean.
Step‑by‑step checklist before you upload
- Save the file as a high‑quality JPEG (or TIFF if you prefer lossless).
- Confirm the image is at least 300 PPI at the final square size.
- Crop to 1:1 ratio and leave a 2‑inch bleed zone around the edges.
- Set the color profile to sRGB and do a quick brightness/contrast check.
- If you love vivid colors, increase saturation by ~5 %.
- Preview the wrap on the printer’s mock‑up tool; zoom in to verify no important detail sits in the bleed area.
- Upload the file, double‑check the preview, and hit “order”.
- Enjoy your new square photo canvas and find the perfect spot to hang it.
Once the file is uploaded, the print shop will stretch the canvas over a pine stretcher frame, mirror the bleed on the sides, and ship your square photo canvas ready to hang. In just a few days you’ll have a gallery‑ready piece that feels personal and polished.
And there you have it – a clear, hands‑on roadmap to turn any favorite snap into a stunning square photo canvas.
Step 4: Ordering and Production Tips
Alright, you’ve got the perfect square photo ready, the canvas material you love, and the finish you’ve chosen. Now comes the part that feels a little like a mini‑adventure: actually placing the order and understanding how the production line turns your file into a wall‑ready piece.
Double‑check before you click “order”
It’s easy to rush the final step, especially when you can already picture the canvas hanging above the sofa. But a quick sanity check can save you from a costly reprint.
- Verify the file size on the printer’s preview – does the image stay sharp when you zoom in 100 %?
- Confirm the bleed area is still intact. Remember those extra 2 inches that wrap around the frame?
- Make sure the color profile is set to sRGB; most print‑on‑demand services, including heartful.gifts, expect that.
If anything looks off, hit “back” and adjust before you hit the final button.
Shipping speed vs. cost
Most sites let you choose between standard (3‑5 business days) and express (1‑2 days). For a birthday gift, the extra fee for express might be worth it; for a permanent piece you can wait, you’ll save a few bucks.
Pro tip: order a test size (8×8 inches) first. It’s cheap, arrives quickly, and shows you exactly how the colors and texture behave in your home’s lighting.
Payment and discount codes
Heartful.gifts often runs seasonal promos – keep an eye on the banner at checkout. If you have a discount code, apply it before you enter your payment details; otherwise you’ll have to go through the refund loop.
And don’t forget to use a secure payment method. Most platforms accept credit cards, PayPal, or Apple Pay. Choose the one you trust most.
Production timeline – what actually happens?
Once the order is confirmed, the file is queued for printing. The printer prints the image onto the canvas, lets the ink dry for a few minutes, then stretches the fabric over a pine stretcher frame.
After stretching, a small roller smooths out any air bubbles, and the edges are tucked neatly into the back of the frame. Finally, the piece is packaged in a rigid mailer to protect it during transit.
That whole chain usually takes 24‑48 hours on a busy shop, which is why the shipping estimate adds a buffer.
Real‑world ordering scenarios
Scenario 1 – Last‑minute Mother’s Day gift. You pick a sweet family portrait, choose the 12×12 inch canvas, and select express shipping. You also apply a 10 % “MOM10” promo code you found on the homepage. The order costs $42, arrives the next day, and you’ve got a ready‑to‑hang gift that feels personal.
Scenario 2 – Home office makeover. You’re redesigning a wall and want three matching canvases. You order a set of 12×12 inch prints, opt for standard shipping to keep the budget low, and skip any discount because you’ve already used a bulk‑order coupon that gives 15 % off the total. Both examples show that the same product can fit different timelines and budgets – just pick the options that match your situation.
Quick‑reference table
| Decision | Option | Tip |
|---|---|---|
| Shipping speed | Standard vs. Express | Choose express for gifts, standard for personal projects. |
| Test print | 8×8 inches | Order cheap test to verify color and texture. |
| Discounts | Seasonal code or bulk coupon | Apply before payment; keep an eye on the homepage banner. |
So, what’s the next move? Upload your file, run through the checklist above, pick the shipping option that suits your timeline, and hit that order button with confidence.
Enjoy the new focal point and watch how it brightens the room.
Step 5: Hang and Care for Your Square Photo Canvas
Find the right spot (and get it level)
First thing’s first – where does that perfect memory belong? Walk the room with the canvas in hand, eye‑level, and imagine the flow of traffic. If you’re not sure, hold it up against a blank wall and step back; does it feel balanced or does it crowd the space?
Once you’ve picked the wall, you’ll need something sturdy yet invisible. That’s where picture hangers come in. The square‑shaped metal hooks attach right to the back of the canvas frame, give you a level line, and keep the piece secure without a mountain of nails.
So, what’s the easiest way to use them? Screw the two tiny brackets into the wooden stretcher at the top corners, hang the canvas on the built‑in hook, and use a small level to double‑check. If the hook feels wobbly, just tighten the screws a notch – you’ll be surprised how often a tiny adjustment makes the whole piece sit perfectly straight.
Mounting tricks for different rooms
Living‑room gallery? Aim for the center of the wall, leaving about 6‑12 inches of breathing room on each side. Home office? Position the canvas at eye height (roughly 57‑60 inches from the floor) so it becomes a natural focal point while you work.
And if you’re dealing with a delicate plaster wall, consider the damage‑free track systems from the same hanging‑hardware line – they let you slide the canvas left or right later without extra drills.
Protecting your square photo canvas
Canvas isn’t glass, so it won’t shatter, but dust and sunlight can dull the colors over time. A gentle dust‑off with a soft microfiber cloth every few weeks keeps the surface looking fresh. Avoid harsh chemicals; a dab of diluted dish soap on a damp cloth works fine for stubborn spots.
For UV protection, the best defense is placement. If the canvas sits near a sunny window, add a sheer curtain or a UV‑filtering film. The fabric of the canvas already absorbs a bit of light, but prolonged exposure can still fade especially bold reds or blues.
Artifact Uprising notes that regular cleaning of “square photo prints” with a dry cloth helps preserve the matte finish according to their care guide. The same principle applies to our square photo canvas – treat it like a fine piece of wall art, not a kitchen countertop.
Handling and moving
When you need to relocate the canvas, keep the frame upright – never lay it flat. Lay a clean sheet or cardboard behind the canvas, slide it out of the hook, and carry it by the frame, not the canvas surface. This prevents the fabric from stretching or developing creases.
If you’re swapping out seasonal photos, the picture‑hanger system makes it a breeze: simply release the hook, swap the canvas, and re‑hook. No new holes, no fuss.
Quick checklist before you step back
- Choose a wall with good eye‑level and enough surrounding space.
- Install square picture hangers on the top corners of the frame.
- Use a level to ensure the canvas sits perfectly straight.
- Dust regularly with a soft microfiber cloth.
- Shield from direct sunlight or use UV‑filtering window treatments.
- When moving, keep the canvas upright and support the frame.
And remember, a well‑hung square photo canvas not only showcases your memory, it becomes a conversation starter. If you’re still looking for inspiration, check out our square wall art collection for ideas on layout and pairing multiple pieces.
Now you’ve got the hanging and care basics covered. Grab those hangers, find that perfect spot, and let your canvas do the talking – all while staying vibrant for years to come.
Step 6: Creative Ideas and Uses
Now that your square photo canvas is hanging and looking fresh, it’s time to let it do more than just sit pretty. What if that one piece could become a little hub for memories, moods, and even a bit of DIY fun?
Mix‑and‑match a gallery wall
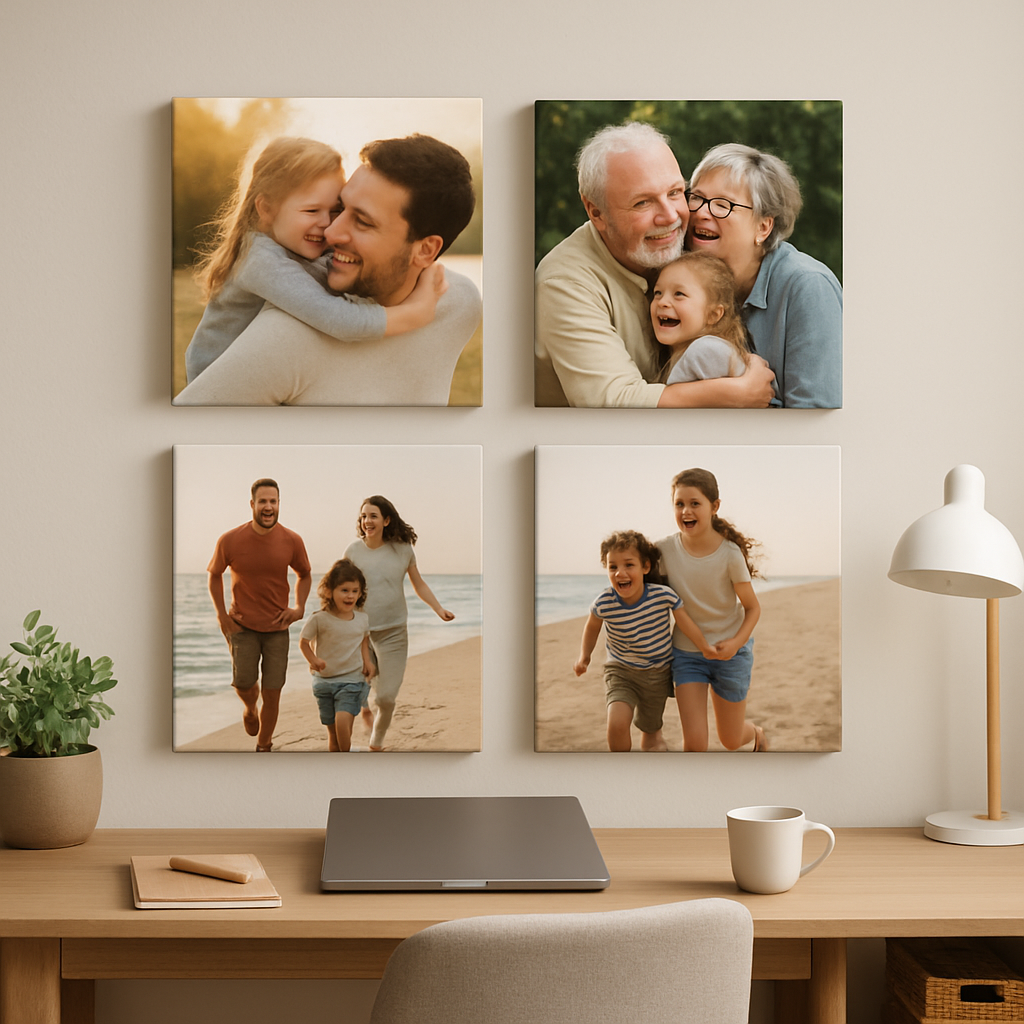
Start by grouping three or four canvases in a loose grid. Keep the spacing even – about two inches between each frame works well – and let each photo tell its own chapter while the whole wall feels like a story. You don’t need a rigid layout; a slightly “off‑beat” arrangement feels lived‑in and inviting.
Think about pairing a family portrait with a map of a favorite vacation, a quirky pet snap, and a bold graphic print. The square shape ties everything together, but the variety keeps the eye moving.
Seasonal swaps made easy
Because the picture‑hanger system lets you unhook the canvas in seconds, you can rotate themes with the seasons. A bright beach sunrise for summer, a cozy cabin scene for fall, and a twinkling holiday lights collage for winter. No new holes, no fuss – just a quick swap and you’ve refreshed the whole room.
Pro tip: keep a small storage box behind the sofa with the extra canvases you plan to rotate. That way you never scramble for a new print when the season changes.
Bathroom boost
Ever walked into a bathroom that feels…blank? A square photo canvas can turn that functional space into a personal gallery. A parent shared how they printed baby bath‑time photos on a 24" × 24" canvas and hung it above the tub – the kids loved seeing themselves every morning according to a DIY enthusiast’s tutorial. The key is to choose a moisture‑resistant spot and avoid direct steam.
Use a waterproof frame or add a clear acrylic shield if you’re worried about humidity. The result is a splash‑of‑joy that makes the room feel less like a chore zone.
Kids’ playroom pop‑ups
Kids love seeing their own artwork on the wall. Print a photo of a hand‑drawn masterpiece, or a snapshot of a recent craft project, and stretch it onto a square canvas. Hang it at their eye level and watch confidence soar each time they point out “my picture!”
Because the canvas is lightweight, you can swap it out as their interests shift – dinosaurs today, space rockets tomorrow.
Personalized gifts that feel handmade
When you’re looking for a thoughtful present, a square photo canvas of a favorite memory beats a generic mug. Think of a couple’s first dance, a grandparent’s anniversary, or a pet’s goofy grin. Add a subtle border of “wrapped” image on the sides for that gallery‑wrap effect, and you’ve got a gift that looks like it was custom‑made in a studio.
Wrap‑around edges work especially well for landscapes – the sky or shoreline can continue onto the frame, giving the illusion of a larger scene.
Creative DIY twists
If you enjoy a little hands‑on crafting, treat the canvas as a base for mixed media. Paint a thin stripe of color around the edge, apply Mod Podge for a glossy finish, or even stencil a short quote in the center. The underlying photo stays visible, but you’ve added a personal touch that feels like a collaboration between you and the printer.
Just remember to let each layer dry fully before moving on – patience here prevents smudges.
Quick‑check checklist for creative uses
- Choose a theme (gallery, seasonal, bathroom, kids, gift).
- Plan spacing and layout on the floor before hanging.
- Use the built‑in picture‑hanger for easy swaps.
- Consider moisture‑resistant placement for bathrooms.
- Add DIY accents only after the canvas is fully stretched.
- Store extra canvases in a flat, dry box for future rotations.
So, what’s your next move? Grab a favorite snapshot, picture how it could brighten a space, and give it a square canvas home. The possibilities are endless, and the effort is surprisingly low – that’s the magic of a square photo canvas.
FAQ
What size square photo canvas works best for a living‑room wall?
Most families find a 12×12‑inch canvas hits the sweet spot – it’s big enough to be a focal point without overwhelming the space. If your wall is wider than four feet, you can step up to 16×16 inches for a bit more drama. Measure the area, leave a few inches of breathing room on each side, and picture the canvas at eye level. That quick visual test usually tells you if the size feels right.
Can I put my own photo with a quote or text on a square photo canvas?
Absolutely. Upload the image with the text already baked in using any photo editor you like. Just make sure the text stays at least an inch away from the edges, because the canvas will wrap around the frame and the outer 2‑3 inches get mirrored. A little extra margin prevents any important words from disappearing on the sides.
How do I keep the colors looking vibrant after the canvas is printed?
Canvas absorbs ink a bit differently than glossy photo paper, so it’s normal for colors to look a shade softer at first. A simple trick is to boost saturation by about 5 % in your editor before you upload – especially for reds, blues, and greens. Also, choose a matte‑woven texture for portraits; it adds depth and helps the hues pop without a shiny glare.
Is a square photo canvas safe for humid places like a bathroom?
Canvas itself handles a little moisture, but prolonged steam can fade the ink over time. If you want a bathroom‑friendly piece, pick a spot away from direct shower spray and consider a thin acrylic shield or a UV‑filtering film on the window. Many homeowners hang a 12×12‑inch canvas on a towel‑rack wall and it stays vibrant for years with just a light dust‑off now and then.
What’s the easiest way to hang a square photo canvas without damaging the wall?
Use the built‑in picture‑hanger that comes with the pine frame – it’s just two tiny metal brackets you screw into the back of the stretcher. Attach a single hook to the wall, hang the canvas, and level it with a small spirit level. If you rent or don’t want holes, a damage‑free adhesive strip works fine for the lightweight canvas.
Can I order a custom border or wrap‑around effect for my square photo canvas?
Yes, most print‑on‑demand services, including heartful.gifts, let you add a “bleed” area when you edit the file. Extend the background 2‑3 inches beyond the square so the image continues onto the frame edges. The result is a seamless gallery‑wrap look that makes a landscape feel like it’s spilling out of the canvas.
How long will it take to get my square photo canvas after I place the order?
Standard production usually runs 24‑48 hours once the file is approved, then shipping adds another 3‑5 business days for the economy option. If you need it fast for a birthday or holiday, most sites offer an express‑ship upgrade that delivers in 1‑2 days after production. Always double‑check the checkout page for the latest timelines before you hit “order”.
Conclusion
We've walked through every step of turning a favorite snap into a square photo canvas you can actually feel proud of. From picking the right size and material, to prepping the file, ordering, hanging, and even dreaming up creative ways to display it – you now have a complete roadmap.
Remember the three things that make the difference: choose a matte‑woven or smooth finish that matches your image, add a 2‑inch bleed so the wrap‑around looks seamless, and use the built‑in picture‑hanger for a hassle‑free, damage‑free install. Those tiny details keep the canvas looking crisp and vibrant for years.
So, what's the next move? Grab that photo you've been scrolling past, crop it to a perfect square, bump the saturation just a touch, and hit order. If you’re unsure, order the cheap 8×8 test print – it’s the fastest way to see color and texture in your own lighting.
When the canvas arrives, give it a moment on the wall, step back, and notice how it changes the room’s vibe. A square photo canvas isn’t just décor; it’s a personal story you get to share every day. Ready to make your walls talk? Let’s get printing. Your home will thank you for the personal touch.