
Create Your Own Custom Photo Collage Phone Case: A Friendly Step‑by‑Step Guide
Ever pulled out your phone and thought, “I wish this thing could tell a story instead of just scrolling endless feeds?” You’re not alone – most of us love a gadget that feels personal, like a little photo album you can carry in your pocket.
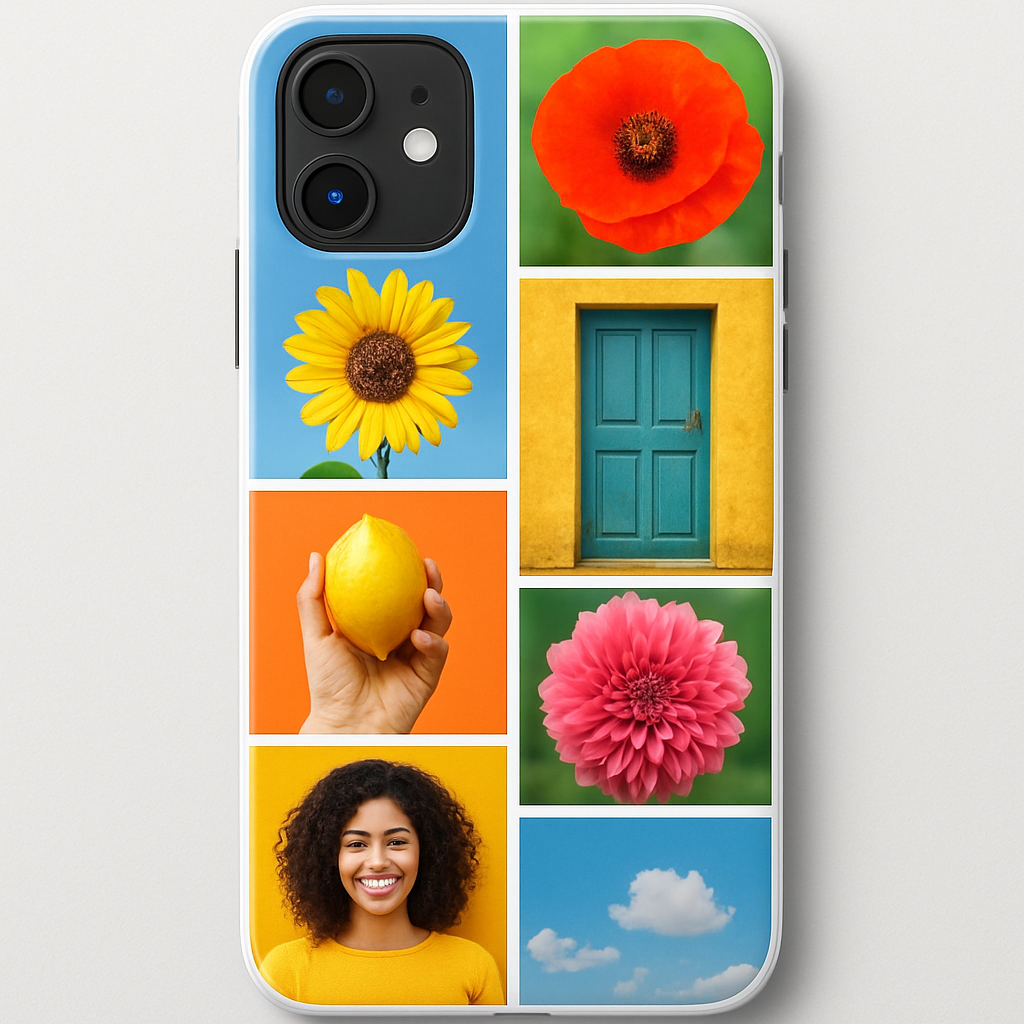
That’s where a custom photo collage phone case steps in. Instead of a bland, solid‑color cover, you stitch together dozens of memories – a family vacation, a newborn’s first smile, that goofy birthday cake photo – and the result becomes a portable scrapbook you actually use every day.
But it’s not just about looking good. Studies show that visual reminders can boost mood by up to 30 % and help you stay connected to the people you love, especially when you’re stuck in a meeting or on a commute.
So, how do you turn a random pile of photos into a case that feels like it was made just for you? First, pick a theme that ties the images together – maybe “summer adventures” or “little moments of joy.”
Next, trim each picture to the same aspect ratio – most phone cases use a 1:1 square or a 9:16 rectangle. Free tools like Canva or the built‑in editor on Heartful’s site let you crop, adjust brightness, and add a subtle border so everything lines up nicely.
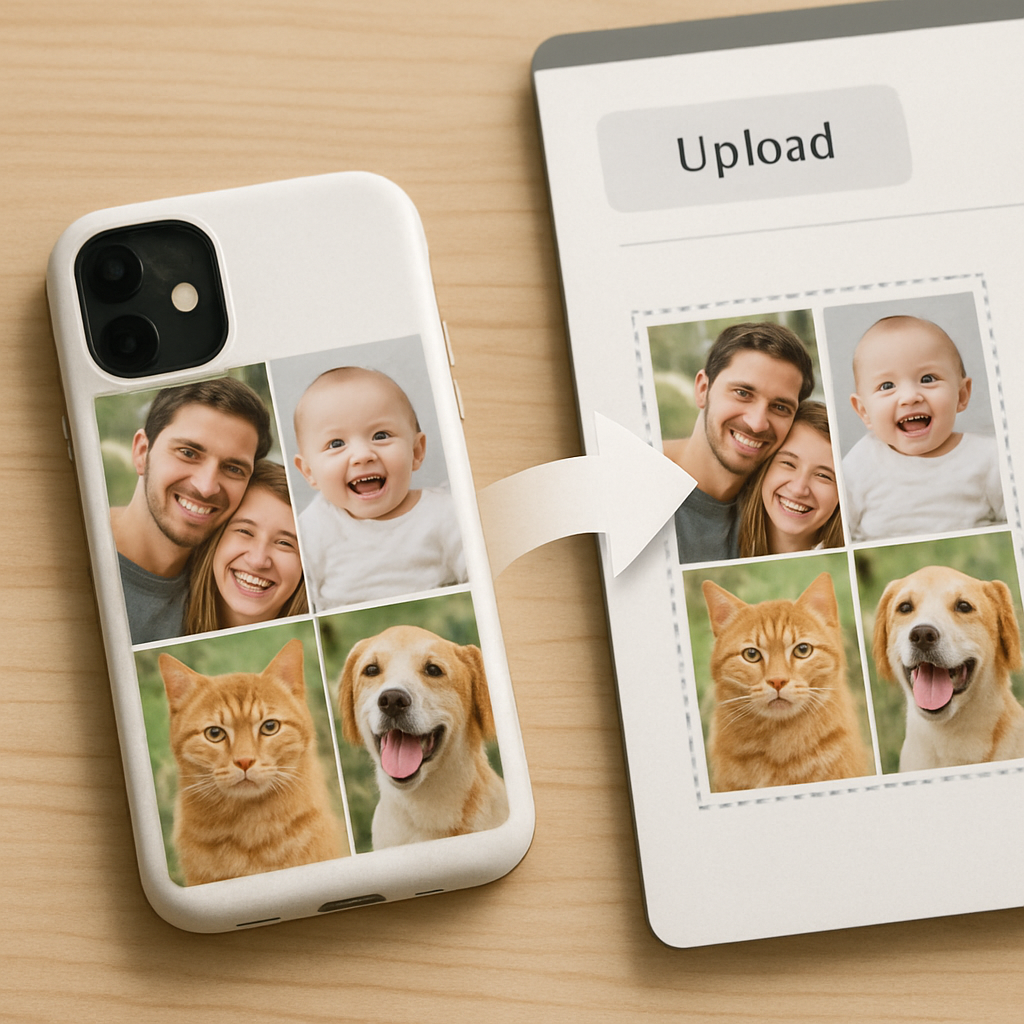
Then upload the collage, choose your phone model, and preview how the edges wrap around the camera and buttons. If a picture gets cut off, just drag it a millimeter left or right – the preview updates instantly, so you can fine‑tune until it looks perfect.
Here’s a quick checklist to keep you on track: ① Select 6–9 high‑resolution photos; ② Keep a consistent color palette; ③ Add a thin white or black border for separation; ④ Double‑check the camera cut‑out; ⑤ Order a test case if you’re unsure.
Need step‑by‑step guidance? How to Design a Personalized Photo Phone Case That Stands Out walks you through every click, from choosing the perfect layout to ordering the final product, so you never feel stuck.
Finally, think of the case as part of a larger gift set – pair it with a timeless present like a handcrafted wooden toy from Poppa's Wooden Creations for a truly memorable bundle that kids and parents will treasure.
TL;DR
A custom photo collage phone case transforms your device into a portable memory album, letting you showcase cherished moments while protecting your phone in style. Follow our checklist—choose 6‑9 high‑resolution photos, keep a consistent palette, add a thin border, preview the cut‑outs, and order a test case to ensure perfection.
Step 1: Choose Your Photos
Okay, picture this: you’re scrolling through your camera roll and a flood of moments washes over you – that sunrise on the beach, your kid’s first steps, the goofy pizza‑party selfie. It feels good, right? That’s the spark we need to start building your custom photo collage phone case.
First thing’s first – decide how many images you actually want. Most cases look clean with 6‑9 high‑resolution shots. Anything less feels sparse, anything more can get cramped. Pick photos that are at least 1500 px on the longest side; you don’t want a blurry patch when the case hits the light.
Now, think about the vibe. Are you going for a bright summer vibe, a muted pastel mood, or maybe a bold monochrome look? Choose a consistent colour palette – it’s like picking a paint colour for a room; the whole thing feels cohesive when the shades speak the same language.
Do you have a favorite frame style? A thin white or black border between images can give each picture its own breathing room without stealing the spotlight. If you’re unsure, try a subtle 2‑pixel border – it’s enough to separate but not distract.
Here’s a quick sanity check: grab each photo and look at it on a phone screen. Does it still pop at a small size? If a detail disappears, consider swapping it for a simpler shot. Remember, the case will wrap around the camera cut‑out, so avoid placing key subjects right at the edges.
What about storytelling? Arrange the pictures so they flow like a mini‑album – start with a strong opener (maybe a wide‑angle landscape), then weave in close‑ups, and finish with a feel‑good group shot. This order helps the eye glide across the case rather than jumping around.
Need a visual aid? The Scalio app lets you drag‑and‑drop thumbnails, preview the exact layout, and even see how the case’s curve will affect each image. It’s a lifesaver when you’re stuck on whether a smile will get cut off.
Take a breath and look at the collage you’ve just assembled. Does it feel like a story you’d want to show off every time you pull out your phone? If something feels off, shuffle the order – the magic is often in the small tweaks.
Don’t forget to consider the little extras that can turn a simple case into a heartfelt gift. Pairing your custom phone case with a handcrafted wooden toy from Poppa's Wooden Creations adds a tactile, warm touch that says “I thought about you.” It’s a sweet combo that makes the whole package feel curated.
If you’re into unique finishes, you might want to peek at what GHO Sydney is doing with textured prints. While they’re not a direct competitor, their approach to material feels can inspire you to pick a matte or glossy coating that matches your photo vibe.
Before you hit “order,” do a final pass:
- All photos are high‑resolution?
- Colour palette stays consistent?
- Border is subtle but present?
- Key subjects aren’t hidden behind the camera cut‑out?
If the answer is “yes” to most, you’re ready to upload your collage and let the case printer work its magic.
Step 2: Design Your Collage Layout
Alright, you’ve got your favorite 6‑9 photos lined up and they all share a vibe. Now comes the fun part: arranging them so the case looks like a purposeful story, not a haphazard scrapbook.
Pick a Grid That Matches Your Phone
If you’re using an iPhone 13, the case surface is roughly a 9:16 rectangle. Most designers default to a three‑by‑three grid for square‑ratio phones, but a 2‑by‑4 layout works better for taller screens. The rule of thumb? Count the “slots” the case offers, then match your photo count to fill them without leaving awkward gaps.
Example: Emma wanted a gift for her dad’s iPhone 14. She chose a 2‑by‑4 grid because the extra vertical space let her showcase a sunset, a fishing trip, a family portrait, and three candid moments without crowding.
Play With Alignment and Overlap
Most design tools – Heartful’s editor, Canva, or even the PixlyCase builder – let you drag each image freely. Start by snapping photos to the invisible grid lines, then experiment with a tiny overlap of 1‑2 mm. Overlap can create a seamless “wrap‑around” effect where the collage continues onto the case’s sides.
Pro tip: keep the overlap away from the camera cut‑out. If a photo’s edge drifts into the lens area, the picture will be partially hidden. A quick way to check? Turn on the “safe zone” overlay (many editors label it with a dotted rectangle).
Real‑World Example
Mark was designing a collage for his sister’s new Samsung Galaxy S23. He placed a bright beach photo right next to the camera cut‑out, but the tool’s safe‑zone highlighted that the horizon would be cut off. He nudged the image a millimeter left, and the whole scene stayed visible – a tiny tweak that made the whole case feel intentional.
Use Borders and Spacing Wisely
A thin white or black border can act like a visual separator, especially when your photos have wildly different brightness levels. Most platforms let you set the border width in pixels; 2‑3 px is enough to give each picture breathing room without making the collage look “boxed.”
If you prefer a more fluid feel, try a “margin” of 0 px and let the images touch. This works best when the photos share a common color palette – think pastel spring shots or monochrome black‑and‑white family portraits.
Test Different Collage Styles
Many services offer pre‑made templates: classic grid, mosaic, heart shape, or even a “free‑form” layout where pictures can rotate slightly. Choose a style that mirrors the story you want to tell. A heart‑shaped collage, for instance, is perfect for a romantic anniversary gift, while a mosaic works great for a travel diary.
Here’s a quick checklist you can follow while you experiment:
- Select a grid that matches your phone’s aspect ratio.
- Place photos, then check the safe‑zone around the camera.
- Decide on border width (2‑3 px) or go border‑less for a seamless look.
- Try at least two template styles before settling.
- Preview on both front and back of the case (if the tool allows).
Final Fine‑Tuning Before You Hit “Save”
Zoom in to 200 % and look for any stray edges that bleed into the case’s edges. A clean edge means the print will be sharp, not fuzzy. Also, double‑check resolution – if any image looks pixelated at 200 %, replace it with a higher‑resolution version.
When everything feels balanced, lock the layout and take one last screenshot. That screenshot becomes your reference point if you ever need to recreate the design or share it with a friend who wants the same look.
And that’s it – you’ve turned a handful of photos into a polished layout that will wrap around your phone like a personal museum. Ready to upload and pick a case material? The next step is just a click away.
Step 3: Select a Phone Case Template
Now that your photos are trimmed and arranged, the next decision feels a bit like picking a frame for a favorite painting. The template you choose will shape how the collage wraps around your device, so it’s worth pausing a second to feel it out.
Why the template matters
Think of a template as the skeleton that holds your memories together. A grid‑style template gives you clean lines and symmetry, perfect for a sleek, professional look. A mosaic or free‑form template, on the other hand, lets the images bleed into each other, creating a more organic, story‑telling vibe. The choice changes the mood of the whole case – formal versus casual, structured versus playful.
And it’s not just about aesthetics. Different templates handle the camera cut‑out, button placements, and side‑wrap differently. A template that pushes images right up to the edge might look amazing on the front, but if it sacrifices the safe‑zone around the lens, you’ll lose a key photo.
Common template families
Classic grid – rows and columns line up perfectly; great for uniform photo sizes and a tidy feel.
Mosaic – pieces of varying size interlock like a puzzle; ideal when you have a mix of portrait and landscape shots.
Heart or shape‑based – the collage forms a recognizable silhouette; works wonderfully for romantic gifts or themed occasions.
Wrap‑around – the design continues onto the sides of the case, giving a 360° visual experience; perfect if you want every angle to tell a story.
Step‑by‑step template selection
1. Open the case‑design tool and look for a “Template” or “Layout” tab. Most platforms, including Heartful’s editor, list the families above as thumbnails.
2. Hover over each thumbnail – a quick preview usually shows how the safe‑zone is highlighted. Notice where the camera cut‑out sits and whether any images are clipped.
3. Pick the template that matches the vibe you’re after. If you’re designing for a parent who loves order, go with the classic grid. If you’re surprising a teen who’s into street art, try the mosaic.
4. After selecting, drag your photos into the placeholder slots. The tool will auto‑snap them, but you can still nudge each picture a millimeter left or right to keep the subject away from edges.
5. Zoom in to 200 % and inspect the borders. If you see any stray pixels bleeding into the camera area, switch to a template with a wider safe‑zone or reduce the image size slightly.
Quick checklist for template sanity
- Does the template respect the camera cut‑out?
- Are the side edges clean or do they bleed into the phone’s frame?
- Is there enough space for borders if you like them?
- Does the style match the emotional tone of your photos?
- Can you preview the back of the case (if the tool offers it)?
When everything lines up, lock the layout. Many editors let you save a draft, so you can come back later or share a screenshot with a friend for a second opinion.
One thing many people overlook is material compatibility. Some templates look perfect on a matte silicone case but lose detail on a clear, glossy finish. If you’re leaning toward a clear case, pick a template with bolder borders or higher contrast so the images don’t get swallowed by the background.
The good news is that most custom providers use high‑definition printing ensures vivid images, keeping colors sharp even on glossy surfaces.
Lastly, remember that you can always switch templates later – the design tool won’t lock you in until you hit “Save” or “Add to Cart.” So feel free to experiment; the only downside is a few extra clicks.
Ready to lock in your design? The next step will walk you through choosing the case material and placing your order, turning that digital collage into a real‑world keepsake.
Step 4: Upload & Arrange Images
Okay, you’ve nailed the layout on your laptop or in a collage app – now it’s time to get that masterpiece onto the case designer. This part feels a bit like sliding a photo into a frame; you want it to sit just right, not wobble.
Choose the right upload method
Most custom case tools give you three ways to bring your collage in:
- Drag‑and‑drop from your desktop.
- Click “Browse” and select the file from your Downloads folder.
- Pull it straight from a cloud service (Google Drive, Dropbox) or a mobile app.
If you’re already fiddling with InCollage app on your phone, you can hit “Export” and choose the same cloud account you’ll use in the case builder – no extra steps.
Mind the file specs
Before you click “Upload,” double‑check these basics:
- Resolution: at least 1080 px on the shortest side.
- File type: PNG or high‑quality JPG (avoid heavy compression).
- Color profile: sRGB works best for most printers.
If the file is too small, the printer will stretch it and you’ll end up with a fuzzy portrait of your dog. Trust me, that’s a vibe kill.
Arrange inside the designer
Once the collage lands on the canvas, you’ll see a safe‑zone overlay. This is the area that stays visible after the case wraps around the camera and buttons. Here’s a quick walk‑through:
- Zoom in to 200 % – you’ll spot any stray pixels that bleed into the camera cut‑out.
- Grab the collage and nudge it with the arrow keys or mouse. A millimeter shift can mean the difference between a clear lens and a hidden smile.
- If the tool lets you layer, place a subtle border or shadow behind the collage; it adds depth and keeps edges crisp.
- Toggle the “preview back” view if available. A back‑case preview helps you see whether the design will look good when you flip the phone over.
Pro tip: keep the collage’s center of mass slightly off‑center. Our eyes love a little asymmetry, and it hides any tiny cropping quirks around the edges.
Save a draft before you commit
Almost every platform has a “Save Draft” button. Hit it. Then send the draft link to a friend or open it on a different device. Fresh eyes often catch a photo that’s half‑cut off or a border that looks too thin.
And remember – you’re not locked in until you click “Add to Cart.” Feel free to swap the collage for a different one if you get a better idea later.
Quick decision table
| Upload Option | Best For | Notes |
|---|---|---|
| Drag‑and‑drop | Desktop users who have the file ready | Fast, but watch for browser file‑size limits. |
| Browse & select | Anyone who prefers a classic file picker | Works on all browsers, no extra software. |
| Cloud import | Mobile‑first creators using apps like InCollage | Keeps workflow in one place; ensure the cloud folder is synced. |
So, what’s the next move? Upload your collage, fine‑tune the placement, and lock the layout. Once you’re happy, the case material selection step is just a click away.
Take a breath, hit “Upload,” and watch your memories snap onto the case like magic.
Step 5: Order and Care for Your Custom Phone Case
Confirm the design before you click
At this point you’ve dragged, dropped, and fine‑tuned every picture, so take a breath and give the preview one last once‑over. Does the camera cut‑out show the right smile? Are the borders where you want them, or does a photo peek out of a corner?
Most tools let you lock the layout, but they also let you save a draft. Hit that button, send the link to a friend, or open it on your phone – a fresh pair of eyes often spots a stray pixel you missed.
Pick the material that matches the vibe
Do you want a soft‑touch matte that feels like a cloud, or a glossy clear case that lets the collage shine through? Matte silicone is great for a cozy grip, while a hard polycarbonate finish protects against drops without adding bulk.
If you’re gifting a kid, consider a TPU (thermoplastic polyurethane) case – it’s flexible, shock‑absorbent, and easy to snap on and off. For a sleek, adult‑oriented gift, a clear acrylic case lets the photos be the star.
Enter the checkout – no surprises
Now you’re ready to hit “Add to Cart.” Double‑check the phone model dropdown – a tiny mismatch (iPhone 13 vs 13 Pro) can shift the whole layout. Most sites show a final mock‑up with the exact dimensions; if something looks off, hit “Back” and adjust.
Enter your shipping details, choose a delivery speed, and apply any promo code you’ve saved. Many print‑on‑demand shops offer a “test case” option – it costs a bit more, but you get a physical sample before you order a batch for a family.
What to expect after you order
Production usually takes 2‑5 business days. You’ll get an email with a tracking number once the case leaves the printer. If the print looks fuzzy or the colors are off, most providers have a hassle‑free return policy within 14 days – keep the packaging until you’re sure you love the final product.
First‑day care tips
When the case arrives, resist the urge to wipe it with a harsh cleaner. A soft, lint‑free cloth lightly dampened with water (or a tiny dab of phone‑safe screen cleaner) is enough to remove fingerprints.
Avoid alcohol, ammonia, or abrasive sponges – they can strip the protective coating and make the collage look dull over time.
Protect the edges
The corners of a case take the brunt of drops. If you notice a chip, a quick dab of clear nail polish can seal the crack and keep moisture out.
For silicone or TPU cases, a gentle massage with your fingertips helps the material settle and improves grip.
Heat and sunlight
Custom prints can fade if they sit in direct sun for weeks on end. Try to keep the phone out of a car dashboard on hot days, and don’t leave it on a windowsill for prolonged periods.
If you love a beach day, rinse the case with fresh water afterward – salt can leave a gritty film that dulls the images.
Long‑term maintenance checklist
- Wipe the case weekly with a microfiber cloth.
- Inspect the camera cut‑out for debris; a quick puff of air clears dust.
- Rotate the case every few months – flipping it upside‑down lets the print “breathe” and reduces uneven wear.
- When you upgrade phones, keep the case as a keepsake; many people frame their favorite collage once the device retires.
And there you have it – from confirming the design to keeping the case looking fresh for months. A well‑cared‑for custom photo collage phone case isn’t just protection; it’s a portable memory gallery you’ll reach for again and again.
Conclusion
So there you have it – a custom photo collage phone case isn’t just a protective shell, it’s a pocket‑sized memory board that reminds you why you fell in love with those moments.
We started by hunting down the six to nine photos that make you smile, trimmed them to the same aspect ratio, and gave them a thin border so they flow together. Then we chose a grid or mosaic template that fits your phone’s shape, nudged the images away from the camera cut‑out, and gave the whole thing a quick once‑over before hitting “save.”
After that, you picked the material that feels right in your hand – matte silicone for a soft grip or clear polycarbonate to let the collage shine – and placed the order. The production window is only a few days, and most shops ship with tracking so you can watch your keepsake travel from printer to doorstep.
Keeping it looking fresh is simple: wipe it weekly with a microfiber cloth, protect the corners with a dab of clear nail polish if they chip, and avoid leaving it in scorching sun for weeks. Rotate the case every few months so the print “breathes” and wear stays even.
Now that you know the whole process, why not turn that stack of photos on your phone into a custom photo collage phone case today? It’s the perfect personal gift for a parent, a spouse, or even yourself – a daily reminder that the best stories are the ones you carry with you.
FAQ
How long does it take to receive a custom photo collage phone case?
Most print‑on‑demand shops need 2–5 business days to print your design, then a standard carrier adds another 3–7 days for delivery. If you choose expedited shipping, you can see the case on your doorstep in as little as 48 hours. Keep an eye on the tracking link you’ll get once the order leaves the printer.
Can I preview the case before I hit “Add to Cart”?
Absolutely. The design tool shows a live mock‑up that wraps around the camera cut‑out and button holes. Flip the view to see the back of the case, and use the safe‑zone overlay to make sure no smile gets sliced off. If anything looks off, you can adjust the collage right there and save a draft before committing.
What photo resolution should I use for the best print quality?
Aim for at least 1080 px on the shortest side and 300 dpi if you can. That keeps the images crisp when they’re enlarged onto the case surface. Export as a high‑quality JPG or PNG, and avoid heavy compression – a blurry file will stay blurry after printing, no matter how good the template is.
Will the custom case still protect my phone from drops?
Yes. Most providers let you choose between matte silicone, TPU, or hard polycarbonate. Silicone and TPU absorb shocks and give a grippy feel, while polycarbonate adds a rigid shield that resists scratches. Whichever material you pick, the case still meets the standard drop‑test ratings for the phone model you selected.
How should I clean and maintain my custom photo collage phone case?
Wipe it gently with a lint‑free microfiber cloth dampened with a little water or a phone‑safe cleaner. Skip alcohol, bleach, or abrasive sponges – they can wear down the printed image. For silicone or TPU, give the edges a quick massage after a few weeks; it helps the material settle and improves grip.
Can I order a test case before buying a larger batch?
Many shops offer a “sample” or “test” option for a few extra dollars. It’s a smart move if you’re gifting dozens or want to double‑check colour fidelity. Order the test, compare it to your screen, and if everything looks good you can place the full order with confidence.
Is my personal photo safe when I upload it to the design platform?
Reputable print‑on‑demand services use SSL encryption for file transfers and store images only for the duration of the order. They don’t share your photos with third parties unless you explicitly grant permission. After the case ships, most platforms delete the files automatically, so your memories stay private.