
Create Custom Face Wrapping Paper: A Friendly Step‑by‑Step Guide
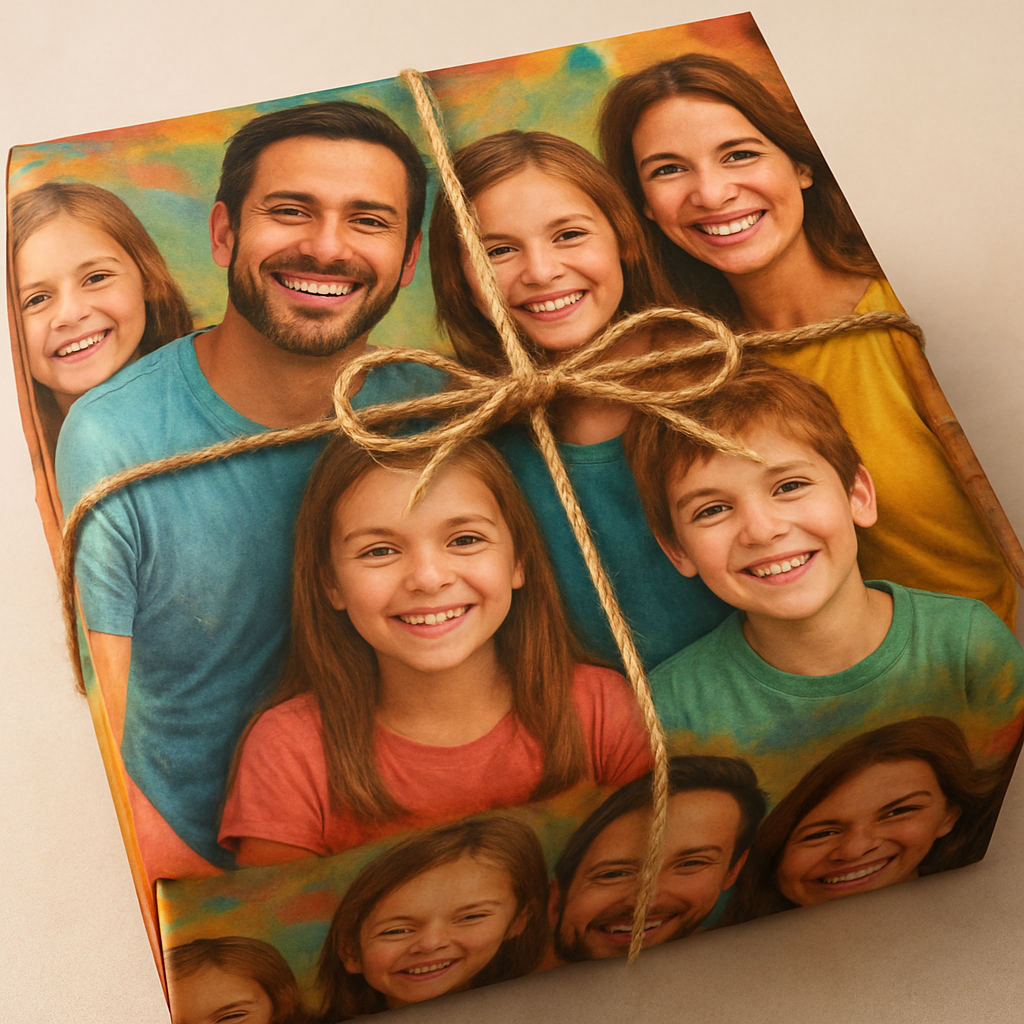
Ever unwrapped a gift and thought, ‘What if the wrapping itself could show the smile of the person inside?’ That little spark of surprise is exactly what custom face wrapping paper does.
Imagine you’re a parent hunting for a birthday surprise for your teen, and the paper itself flashes their favorite selfie. It turns a simple box into a memory you can hold.
In our experience at heartful.gifts, the reaction is immediate – eyes widen, a grin spreads, and the gift feels personal before it’s even opened.
But why settle for ordinary paper when you can print a loved one’s face across the whole sheet? It’s like wrapping a hug around the present.
Custom face wrapping paper isn’t just for birthdays. Think holidays, anniversaries, or a “just because” note for your spouse – a tiny, everyday celebration of who they are.
The process is surprisingly simple. Upload a clear photo, choose the paper size, and let the printer do the magic. You’ll get a roll that looks like a collage of smiles.
And if you’re a gift buyer worried about quality, rest easy – the paper is sturdy enough for shipping yet soft enough to feel premium when you hold it.
One tip we’ve seen work wonders: match the color palette of the photo to the occasion. A warm, golden tone for a wedding, bright neon for a teen’s party.
You might wonder about the cost. Because it’s print‑on‑demand, you only pay for what you need – no bulk orders, no waste.
So, whether you’re looking to wow a spouse, make a child’s birthday unforgettable, or just add a personal touch to a corporate gift, custom face wrapping paper gives you that extra layer of love.
Ready to try it? Grab a photo that means something, and let the paper do the storytelling. Your next gift will feel like a memory you can unwrap.
Let’s dive in and explore how you can design, order, and personalize custom face wrapping paper for any occasion.
TL;DR
Custom face wrapping paper lets you turn a favorite photo into a full‑sheet gift wrap, so the present feels personal before it’s even opened.
With an upload, size selection, and print‑on‑demand service, you can create a one‑of‑a‑kind wrap for birthdays, holidays, or just‑because moments that truly reflect your love.
Step 1: Choose Your Design Theme
Okay, picture this: you’ve just grabbed a favorite selfie of your teen, a sweet portrait of grandma, or even a goofy pet snap. The next move? Deciding what vibe the wrapping paper should carry. That’s the heart of “choose your design theme.”
Feel the Moment
First, ask yourself what emotion you want the paper to whisper when someone lifts the lid. Is it playful excitement for a birthday bash? Warm nostalgia for a wedding anniversary? Or calm reassurance for a new‑born baby’s first birthday? When the feeling is clear, the visual theme falls into place.
And here’s a tiny trick: write that emotion on a sticky note and keep it on your desk while you browse photos. Seeing the word “joy” or “cozy” right there nudges your brain toward colors and patterns that actually match.
Match Colors to the Occasion
Colors are the quickest shortcut to mood. Bright citrus tones scream summer fun, while muted golds whisper elegance. If you’re wrapping a graduation gift, think school colors or the grad’s favorite shade. For a holiday gathering, traditional reds and greens work, but you can also flip it—soft teal for a modern twist.
Pro tip: pull the dominant hue from the photo itself and use it as the background color of the wrap. It creates a seamless flow, like the picture is spilling out of the paper.
Consider Photo Composition
Not every photo works as a repeat pattern. Look for images with clean backgrounds and good contrast. A close‑up face with a neutral backdrop repeats nicely; a busy street scene will get lost when tiled. If you have a group shot, crop to the faces you love most and let the software fill the rest.
Sometimes, a simple black‑and‑white portrait adds a timeless feel, especially for formal events. Other times, a splash of color in the subject’s clothing can become the accent that ties the whole sheet together.
So, what should you do next? Grab three potential photos, test each in a small mock‑up, and see which one makes you smile the most. That smile is your green light.
After you’ve settled on a theme, think about the practical side: paper size and orientation. Most of our customers start with a standard 24‑inch roll, which fits most gift boxes. If you’re wrapping a large present, consider ordering a custom width—our print‑on‑demand service handles it without waste.
When the theme is locked, think about the paper’s texture. Matte finishes let colors stay soft, while glossy surfaces make faces pop like a photo album. For kids’ parties, a slightly thicker, semi‑gloss paper stands up to enthusiastic handling. And if you’re sending a gift across the country, our sturdy, tear‑resistant stock ensures the wrap arrives pristine.
Finally, give yourself a quick checklist before you hit "order."
- Emotion defined (joy, elegance, calm)
- Color palette aligned with photo
- Photo has clean composition
- Paper size matches your gift
Enjoy the personal touch it brings.
If every box is ticked, you’re ready to move on to the next step: uploading your image and fine‑tuning the layout. Trust us, once you see the finished roll roll out of the printer, you’ll feel that same excitement you imagined at the start.
Step 2: Capture High‑Quality Face Images
Alright, you’ve nailed the theme, now it’s time to bring the star of the show – the faces – into crystal‑clear focus. A blurry grin or a shadowed cheek can make even the most beautiful design feel cheap, and nobody wants that when they’re about to wrap a gift for a loved one.
1. Pick a Photo That Actually Shows the Face
Start with a picture where the subject’s eyes, nose, and mouth are fully visible. Close‑ups work best; think of a passport photo without the stiff pose. If you’re a parent, a candid shot of your kid laughing while blowing out birthday candles often hits the sweet spot – you get a natural expression and the lighting is already flattering.
Pro tip: avoid photos taken through glasses or sunglasses. The reflection can turn the eyes into mirrors, and the print will struggle to reproduce that sparkle.
2. Light It Right
Natural daylight is your friend. Position the person near a window on a cloudy day, or step outside in the early morning or late afternoon. The soft, diffused light reduces harsh shadows that can make the skin look blotchy.
What if you only have indoor lighting? Turn on as many lamps as you can, but steer clear of direct flash. A cheap trick is to bounce a white sheet of paper off the ceiling to soften the light – it’s the same principle photographers use.
3. Keep the Background Simple
A plain, neutral background (white, light gray, or a subtle pastel) lets the face stand out. If you’re wrapping a gift for a spouse, a soft beige wall works fine; for a teen’s birthday, a bold teal backdrop can add a pop of color without stealing the spotlight.
And remember, busy patterns can confuse the printer’s software, leading to a grainy final product.
4. Technical Specs – Size, Resolution, Format
Aim for a minimum of 300 dpi (dots per inch). That means if you’re cropping a 4 × 5 inch headshot, the file should be at least 1200 × 1500 pixels. JPEG works for most cases, but if you have a PNG with a transparent background, that gives you extra flexibility for layering later.
If your camera or phone lets you shoot in “RAW,” grab that file and convert it to JPEG at the highest quality setting. RAW retains more detail, which translates into sharper prints.
5. Do a Quick Test Print
Before you upload the full‑resolution file, print a single 8 × 11 inch sheet on regular paper. Hold it up next to the original photo; can you still read the expression? If the colors look off, adjust the exposure in a free editor like GIMP or your phone’s built‑in editor.
This low‑cost step catches issues early and saves you from re‑ordering a whole roll of paper.
6. Checklist Before You Hit Upload
- Is the face centered and filling most of the frame?
- Did you shoot in natural light or use diffused artificial light?
- Is the background plain enough to avoid visual noise?
- Is the file at least 300 dpi and saved as a high‑quality JPEG?
- Did you run a test print and confirm the details look sharp?
Cross‑checking these items usually means you’ll end up with a wrap that feels like a hug, not a hassle.
Once you’re satisfied, go ahead and upload the photo to heartful.gifts, select the paper size you need, and let the print‑on‑demand magic happen. You’ll get a roll that showcases every smile, every laugh line, and every little quirk that makes the recipient unique.
So, grab that phone, snap a few shots, and remember: the clearer the face, the more personal the wrap feels. Happy shooting!
Step 3: Edit and Prepare the Artwork
Okay, you’ve got a solid test print and the photo looks good – now it’s time to turn that single sheet into a repeat‑ready masterpiece. This is where the magic really happens, because a clean, well‑edited file will print crisp on every inch of your custom face wrapping paper roll.
Crop and clean up the face
First thing’s first: isolate the smile. Open your favorite editor – GIMP works great for free, Photoshop is handy if you have it, even phone apps can do the trick. Use a selection tool to trace around the head, then feather the edge a little so you don’t end up with a harsh, cut‑out look.
Watch out for stray background pixels – they can turn into unwanted speckles when the image repeats. A quick brush‑clean or mask cleanup will save you a ton of re‑prints later. If you need a visual walk‑through, check out this step‑by‑step face cutout guide that shows exactly how to get a clean edge.
Adjust colors and contrast
Now that the face is isolated, match its tones to the occasion. A warm birthday vibe might need a touch more saturation; a wedding wrap could benefit from a soft, muted palette. Play with brightness, contrast, and maybe a subtle curve adjustment until the smile pops without looking over‑processed.
Tip: keep an eye on skin tones. If they start to look like a cartoon, dial back the saturation. A quick test print on regular paper will tell you if the colors stay true after the printer does its thing.
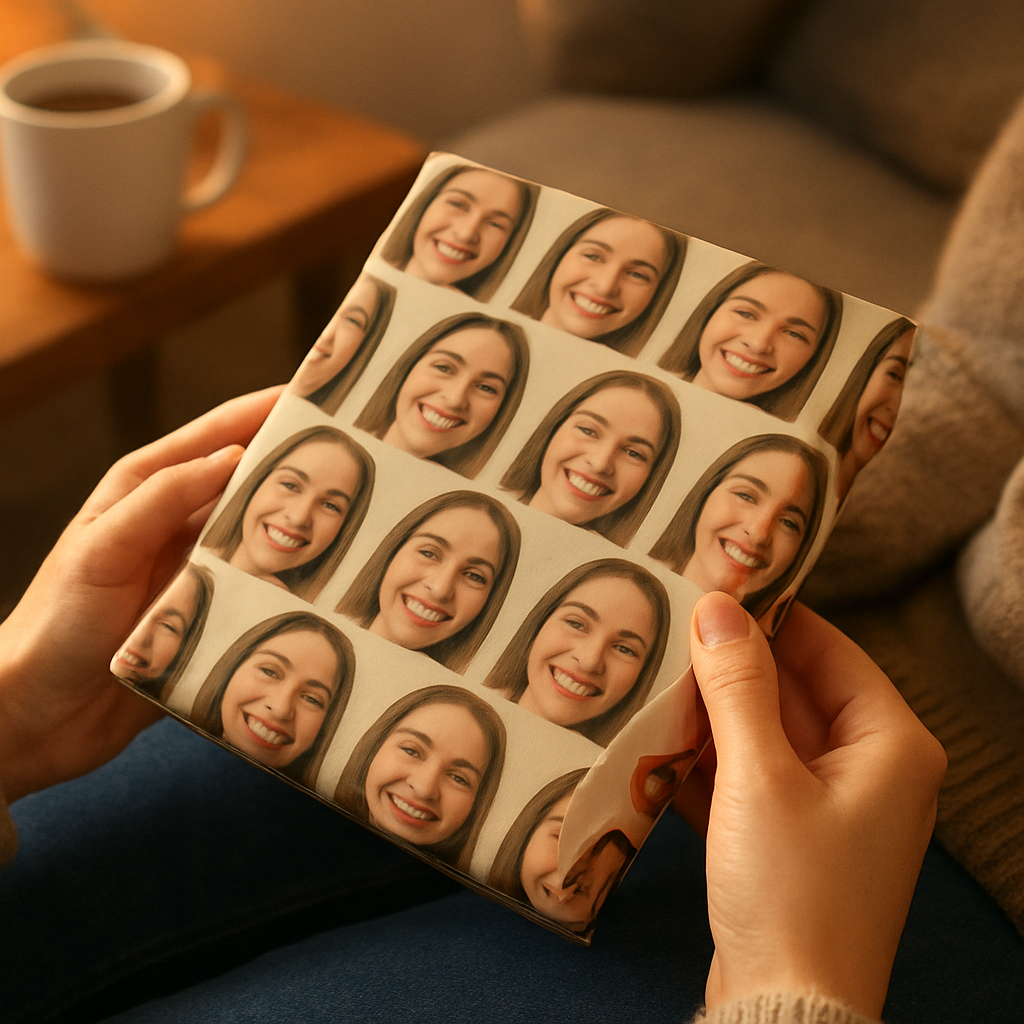
Create a repeating pattern
Most of us want the faces to tile across the whole sheet, right? Set up a new canvas that matches the exact dimensions of the roll you ordered – for example, 24 × 36 inches for a standard gift‑wrap size. Paste the cleaned‑up face, then duplicate it in a grid. Leave a tiny gap if you want a breathing room between smiles; otherwise, let them kiss for a denser look.
Watch the edges: if a face gets cut off halfway at the border, the repeat will look broken. Use the “offset” trick – shift the whole pattern by half its width and height, then fill the new gaps. When you snap the canvas back, the repeat will line up perfectly on the roll.
Export settings
When you’re happy with the layout, export a high‑resolution file. JPEG is fine for most prints, but if you’ve kept a transparent background, PNG preserves those edges. Aim for at least 300 dpi – that means a 24‑inch wide image should be roughly 7200 pixels across.
Save using the sRGB color profile; it’s the safest bet for web‑to‑print workflows. Give the file a clear name like birthday‑smile‑pattern.jpg so you can find it quickly when you upload to heartful.gifts.
Ready for a quick visual aid? Here’s a short video that walks through the whole editing flow, from cropping to tiling. It’s perfect if you learn by watching.
Take a breath, then run through this final checklist before you hit “upload”.
Final quick checklist
- Face is cleanly cut out with no stray background.
- Colors and contrast are balanced for the occasion.
- Pattern tiles without half‑cut faces at the edges.
- Canvas size matches the roll dimensions you ordered.
- Exported at 300 dpi, sRGB, and saved as high‑quality JPEG or PNG.
If everything checks out, you’re good to go. Upload the file, choose your paper size, and let heartful.gifts handle the rest. The result? A roll of custom face wrapping paper that feels like a hug every time you pull out a sheet.
Step 4: Select Paper Type and Finish
Now that your faces are polished and tiled, the next big decision is the actual sheet that will carry them. Paper type and finish aren’t just aesthetic fluff – they dictate how the wrap feels in your hands, how it survives a rainy move, and whether the colors pop or stay muted.
Understanding the Core Paper Families
We generally see three families: matte, glossy, and textured. Matte paper gives a soft, sophisticated look. Think of a wedding gift where you want the faces to blend gently with pastel tones – the lack of shine keeps the focus on the smiles.
Glossy paper, on the other hand, amps up color saturation. It’s perfect for a teen’s birthday where neon yellows and electric blues need that extra punch. The glossy surface also makes the pattern look deeper, almost like a photo album.
Textured options – such as linen or recycled kraft – add a tactile dimension. A linen‑finish is great for a parent’s anniversary gift because the subtle weave feels as warm as the memories you’re wrapping.
Finishes That Make a Difference
Beyond the base stock, you can add a finish. UV coating adds a protective layer that resists spills and fingerprints – ideal for kids’ gifts that might end up on the kitchen counter. Embossing creates a raised effect on certain design elements (like tiny hearts or stars) without altering the face tiles.
Foil stamping is another show‑stopper. A thin gold or silver stripe along the edge can turn a simple birthday wrap into a mini‑luxury item. Just remember foil adds cost, so reserve it for occasions where you want that extra wow factor.
Real‑World Examples
Imagine you’re a parent ordering a wrap for your daughter’s graduation. You choose a matte, 200‑gsm paper with a subtle linen texture. The muted surface lets the black‑and‑white graduation photos shine without competing glare.
Now picture a spouse’s anniversary. You go glossy, 250‑gsm, with a UV coating and a thin silver foil line that matches the silverware you’ll serve dinner on. The finish catches the candlelight, making the entire table feel coordinated.
For a corporate thank‑you package, a recycled kraft paper with a matte finish says “we care about the planet” while still delivering a professional look. Adding a small embossed logo keeps the brand subtle yet memorable.
Actionable Steps to Pick the Right Combo
- Identify the occasion – is it formal, playful, or eco‑focused?
- Match the paper weight to durability needs. 200‑gsm works for most gifts; go 250‑gsm for heavy‑duty or high‑impact designs.
- Choose a base finish (matte, glossy, textured) that complements your color palette.
- Decide if you need extra protection (UV coating) or a special touch (foil, emboss).
- Order a small sample sheet from heartful.gifts before committing to a full roll. Hold it under different lighting to see how the faces read.
When you’re unsure, our creative ideas for custom photo gifts page offers quick inspiration on how different finishes play out in real homes.
Quick Comparison Table
| Paper Type | Finish | Best For | Pros / Cons |
|---|---|---|---|
| Matte 200‑gsm | None | Weddings, anniversaries | Soft feel, low glare / less vibrant colors |
| Glossy 250‑gsm | UV coating | Teen birthdays, holidays | Bright colors, water‑resistant / fingerprints visible |
| Textured linen 200‑gsm | Embossed accents | Parent gifts, eco‑friendly | Premium tactile experience / higher cost |
Bottom line: the paper you pick should echo the emotion you want to deliver. A matte, linen‑feel wrap whispers intimacy, while a glossy, foil‑lined sheet shouts celebration. Take a minute, run through the checklist above, and you’ll end up with a roll of custom face wrapping paper that feels as thoughtful as the gift inside.
Step 5: Print and Assemble
Alright, you’ve polished the design, picked the perfect paper, and you’re staring at a digital file that’s just begging to become a roll of custom face wrapping paper. This is the moment where the idea turns into something you can actually hold, fold, and wrap around a gift.
Ready the Print File
First, double‑check the file dimensions. Most of our customers order a 24‑by‑36‑inch roll, so make sure your canvas matches that size exactly. If you’re using a different size, adjust the pixel count so you stay at a solid 300 dpi – that’s the sweet spot for crisp faces without any fuzzy edges.
Save the final version as a high‑quality JPEG or PNG. JPEG keeps the file size manageable, while PNG preserves any transparent bits you might have left from the cut‑out process. Name the file something descriptive like mom‑birthday‑smile‑roll.jpg so you can find it fast when you upload.
Choose a Print Provider
We usually recommend a print‑on‑demand service that handles large rolls and offers UV coating if you need extra durability. The good news? Most providers let you upload directly from your computer or cloud storage, and they’ll give you a preview of how the pattern repeats across the whole sheet.
If you’re feeling DIY‑curious, the custom tissue paper guide walks you through using a home printer and a thin 22‑gsm backing sheet to soak up excess ink – a handy trick for small batches.
Proof and Color Check
Before you hit “order”, order a single proof sheet. It’s cheap, and it lets you see the true colors under the lighting you’ll use when you wrap a present. Compare the proof to your screen – if the faces look washed out, crank up the contrast a notch in your editor and re‑export.
Ask yourself: does the finish (matte, glossy, or textured) affect the readability of the faces? Glossy surfaces tend to make colors pop, but they also show fingerprints. Matte tones soften the look, which can be perfect for a wedding gift where you want a gentle vibe.
Print the Roll
Once the proof passes, place the full order. Most services ship the roll in a sturdy tube, so you don’t have to worry about creases during transit. If you ordered a UV coating, you’ll notice a subtle sheen that helps protect the paper from spills – a lifesaver for kids’ birthday parties.
When the roll arrives, let it sit flat for a few hours. This lets any residual moisture evaporate and prevents the paper from curling when you start cutting.
Assemble and Trim
Now comes the fun part: turning the roll into gift‑ready sheets. Grab a clean cutting mat, a sharp rotary cutter, and a ruler. Measure the width you need – most gift boxes use a 24‑inch width, but you can always cut narrower strips for smaller parcels.
Mark the cut line lightly with a pencil, then glide the cutter along the ruler. If you’re using a textured linen stock, a gentle press will keep the surface from lifting. For glossy paper, a quick wipe with a lint‑free cloth removes any smudges before you start folding.
Tip: keep a small stash of extra sheets in a dry drawer. That way you’ll never be caught without a matching wrap when an impromptu gift opportunity pops up.
Final Quality Checklist
- Faces are sharp and centered on each sheet.
- Colors match the proof under natural light.
- Paper weight feels sturdy but folds easily.
- Finish (matte, glossy, textured) aligns with the occasion.
- All cuts are straight – no jagged edges.
If everything checks out, you’re ready to start wrapping. Pull a sheet, line up the seam, and watch the smiles line the gift like a personal photo album.
And remember, the joy isn’t just in the final product; it’s in the little moments you create while cutting, folding, and seeing the reaction when someone unravels a wrap that literally bears their face.
Step 6: Wrap and Personalize Your Gifts
Set the scene before you start
Before you even pull a sheet from the roll, think about the moment you want to create. Is it a quiet bedtime surprise for a toddler, a bold "wow" for a teen’s birthday, or a romantic reveal for your partner? The feeling you aim for will guide every next decision.
In our experience, parents who picture the unwrapping moment – the gasp, the grin, the instant connection to the photo – end up with a wrap that feels less like paper and more like a memory.
Gather the tools you’ll need
- Scissors or a rotary cutter (a sharp blade saves you from jagged edges).
- Ruler or measuring tape – most gift boxes need a 24‑inch width, but keep a smaller 12‑inch strip handy for jewelry boxes.
- Double‑sided tape or a thin brush‑on glue for a seamless seal.
- A clean, flat surface – a large tabletop or a cutting mat works best.
- Optional: a small stash of coordinating ribbon, twine, or a handwritten tag.
Having everything within arm’s reach cuts down on interruptions and keeps the wrapping flow natural.
Step‑by‑step: From roll to ready‑to‑gift
1. Measure the box. Measure the length, width, and height. Multiply the perimeter by 1.2 to give yourself a little wiggle room. Write the dimensions on a scrap of paper – it’s easier than guessing later.
2. Cut the sheet. Lay the roll flat, align the ruler with your measured length, and cut a clean strip. If you’re using textured linen, a gentle press with the cutter prevents the surface from lifting.
3. Position the pattern. Center the strip so the faces are evenly spaced. For a personal touch, you can rotate the sheet 90° so the faces run vertically – it creates a subtle surprise when the recipient lifts the paper.
4. Fold the edges. Fold the paper inward along the box’s edges, pressing gently to create crisp creases. A bone folder (or the back of a credit card) works wonders for a professional look.
5. Secure with tape. Use double‑sided tape on the inside seams – it hides the adhesive and keeps the wrap smooth. If you prefer a vintage vibe, a thin line of clear glue gives a matte finish without the shine.
6. Add a personal accent. Here’s where the customization really shines. Grab a piece of ribbon that matches the color palette of the faces, or write a short note on a blank tag that echoes the photo’s memory (“First day of school, 2023”).
Real‑world examples
Example 1 – A mom’s graduation gift. She cut a 24‑inch strip of matte linen paper featuring her son’s smiling face from kindergarten to high school. She folded the strip around the diploma folder, then tied a burgundy satin ribbon that matched the school colors. When her son opened it, the faces lined up like a timeline, and he literally cried.
Example 2 – A husband’s anniversary surprise. He chose glossy paper with a subtle UV coating, printed a collage of their beach vacation selfies, and added a thin silver foil stripe along the seam. The foil caught the candlelight, turning the simple act of unwrapping into a mini‑celebration.
Example 3 – A corporate thank‑you package. A small business owner used recycled kraft with a matte finish, overlaid with tiny, embossed logos between the faces of the team. The tactile feel reinforced the brand’s eco‑friendly message while still feeling personal.
Tips from the pros
- Test a small corner first. Before committing to the full wrap, fold a 4‑inch corner and see how the faces line up. Adjust spacing if the pattern looks crowded.
- Mind the lighting. Bright, natural light reveals if the print is too glossy or if colors wash out. A quick photo on your phone can confirm the look.
- Keep a backup roll. Accidents happen – a torn edge or a stain. Having an extra sheet saved in a dry drawer means you never scramble at the last minute.
- Personalize the tag. Hand‑written notes feel heavier than printed ones. Use a simple cardstock, match the paper weight, and write a line that references the photo (“Remember this smile? That was the day we got our first dog.”).
Final quick checklist
- Box dimensions measured and written down.
- Sheet cut to exact length with a clean edge.
- Pattern positioned for optimal face visibility.
- Creases crisp, tape hidden, and any glue dry.
- Personal accent (ribbon, tag, foil) added.
- Backup sheet stored for emergencies.
When you follow these steps, the wrap becomes an extension of the gift itself – a visual story that starts the celebration before the box even opens. And honestly, there’s nothing quite like watching someone’s eyes widen as they see their own face smiling back at them on the paper.
FAQ
How do I choose the right photo for custom face wrapping paper?
Start with a picture where the face is clearly lit, the eyes are open, and the expression feels genuine. A natural smile or a candid laugh works better than a stiff, posed shot. Make sure the background is simple – a plain wall or a soft pastel keeps the focus on the smile. If you’re wrapping a gift for a parent, a family portrait from a recent holiday often hits the sweet spot because it already carries emotion.
What file format and resolution should I upload?
We recommend a high‑quality JPEG or PNG at a minimum of 300 dpi. For a standard 24‑by‑36‑inch roll that means roughly 7200 × 10800 pixels. JPEG keeps the file size manageable while preserving detail, and PNG is handy if you’ve removed the background and need transparency. Double‑check that the image isn’t compressed too heavily – you can open it in any photo viewer and zoom in; the skin texture should still look smooth.
Can I order a small roll for a single gift?
Absolutely. Many gift buyers only need enough paper for one box, so we offer a 12‑inch‑wide roll that’s perfect for a single present. It’s priced lower than the full‑size roll and still gives you the same high‑resolution print. When you order, just select the “small roll” option on the product page and the system will automatically calculate the length you need based on the dimensions you enter.
How long does shipping take from heartful.gifts?
In our experience, most orders ship within 2–3 business days after you’ve uploaded your artwork and completed payment. Once it leaves our facility, standard US shipping usually arrives in 4–6 days, while expedited options can get the roll to your door in 2–3 days. We send a tracking number as soon as the package is on its way, so you can keep an eye on the journey and plan your gift‑wrapping session accordingly.
Is it safe to use glossy paper for kids’ gifts?
Glossy paper makes colors pop, which is great for bright, playful designs. The finish does attract fingerprints, but a quick wipe with a lint‑free cloth restores the shine. For kids, we often suggest adding a UV coating – it adds a thin, protective layer that repels spills and makes the paper a bit more durable. If you’re worried about messes, a matte or linen‑textured stock is a softer alternative that still looks polished.
What if I need a backup sheet or extra roll?
Accidents happen – a torn edge or a smudge can ruin the moment. We recommend ordering an extra sheet or a second roll when you place your first order. It only adds a few dollars and saves you the scramble of a last‑minute re‑print. Store the spare in a dry drawer, and you’ll always have a matching piece ready for that surprise gift that pops up later.
How do I care for the wrapped gift to keep the paper looking fresh?
Treat the wrapped box like you would any delicate paper. Keep it out of direct sunlight, which can fade the colors over time. If the gift sits in a humid environment, consider a light spray of a matte fixative – it helps prevent curling without altering the look. When you’re done, gently roll the paper back onto its tube instead of folding it; this keeps the repeat pattern intact for the next occasion.
Conclusion
By now you’ve seen how a few simple choices turn a regular gift into a memory‑filled experience with custom face wrapping paper. The smiles on the paper become the first thing people notice, setting the tone before the ribbon even appears.
So, what’s the next move? Do you have that extra sheet tucked away, or are you waiting to order the perfect roll?
Remember the flow: capture a clear, well‑lit face; clean it up and tile it; pick a paper type that matches the occasion; let a print‑on‑demand service handle the roll; then cut, fold and seal.
A quick tip: keep a backup sheet in a dry drawer. It saves you the panic of a smudge or tear right when the moment arrives, and a light spray of matte fixative keeps the colors fresh for weeks.
Now that you’ve got the roadmap, go ahead and design that custom face wrapping paper you’ve been dreaming about. When you’re ready, heartful.gifts makes ordering a roll as easy as uploading a photo, so you can focus on the joy of giving rather than the logistics.
Give it a test run on a small box first – that little preview will confirm everything looks just right before you wrap the big gift.