
Create a Personalized Photo Phone Case That Shows Your Style
Ever glanced at your phone and felt it was missing that little spark of you?
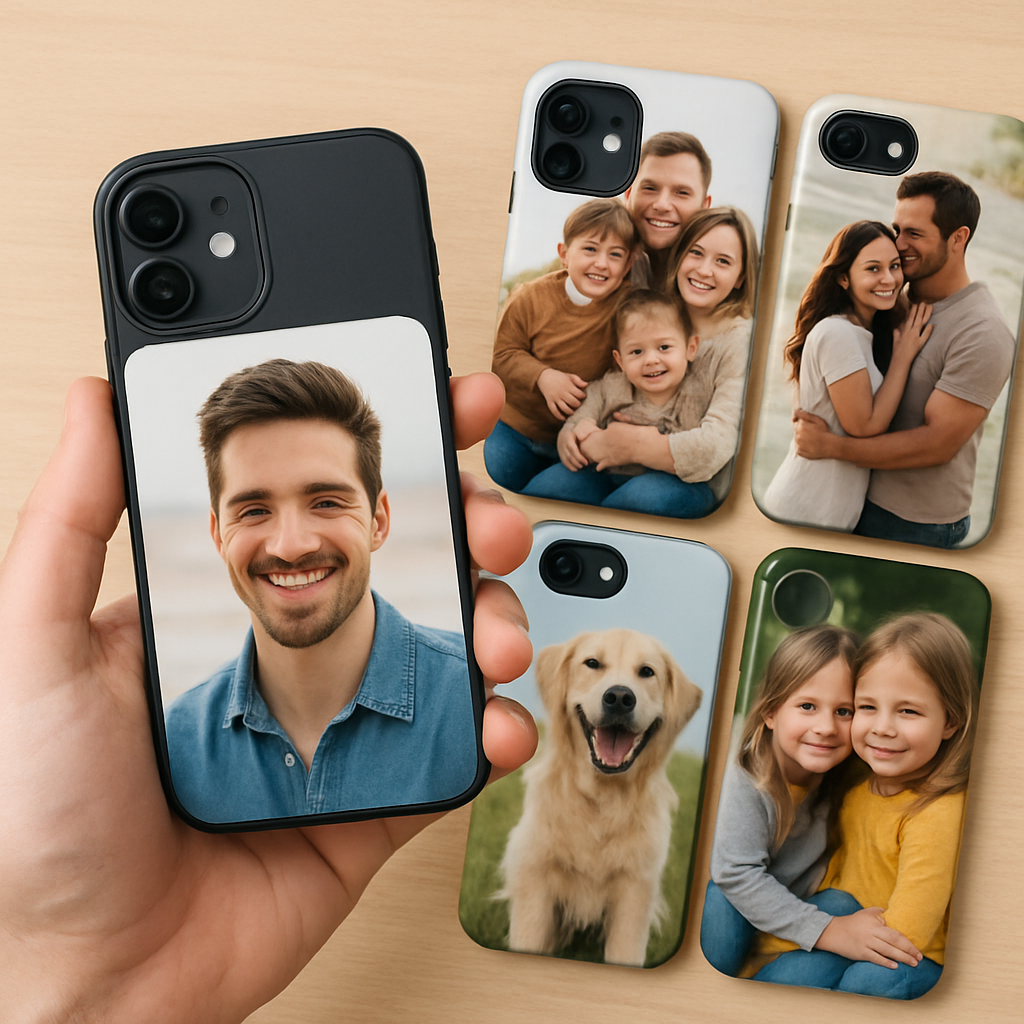
Maybe you’ve got a photo tucked away—your kid’s grin, a sunset from last summer, or that goofy selfie you keep sharing. Imagine that moment right on your screen, protected and personal.
That’s exactly what a personalized photo phone case does: it turns a flat image into a daily reminder you actually want to see.
But why settle for a plain case when you can carry a story? We all know how quickly phones become extensions of ourselves, so why not let yours wear your favorite memory?
Here’s the thing: a personalized photo phone case isn’t just about looks. It shields your device from drops, scratches, and that inevitable coffee spill, all while showcasing your chosen snap.
Think about it way: every time you pull out your phone, you get a tiny boost of nostalgia—like a mini-photo album you can actually use.
And if you’re shopping for a gift, you’ve just hit the sweet spot. A custom case says, "I see what matters to you," without needing a long speech.
Worried about quality? Modern print-on-demand shops use high-resolution UV printing that captures even the tiniest details, so your image stays crisp whether you’re scrolling Instagram or taking a selfie.
Plus, you get choices: matte finishes that feel velvety, glossy that pop like a postcard, or even a soft silicone that adds extra grip. Pick the vibe that matches your style.
So, what’s the first step? Grab the photo that makes you smile, upload it to a trusted site, and let the magic happen. It’s as easy as ordering pizza.
And if you’re still on the fence, ask yourself: would you rather have a case that blends in, or one that sparks conversation every time someone asks, "Where'd you get that?"
Let’s dive in and explore how you can create a personalized photo phone case that feels truly yours, without any hassle.
TL;DR
A personalized photo phone case lets you protect your device while showcasing a memory you love, turning everyday phone checks into tiny moments of joy.
Choose matte, glossy, or silicone finishes, upload your favorite picture, and order in minutes—so you’ll have a unique, daily conversation‑starting accessory that feels truly yours.
Step 1: Choose Your Phone Model
Okay, before we dive into uploading that sunset or your kid’s goofy grin, we need to know which phone you’re actually dressing up. It sounds trivial, but picking the right model is the foundation of a case that fits like a glove—not a tight fist.
First thing’s first: grab your phone and look at the back. Do you see a notch, a camera bump, or maybe a sleek flat surface? Those little design quirks dictate which case template you’ll need.
Know Your Device’s Exact Model
Don’t just settle for “iPhone 13” or “Galaxy S22.” Every generation has multiple sizes—mini, standard, Pro, Pro Max. Even a single model year can have a “+” version with a bigger screen. If you’re unsure, check the Settings > About Phone section; the model number is usually a string of letters and numbers (e.g., A2633, SM‑G991B).
Why does this matter? A case cut for the wrong camera layout can leave the lens exposed, or worse, block the side button. Imagine trying to mute a call and the button is glued under a piece of plastic—that’s a nightmare we all want to avoid.
Compatibility Checklist
- Screen size (inches) – ensures the edges line up.
- Camera module shape – some phones have a rectangular array, others a circular bump.
- Button placement – volume, power, mute, and fingerprint sensor.
- Wireless charging compatibility – metal plates can interfere if the case is too thick.
Take a quick photo of the back of your phone and compare it to the model guide on the retailer’s site. Most print‑on‑demand shops, including how to create a personalized photo phone case that looks great, provide a drop‑down menu that automatically filters out cases that don’t match your device.
Still not sure? Search your phone’s name plus “case dimensions” on a search engine – you’ll find PDFs from the manufacturer that list exact measurements. It’s a tiny step that saves you a whole lot of hassle later.
What If You Have Multiple Phones?
Maybe you’ve got a work phone and a personal one, or you’re switching between Android and iOS. No problem. Treat each device as its own project. Create a simple spreadsheet: Column A = Device Model, Column B = Desired Finish (matte, glossy, silicone), Column C = Photo you want. This visual map keeps you from mixing up orders.
And hey, if you’re buying a case as a gift, ask the recipient subtly: “What’s the exact model of your phone? I want the case to fit perfectly.” Most people appreciate the thoughtfulness, and you’ll avoid the dreaded “it doesn’t fit” return.
Quick Tip: Use the Phone’s Serial Sticker
Look under the battery (if removable) or on the back panel for a tiny sticker. It often lists the model code in plain text. Snap a picture of that sticker – it’s your cheat sheet.
Now that you’ve nailed down the exact model, the next step will be uploading your chosen image. Trust me, once the dimensions line up, the design process feels like sliding a puzzle piece into place.
Ready to move forward? Grab that model info, double‑check the camera layout, and you’ll be set to pick a case that protects and showcases your memory without a hiccup.
Step 2: Select Your Photo and Design Layout
What makes a photo worth printing?
First thing’s first: you want a picture that still looks good when it’s blown up to cover a whole phone back. That means decent resolution (at least 150 dpi at the case’s printable dimensions) and a clear focal point. If the image is grainy, the "personalized photo phone case" will end up looking like a fuzzy postcard.
Think about the moment you’re trying to capture. Is it a candid laugh, a sunset’s orange glow, or a pet’s goofy face? Those details survive the printing process better than a busy group shot where everything competes for attention.
So, does your photo meet the basics? If you’re not sure, open it in any photo editor and check the pixel dimensions. A quick Google search for understanding image resolution will show you why a 2000 × 3000 px file is usually safe for most cases.
Choosing the right layout
Most print‑on‑demand shops give you a few layout options: full‑bleed (the image covers the whole back), border (a thin margin around the edges), or a collage with multiple photos. Full‑bleed feels immersive, but a border can protect key details from the case’s cut‑outs.
Here’s a quick cheat sheet:
- Full‑bleed: Best for single, dramatic shots where the subject is centered.
- Border: Ideal if your photo has important elements near the edge – the border keeps them from being trimmed.
- Collage: Great for families or travel lovers who want a mini‑album on their case.
Real‑world example: Sarah wanted a case for her son’s graduation. She chose a full‑bleed photo of the campus quad at sunset – the warm tones made the whole case pop. Her brother, meanwhile, preferred a 3‑photo collage of the kid’s soccer, music, and gaming moments, each separated by a thin white line. Both ended up looking polished because they matched the layout to the image’s strengths.
Step‑by‑step: From folder to design tool
- Gather your files. Create a folder called "Phone‑Case‑Design" and drop in every candidate image.
- Check resolution. Right‑click > Properties (Windows) or Get Info (Mac) and verify the pixel count. Aim for at least 150 dpi at the case’s printable size (usually around 2.7 × 5.5 in for most smartphones).
- Crop wisely. Use a free editor like Canva to crop to the exact aspect ratio the shop provides (often 1:2). Keep the main subject away from the corners where the camera cut‑out lives.
- Test contrast. Turn the image to grayscale for a second; if you can still see the subject, the contrast is strong enough for printing.
- Save as PNG. PNG preserves colour depth without compression artefacts that JPEG sometimes introduces.
- Upload. Drag the file into the case designer, then use the preview pane to move, scale, or rotate. Most tools let you toggle a “safe zone” overlay – respect it.
Pro tip: If you’re feeling crafty, you can add a subtle texture behind the photo (like a linen pattern) to hide any tiny imperfections. It’s a trick I learned while experimenting with the HTVRONT H17 heat‑press workflow – the extra layer gives the final print a matte‑like depth that feels premium (source).
Design tools you can trust
Most custom case sites have their own web‑based editor, but you can also use free desktop apps. I recommend the free version of Canva for its drag‑and‑drop simplicity, or GIMP if you need more control over colour curves.
When you’re happy with the layout, hit the “preview” button and zoom in to 100 %. Look for pixelation around edges, and double‑check that the camera hole isn’t covering any important part of the picture.
Final checklist before you click “order”
- Image resolution ≥ 150 dpi at printable size.
- Subject positioned away from camera cut‑outs.
- Layout (full‑bleed, border, collage) matches the photo’s composition.
- File saved as PNG with sRGB colour profile.
- Preview looks sharp at 100 % zoom.
If you can tick all those boxes, you’re ready to move on to the next step: uploading the design to the case maker and choosing your finish. Trust me, a well‑chosen photo makes the whole "personalized photo phone case" experience feel like a daily hug.
Step 3: Customize Materials and Finish (Video Tutorial)
Why material matters more than you think
Ever held a phone case that felt like a cheap plastic wrapper? Yeah, that’s the feeling you want to dodge. The material you pick decides whether your personalized photo phone case looks sleek, feels grippy, and survives daily drops.
So, which material should you trust? Let’s break it down in plain English.
Silicone – the soft‑handed hug
Silicone is flexible, gives a rubbery grip, and absorbs shocks like a tiny pillow. It’s perfect for parents who worry about accidental drops while juggling kids.
One downside? It can attract lint and sometimes feels a bit “squishy” under the phone’s edges.
Polycarbonate (PC) – the lightweight shield
PC is rigid, lightweight, and prints colors brilliantly. That’s why many print‑on‑demand shops use it for vibrant, glossy finishes.
If you love a crystal‑clear look that shows off your photo without a matte veil, PC is your go‑to.
TPU – the best of both worlds
Thermoplastic polyurethane blends the flexibility of silicone with the durability of hard plastic. It snaps onto your device and stays put, while still letting the photo pop.
Pro tip: TPU often comes in a “dual‑layer” style – a hard back for protection and a soft bumper for extra grip.
Leather, wood, and metal – the premium vibes
Leather gives a classy, warm feel, but it’s pricier and can wear over time. Wood adds an eco‑friendly, unique grain pattern; just make sure the finish is sealed so the photo doesn’t bleed.
Metal cases look futuristic and protect like a tank, yet they can interfere with wireless charging and add weight.
Choosing the finish: matte vs. glossy vs. textured
After you’ve settled on a material, think about the surface. A glossy finish makes colors pop, but fingerprints love it. Matte tones hide smudges and add a soft‑touch feel, especially nice for pastel photos.
Textured finishes – like a subtle linen pattern – can hide tiny imperfections in the print and give your case a tactile edge.
Does a matte finish make your photo look dull? Not if you boost contrast in the design step; the texture actually adds depth.
Video tutorial cheat‑sheet
Grab a coffee, hit play, and follow these quick checkpoints while the video walks you through the editor:
- Select material from the dropdown (silicone, PC, TPU, etc.).
- Choose “matte” if you want a soft look, “glossy” for vibrancy, or “textured” for extra grip.
- Toggle the “preview 3D rotation” to see how the photo wraps around edges.
- Zoom in 200 % to inspect the safe‑zone around the camera cut‑out.
- Save a low‑resolution preview for a final sanity check before ordering.
Notice the “safe‑zone” overlay? That’s the area the printer guarantees won’t be trimmed. If any part of your cherished photo sits in that border, shift it a millimetre or two.
Real‑world example
Sarah ordered a silicone case for her teen’s iPhone 14. She chose a matte finish because her son’s favorite photo was a sunrise – the soft surface muted glare and the case stayed slip‑free in his backpack.
Meanwhile, Mark opted for a glossy polycarbonate case for his wedding photo. The glossy coat made the white dress sparkle, and the rigid PC protected his phone during a weekend camping trip.
Both stories show that matching material to lifestyle and photo style makes the personalized photo phone case feel less like a gimmick and more like a daily companion.
Quick checklist before you hit “order”
- Material selected matches your grip & durability needs.
- Finish (matte, glossy, textured) aligns with your photo’s colour vibe.
- Safe‑zone preview shows the subject fully visible.
- Video tutorial replayed for any last‑minute tweaks.
- Final file exported as PNG with sRGB profile.
Got all that? Awesome. Your case is now ready to become a little piece of art you actually want to touch every day.
Need more detail on material pros and cons? Silicone’s flexible properties are explained nicely on Wikipedia, and polycarbonate’s durability gets a deep dive there too.
Step 4: Add Personal Touches and Text
Alright, you’ve picked the material and the finish, so now it’s time to make that personalized photo phone case feel unmistakably yours. Think of it as adding the final brush strokes to a painting you’ve been working on for weeks.
Why text matters (and why a doodle can be magic)
Words turn a pretty picture into a story you can read every time you pick up your phone. A simple date, a nickname, or a short mantra can anchor the memory. And if you’re feeling playful, a tiny hand‑drawn heart or a coffee‑cup sketch can add that “hand‑made” vibe without actually having to draw.
Research shows that people are more likely to keep and cherish items that contain personal text – it creates an emotional anchor that plain images alone can’t achieve.
Choosing the right font and size
Start with a font that matches the mood of your photo. A sleek sans‑serif works great with modern cityscapes, while a handwritten script feels cozier for a family portrait. Keep the size readable but not overpowering – usually 12‑16 pt works on most phone‑case canvases.
Tip: Most design tools let you preview the text on a mock‑up. Zoom in to 200 % and make sure the letters aren’t blurry at the edges. If they look fuzzy, bump the font weight up a notch.
Step‑by‑step: Adding text that sings
- Open your design file. Load the PNG you exported earlier into Canva, GIMP, or the shop’s web editor.
- Insert a text box. Click “Add Text,” type your phrase, then position it near a natural blank space in the photo – think sky, a wall, or the background.
- Pick a font. Choose a typeface that complements the photo’s style. For a beach sunrise, try a relaxed script; for a graduation snap, a bold serif adds gravitas.
- Adjust color and opacity. Contrast is king – if your photo is bright, go for a dark font, and vice versa. A 85 % opacity can make the text feel like a subtle watermark rather than a billboard.
- Test legibility. Toggle the “safe zone” overlay. Make sure no letters fall into the camera cut‑out or the side buttons.
- Optional embellishments. Add a tiny icon (heart, star, paw print) next to the text. Keep it under 5 % of the total design area so it doesn’t distract.
Once you’re happy, save a new PNG version – you now have a photo + text combo ready for upload.
Real‑world examples
Emma wanted a case for her dad’s 60th birthday. She placed a black‑and‑white portrait of him fishing and added the line “Best Catch Ever” in a vintage typewriter font. The result felt nostalgic and made her dad grin every time he pulled his phone out of his pocket.
Meanwhile, Carlos turned his travel vlog thumbnail into a case. He overlaid the coordinates “48.8566° N, 2.3522° E” in a sleek sans‑serif and added a tiny Eiffel‑tower icon. The subtle text turned a simple skyline into a personal souvenir.
Pro tips from the pros
• Silicone’s flexible properties let you emboss raised lettering if the printer supports it – it feels like braille and adds tactile interest.
• Polycarbonate durability means you can experiment with glossy foil‑stamped text that catches the light without scratching.
• Keep a master text layer hidden in your file. If you later decide to switch fonts or wording, you won’t have to start from scratch.
Quick checklist before you finalize
- Text is legible at 100 % preview.
- Font style matches the photo’s emotion.
- Color contrast passes the “readability test” (light on dark or dark on light).
- Any icons or doodles stay under 5 % of the canvas.
- Safe‑zone overlay shows no letters in cut‑out areas.
And that’s it – you’ve turned a simple snapshot into a piece of daily motivation that you’ll actually want to touch.
Ready to see how it feels in your hand? Upload the final PNG, hit preview, and imagine the moment you hand the case to a loved one.
Step 5: Review Pricing, Shipping, and Compare Top Providers
Now that your design is polished, it’s time to look at the numbers. You might be thinking, “I just want a cute case, why does this matter?” Trust me, a quick pricing and shipping audit can mean the difference between a happy surprise and a wallet‑wincing regret.
Understand the pricing landscape
Print‑on‑demand (POD) shops usually break the cost into three buckets: base material, printing method, and any add‑ons (like raised lettering or foil). A silicone case with a matte finish might start around €12, while a glossy polycarbonate version could be €15‑€18. If you add embossing, expect an extra €2‑€3 per unit.
According to Shopify’s guide on POD pricing, bulk discounts kick in after you hit roughly 50‑100 pieces, but most gift‑givers stay under that threshold. That’s why it helps to compare the per‑unit cost versus the total order price – especially if you’re buying for a family reunion or a corporate giveaway.
Shipping matters more than you think
Shipping isn’t just a line‑item; it can affect the perceived value of your gift. Many European POD providers, including heartful.gifts, ship within 3‑5 business days for standard rates, but they also offer “express” options that shave a day or two for an extra €4‑€6.
When you read Shopify’s shipping deep‑dive, you’ll see that carriers often bundle tracking and insurance for free on orders over €30. That’s a handy trick: bump the order a little to unlock those perks, especially if the case is a surprise for someone who loves a bit of drama.
Compare top providers
Below is a quick snapshot of three popular POD platforms that specialize in personalized photo phone cases. The numbers are based on publicly listed prices (as of late 2024) and typical shipping times to most EU countries.
| Provider | Base Price (EUR) | Standard Shipping | Notable Perks |
|---|---|---|---|
| heartful.gifts | 12‑18 | 3‑5 days (free over €30) | Embossed lettering, EU‑wide tracking, eco‑friendly packaging |
| Redbubble | 14‑20 | 5‑7 days (standard) | Large artist community, worldwide fulfillment |
| Zazzle | 13‑19 | 4‑6 days (express optional) | Extensive customization tools, volume discounts |
Notice how heartful.gifts sits in the middle on price but wins on speed and eco‑credentials. If you care about carbon‑offset shipping, that’s a solid reason to choose them over the others.
Actionable checklist
- Calculate the total cost (base + any add‑ons + shipping). If it exceeds €25, ask yourself if you can trim an add‑on or switch to a cheaper material.
- Check the provider’s shipping zones. Some sites don’t ship to certain EU micro‑states without extra fees.
- Look for “free shipping thresholds.” Adding a second case for a sibling often pushes you over the limit and saves €5‑€7.
- Read recent reviews about packaging quality – a case that arrives bent defeats the whole personalization effort.
- Save the provider’s promo code (many offer 10 % off first orders). Apply it before you hit checkout.
By running through these steps, you’ll feel confident that the personalized photo phone case you order not only looks amazing but also arrives on time and at a price that makes sense. Happy hunting!
Step 6: Order, Track, and Care for Your Case
Confirm your order details
Before you click that final "Buy" button, take a breath and run through a quick sanity check. Did you double‑check the photo resolution? A 300 dpi image looks crisp on a matte silicone case, but it can turn blurry on a glossy polycarbonate finish.
Next, verify the phone model. A tiny mismatch – say ordering an iPhone 13 case for an iPhone 14 – ends up in a box you can’t use and a wasted €10. Most sites, including heartful.gifts, show a drop‑down with exact model numbers; use it.
Finally, look at the add‑ons. Embossed lettering adds €2‑€3, but if you’re already over €30 you’ll unlock free shipping (and often free tracking). That little €2‑€3 can be the difference between a surprise that arrives on time and one that lags.
Track like a pro
Once the order is placed, you’ll get a confirmation email with a tracking number. Most European POD providers partner with DHL, UPS, or local postal services that update every 24 hours.
Pro tip: copy the tracking URL into a free monitoring tool like AfterShip’s package tracker. It sends you push notifications when the parcel leaves the warehouse, arrives at the local hub, and is out for delivery. That way you won’t be left staring at the mailbox wondering why your gift hasn’t shown up.
If you notice a delay (say the status stalls at “customs clearance” for more than two days), reach out to the seller’s support chat. A quick message can often expedite the process or at least give you a realistic new ETA.
Protect and keep your case fresh
When the box finally arrives, resist the urge to yank the case out and snap a photo. First, let it sit for a minute – the protective film on the printed side can be a bit tacky right out of the box.
Gently peel off the backing, then wipe the surface with a microfiber cloth. Avoid harsh chemicals; a dab of diluted dish soap and water is enough to remove any residue.
For long‑term care, store the case in a cool, dry place away from direct sunlight. UV light can fade the printed photo over months. If you’re a frequent traveler, toss a small zip‑lock bag with the case to keep dust out of the camera cut‑out.
And remember, silicone cases love a little silicone‑based spray once every three months. It restores the soft‑touch feel without making the case slippery.
Real‑world example
Maria ordered a personalized photo case for her sister’s birthday. She chose a matte silicone base, added a subtle gold foil accent, and hit the €30 free‑shipping threshold by adding a second case for her brother.
She received the tracking email, plugged the number into AfterShip, and got a “out for delivery” alert the morning of the party. She arrived early, wiped the case with a damp cloth, and the photo – a candid of the sister laughing at a beach bonfire – still looked vibrant after a week of sunshine.
Contrast that with Jake, who skipped the tracking step and assumed the case would arrive a week later. It got delayed at customs, and the surprise turned into a last‑minute scramble to buy a generic case. The lesson? A few extra seconds on the tracking page save hours of stress.
Actionable checklist
- Confirm image resolution (≥300 dpi) and phone model before checkout.
- Check add‑on costs; aim for free‑shipping thresholds when possible.
- Save the tracking number and paste it into a free tracker like AfterShip.
- Set phone‑case care routine: microfiber wipe, mild soap, avoid harsh chemicals.
- Store in a cool, dry place; consider a zip‑lock bag for travel.
- Re‑apply silicone‑based spray every 3‑4 months to keep the grip fresh.
By following these steps, you’ll not only get a personalized photo phone case that looks exactly how you imagined, but you’ll also enjoy a smooth, stress‑free delivery and a case that stays gorgeous for months. Happy ordering!
FAQ
How long does it take to receive a personalized photo phone case?
Most European POD shops ship within 3‑5 business days for standard rates, and they usually upgrade to express for an extra €4‑€6 if you’re in a hurry. That means you can expect your personalized photo phone case on your doorstep in about a week from the moment you hit “order”. Keep an eye on the tracking email – a quick check in AfterShip can save you a nervous glance at the mailbox.
Can I use any photo for my custom case?
You don’t need a professional‑grade DSLR – a phone snapshot works fine as long as it’s at least 300 dpi and the subject fills most of the frame. Avoid heavy filters; they can wash out details when printed. If you’re using a portrait, rotate it so the horizon is level, and crop out any distracting background. A quick preview on the designer tool will show you exactly how the image will look on the case.
What materials are best for a personalized photo phone case?
Silicone feels soft, grips well, and hides fingerprints, while matte finishes keep your photo from glare. Polycarbonate is harder and shows colors a bit brighter, but it can get slippery when wet. If you love the beach‑vibe photo, silicone’s slight stretch lets the case hug the phone without cracking. For a sleek, glossy look, go polycarbonate and add a matte spray coat later to protect the print.
How do I make sure my photo prints without blurry spots?
Before you upload, zoom in to 100 % on your computer – you should see crisp edges and no pixelation. If the image looks fuzzy, try a higher‑resolution version or use an image‑enhancement tool to upscale it without losing detail. Many designers recommend saving the file as a PNG to preserve colour depth. Finally, double‑check that the dimensions match your phone model’s printable area; a mismatch shows up as a blurry border.
Is it safe to wash my phone case with the photo on it?
Yes – most silicone and polycarbonate cases can be washed gently. Pop the case off, rinse it under lukewarm water, and give it a quick rub with a soft cloth and a drop of mild dish soap. Avoid abrasive sponges or bleach; they’ll eat away at the printed image. After washing, pat it dry and let it air‑dry for a few minutes before slipping it back on.
What if the case doesn’t fit my phone model?
First, double‑check the drop‑down list on the product page – most sites label cases by exact model number (iPhone 13 Pro, Samsung S23, etc.). If you’ve already ordered the wrong size, reach out to customer service within 24 hours; many POD shops will let you swap or cancel without a fee. For future orders, keep a cheat‑sheet of your devices so you never guess again.
Conclusion
By now you’ve seen how a personalized photo phone case can turn a simple accessory into a memory you carry everywhere.
If you’ve ever stared at a blank case wondering why it feels so impersonal, you know that feeling of missing the personal touch.
The good news? All the steps we’ve covered – choosing the right image, picking the perfect material, double‑checking resolution, tracking the parcel and caring for the case – line up to give you a result that looks great and lasts.
So, what’s the next move?
Grab that favorite photo, run it through the quick checklist, and head to heartful.gifts to start the design. Remember to set the image to at least 300 dpi, select the exact phone model, and add a silicone‑based spray if you want that soft grip later on.
A tiny habit, like popping the case into a zip‑lock bag when you travel, can keep the print vibrant for months – no fading, no regrets.
And when the package arrives, give the protective film a minute to settle, wipe it gently, and you’ll see your memory come alive on the go.
Enjoy the compliments, the conversation starter, and the little reminder of why you chose that photo in the first place.