
A Friendly Guide to Choosing and Displaying Square Canvas Prints
Ever walked into a living room and felt that quiet “wow” when a perfectly framed square canvas catches your eye? You’ve probably experienced that moment when a simple photo, stretched over a square, turns a blank wall into a memory you can actually touch.
That little spark is exactly why square canvas prints have become a go‑to gift for birthdays, anniversaries, or just because you want to surprise someone you love. They’re compact enough to fit any space, yet bold enough to become the focal point of a room.
Think about the last time you framed a family portrait on a rectangular canvas – you might have had to trim the edges or live with awkward white borders. With a square format, the composition stays true to the original shot, preserving every smile and detail without the need for cropping.
Take Jenna, for example. She uploaded a candid photo of her kids playing in the backyard, chose a 12‑inch square, and within days the canvas arrived. She hung it above the mantel, and now every guest asks, “Is that a photo or a piece of art?” The square shape gave the picture a gallery‑like presence without the museum price tag.
Or consider Mark, a pet‑owner who wanted to celebrate his dog’s birthday. He turned a silhouette of his golden retriever into a square canvas print. The clean lines of the square frame highlighted the silhouette, making the artwork feel modern and sleek – a perfect blend of personal sentiment and stylish décor.
So, how do you get that same magic? Here’s a quick checklist:
- Pick a high‑resolution image – at least 150 dpi for crisp details.
- Choose a square size that fits the intended wall space (8", 12", 16" are popular).
- Decide if you want a matte or glossy finish – matte reduces glare, glossy enhances colors.
- Use a reputable print‑on‑demand service that offers edge‑to‑edge printing to avoid unwanted borders.
- Preview the mock‑up before ordering to ensure the subject sits nicely in the centre.
Pro tip: If you’re unsure about color accuracy, order a small sample or ask the provider about their color‑proofing process. A little extra step now saves you from a mismatch later.
Need more inspiration on picking the right photo and finishing options? Check out how to choose and create the perfect custom photo hanging canvas gift for a friendly, step‑by‑step guide that walks you through every decision.
When you finally hang that square canvas, you’ll notice how it transforms not just a wall, but the feeling of the whole room. Ready to turn your favorite memories into a square masterpiece? Let’s get started.
TL;DR
Square canvas prints turn favorite photos into striking, gallery‑ready art that brightens any room with personal flair.
Choose the right size, finish, and a reliable print‑on‑demand service, preview the mock‑up, and you’ll enjoy a hassle‑free, vibrant masterpiece that feels truly yours, lasting years and sparking conversation daily in your home.
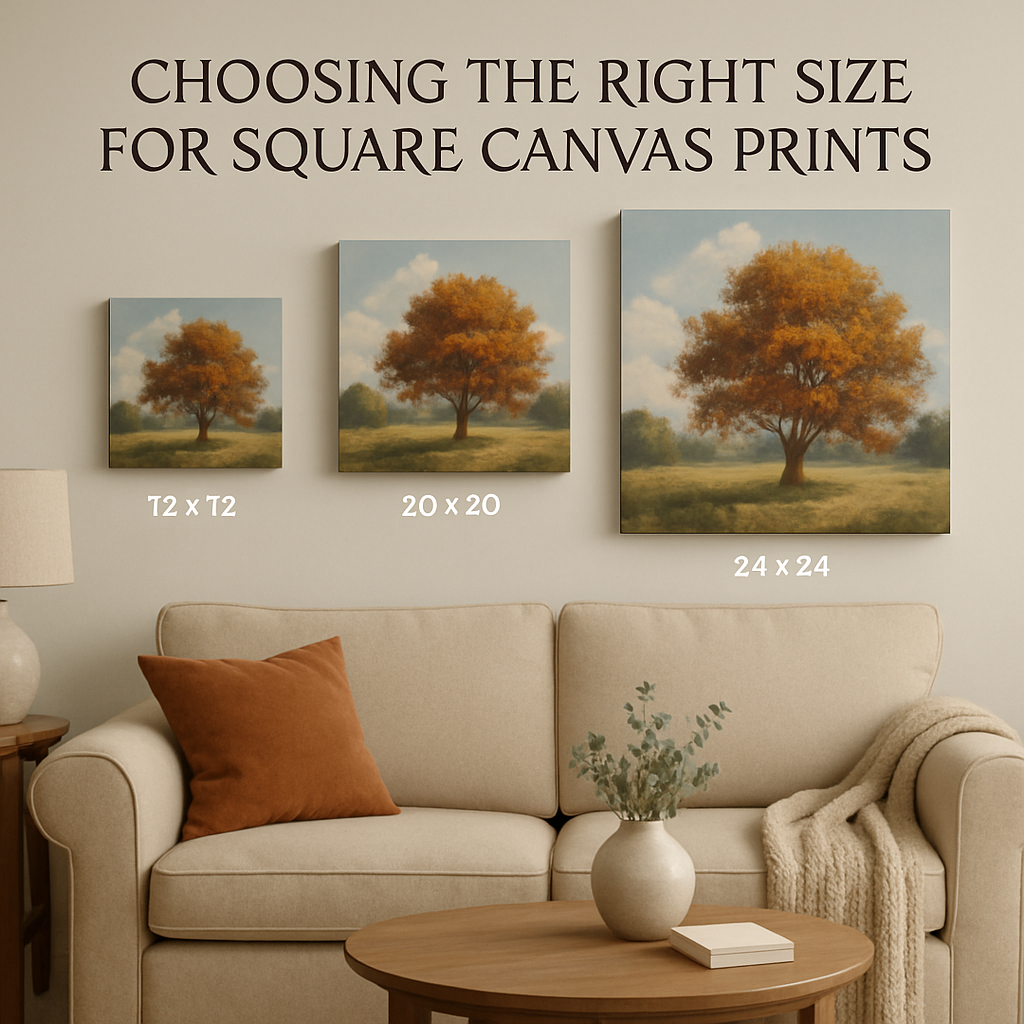
Choosing the Right Size for Square Canvas Prints
Ever stood in front of an empty wall, picture a perfect square canvas, and wondered whether to go big or stay modest? That's the exact tug‑of‑war many of us feel when the size decision looms.
First thing’s simple: measure the space you actually have. Grab a tape, jot down the width and height of the area, and then subtract a couple of inches on each side so the canvas doesn’t scream for attention. That breathing room lets the piece sit naturally, like a friend leaning against a couch instead of crashing into it.
What the room’s function tells you
If the wall is a focal point above a mantel, a 12‑inch or 16‑inch square usually works well – big enough to anchor the room but not so massive that it overwhelms the fireplace. For a hallway or a nook between two bookshelves, an 8‑inch square feels intimate and won’t block traffic flow.
On the other hand, a large open‑plan living room can handle a 20‑inch canvas or even a pair of matching squares side by side. The rule of thumb? The canvas should cover roughly one‑third to one‑half of the wall’s width. Anything less looks lost; anything more can dominate.
Visual tricks to make a size feel right
Sometimes the perfect size isn’t just about dimensions; it’s about what you frame within the square. A close‑up portrait or a tiny pet silhouette tends to look best on a smaller canvas where the details fill the space. A sweeping landscape or a group family shot, however, often shines on a larger square that gives the eye room to wander.
One quick test: print a cheap 8‑inch version of your image and tape it to the wall. Step back. Does it feel cramped or does it float? If it floats, you can safely move up a size.
Pro tip: mix and match
Don’t feel forced to pick just one size. A 12‑inch square paired with a 8‑inch companion creates a balanced gallery cluster. The larger piece becomes the anchor, while the smaller adds curiosity. This approach works especially well for themed gifts – think “our dog’s milestones” spread across two canvases.
And if you’re still on the fence, our step‑by‑step guide to creating a stunning square photo canvas walks you through sizing decisions, showing mock‑ups and printable rulers you can use at home.
Remember, the right size isn’t a one‑size‑fits‑all rule; it’s a conversation between the image, the wall, and the vibe you want to set. Take a moment, measure, test, and let the square find its perfect home.
Don’t forget the frame or stretched‑canvas depth when you size up. A thin ½‑inch gallery wrap on a 12‑inch square feels sleek, but the same wrap on a 20‑inch piece can look a bit flimsy. Adding a modest 1‑inch profile or a thin wood trim adds presence without stealing the spotlight.
Most shoppers start with a “hero” canvas – the piece that tells the main story – and then flank it with two smaller squares. A 16‑inch hero paired with two 8‑inch side‑by‑side canvases creates a balanced trio that works on everything from a bedroom wall to a home office.
Selecting the Perfect Photo or Artwork
Choosing the right image is the heart of any square canvas prints project, because the canvas will magnify every detail you’ve captured.
So, what should you look for when you scroll through your camera roll? Think about moments that make you smile the instant you see them – a kid’s laugh, a pet’s goofy pose, or a sunrise that stole your breath.
Resolution matters, but not in a scary way
First things first: the photo needs enough pixels to stay crisp when it’s stretched to a square. A good rule of thumb is at least 150 dpi at the final size, which for a 12‑inch canvas means roughly 1800 × 1800 pixels.
If your phone gave you a 12‑megapixel shot, you’re already in the safe zone for most common square sizes.
Don’t panic if the image is a little smaller than the ideal – most print‑on‑demand services will upscale gently, and the result often looks fine on a wall.
Composition that loves the square
Squares love symmetry, but they also thrive on a strong focal point that sits comfortably in the centre.
Ask yourself: does the subject naturally gravitate toward the middle, or will you have to crop heavily?
If you have a portrait where the eyes are already near the centre, you’re golden.
If the subject sits off‑centre, consider a slight rotation or a different shot.
A simple background gives the eye room to breathe, especially when the canvas is large.
Colour and mood
Think about the room where the canvas will live. Warm, saturated tones can add coziness to a living‑room wall, while cool blues or muted pastels feel right in a bedroom or office.
Do you want the artwork to be a bold statement or a subtle accent? Let the colour palette of the photo guide that decision.
And remember, glossy finishes will make colours pop, while matte will soften them – a tiny choice that changes the whole vibe.
Personal stories make the best art
One of my favourite projects was a photo of a dad holding his newborn’s tiny hand – the image was slightly grainy, but the emotion was undeniable. When we printed it as a 20‑inch square, the grain added a vintage feel that matched the family’s rustic décor.
Another client sent a silhouette of their rescue dog against a sunset. The contrast was perfect for a square canvas; the dark shape became a striking graphic that now hangs above their mantel.
Quick sanity‑check checklist
- Is the image at least 150 dpi at the size you want?
- Does the main subject sit near the centre?
- Is there enough negative space to avoid a cramped look?
- Do the colours match the room’s mood?
- Can you visualise the piece with a paper cut‑out?
Run through these five points, and you’ll feel confident that the photo you pick will translate into a canvas that looks intentional, not accidental.
When a photo just won’t work
Sometimes a picture looks great on a screen but falls flat when it’s enlarged. If you notice a lot of pixelation, blurry text, or a busy background that competes with the subject, consider swapping it out.
In those cases, try turning the image into a simple artwork – a line drawing, a watercolor‑style filter, or even a custom illustration. Many print‑on‑demand platforms let you upload a vector file, which stays razor‑sharp at any size.
So, if your favorite snap feels a bit noisy, don’t discard it; give it a creative makeover and watch it shine on a square canvas.
Final tip: mock‑up before you commit
Print a cheap black‑and‑white test strip at the exact dimensions you plan to order. Hold it up to the wall, step back, and ask yourself if the composition still feels balanced.
If something feels off, tweak the crop or choose a different image before you click “Add to Cart.” A few minutes now saves you a costly re‑print later.
Now you’ve got a toolbox of questions and checks to guide you toward the perfect photo or artwork for your square canvas prints. Happy hunting, and enjoy the moment when your chosen memory finally becomes wall‑ready art.
Printing Techniques & Finishes for Square Canvas Prints
Ink choices: why they matter
When you order a square canvas, the first thing that decides how vivid it looks is the ink. Most print‑on‑demand shops use UV‑cured or pigment‑based inks. UV‑cured ink dries instantly under ultraviolet light, so colors stay bright even in sunny rooms. Pigment ink, on the other hand, penetrates the canvas fibers and resists fading for years.
So, which one feels right for your space? If you love that pop‑color look for a living‑room gallery wall, UV is a safe bet. If you’re after a subtle, museum‑grade feel for a bedroom, pigment might be the quieter hero.
Surface finishes: matte vs. glossy vs. satin
Matte finishes swallow glare. They’re perfect for hallways where light bounces off walls all day. You’ll notice the texture more than the shine, which can make a black‑and‑white portrait feel soft and intimate.
Glossy finishes crank up the contrast. Think of a vibrant sunrise or a pet’s glossy coat – the shine makes reds richer and blacks deeper. Just remember that glossy surfaces can catch a lamp’s reflection, so place them away from direct light if you don’t want hotspots.
Satin sits right in the middle. It gives a gentle sheen without the full‑on glare of gloss. Many people pick satin when they can’t decide between matte and gloss – it works for both portraits and landscape shots.
Special coatings: protection and texture
Some providers add a clear coat on top of the canvas. This extra layer shields the ink from humidity, dust, and UV rays. If you’re gifting a canvas to a family that lives in a sunny coastal town, ask for a protective coating – it’s a small extra cost for a big peace of mind.
Other shops offer a textured “linen” coating that mimics the look of traditional canvas art. The subtle weave adds depth and can make a simple photo feel like a fine‑art print. It also helps hide any tiny imperfections that sometimes appear when you stretch a canvas over a frame.
Edge options: wrapped, framed, or raw
Edge‑to‑edge printing means the image continues around the sides of the square. This creates a seamless, modern vibe and works great when the subject has a clean background. If you want a bit more structure, a thin black or white wooden frame around the wrapped edges adds definition without stealing focus.
Raw edges expose the canvas fibers. Some artists love the rustic look, especially for black‑and‑white or minimalist designs. Just be sure the raw edge aligns with the overall aesthetic of the room – it can feel too “unfinished” in a formal setting.
Practical checklist before you hit “Add to Cart”
- Confirm the printer uses UV‑cured or pigment ink based on your color‑longevity needs.
- Choose matte for glare‑free rooms, glossy for high‑impact colors, or satin for a balanced look.
- Ask about a clear protective coating if the canvas will face sunlight or humidity.
- Decide if you want edge‑to‑edge printing, a thin frame, or raw edges for texture.
- Order a small sample swatch if the provider offers it – it’s the fastest way to see finish and texture in person.
Bottom line: the right combination of ink, finish, and edge treatment can turn a good photo into a show‑stopping piece. Play with the options, trust your gut, and remember that a square canvas is a tiny canvas of possibility – the finish you pick tells the story just as much as the image itself.
Framing and Hanging Options (Includes Comparison Table)
Okay, you’ve picked the perfect photo and nailed the size – now the real fun begins: how you’ll actually get that square canvas onto the wall. The way you frame (or don’t) and hang it can totally change the vibe, so let’s break it down together.
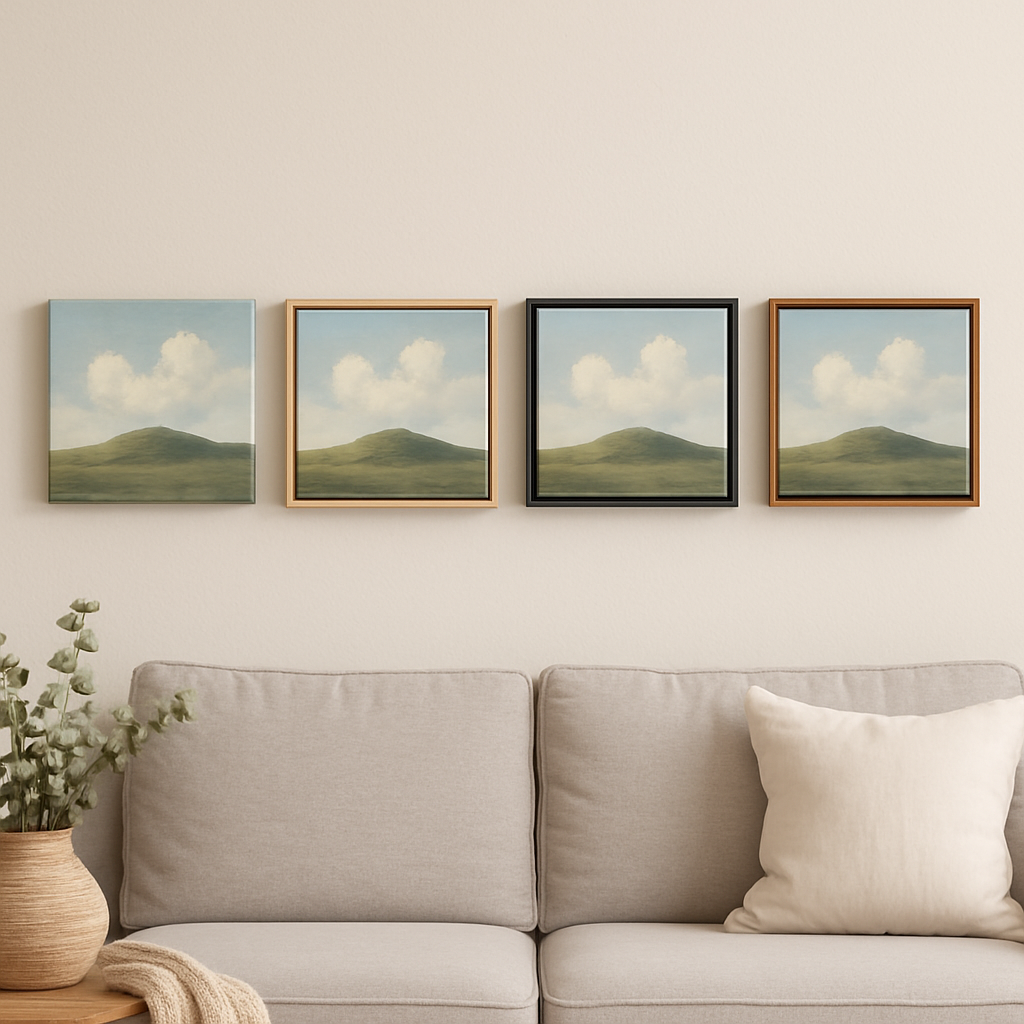
Wrapped edge vs. framed vs. raw edge
First up, the three most common edge treatments. A wrapped edge means the canvas continues around the sides, giving it a sleek, modern look that feels like a single, floating panel. A thin wooden frame adds a subtle border – think of it as a whisper of structure that can pull together other décor. And raw edges leave the fabric exposed, which can feel wonderfully rustic, especially with black‑and‑white or minimalist shots.
Which one feels right for your space? Imagine a bright family portrait on a wrapped edge – it almost disappears into the wall, letting the image do all the talking. Now picture a delicate pastel print with a thin white frame in a light‑filled kitchen; the frame gives it a little anchor without stealing the spotlight. Or think about that gritty, grainy street photo you love – raw edges could amplify the texture and make it feel like a gallery piece.
Does any of that ring a bell? If you’re still unsure, keep reading – the comparison table below will help you decide.
Hanging hardware: what actually holds the weight?
Even the sturdiest‑looking canvas can flop if you pick the wrong hardware. Most square canvases come with a pre‑drilled D‑ring on the back; all you need is a sturdy picture hook or a small nail. For heavier pieces (think 24‑inch or larger), a French cleat system spreads the load across two points and makes future adjustments a breeze.
And don’t forget about level. A quick bubble level or even the “phone app” method (place your phone flat, turn on the level) saves you from that dreaded crooked wall look. Trust me, a perfectly level canvas feels like a tiny triumph every time you walk past it.
Ready for the quick‑look table?
| Option | Description | Pros | Cons |
|---|---|---|---|
| Wrapped Edge (edge‑to‑edge) | Image prints on all four sides, no visible frame. | Modern, seamless look; easy to hang with D‑ring; good for minimal décor. | May show canvas texture on sides; less “hand‑crafted” feel. |
| Thin Wooden Frame | 1‑inch black or white frame around wrapped canvas. | Adds subtle structure; hides minor edge imperfections; matches many interior styles. | Adds a tiny amount of weight; slightly higher cost. |
| Raw Edge | Canvas fibers left exposed; no frame. | Rustic, artistic vibe; highlights texture; often cheapest. | Can look unfinished in formal rooms; may collect dust. |
Choosing the right hanging method
Now that you know the edge styles, think about how you’ll actually mount the piece. If you’re dealing with drywall, a simple picture hook works fine for anything under 5 lbs. For plaster or brick, a toggle bolt or masonry anchor will give you confidence that the canvas won’t wobble.Do you love the idea of being able to slide the canvas up or down without re‑drilling? A picture rail system lets you hang multiple canvases at varying heights using just one rail – perfect for a gallery wall that evolves over time.
And here’s a tiny tip: attach a small piece of painter’s tape to the back of the canvas at the hanging point. When you press it against the wall, the tape leaves a faint mark that tells you exactly where to place the hook. No guesswork, no extra holes.
Putting it all together – a quick checklist
- Pick an edge treatment that matches your room’s style (wrapped, thin frame, raw).
- Choose hanging hardware based on canvas weight and wall type.
- Use a level or phone app to ensure straight placement.
- Consider a picture rail for future flexibility.
- Test the hook location with painter’s tape before committing.
When you step back and see that square canvas perfectly framed and hanging just right, you’ll feel that little “wow” all over again – only this time it’s yours.
Ready to make the decision? Grab your favorite edge, snap on the appropriate hardware, and watch your memory transform into a piece of art you can actually live with.
Caring for and Maintaining Your Square Canvas Prints
We’ve gotten your square canvas up on the wall, and now you’re probably wondering how to keep that “wow” feeling fresh for years. The truth is, a little bit of TLC goes a long way, especially when the canvas is a cherished memory or a gift that means a lot.
First up, dust. A fine layer of dust can mute colors and make the surface look dull. A soft, dry microfiber cloth or a gentle paintbrush sweeps away particles without scratching the printed surface.
What about light? Sunlight is the silent thief of any artwork. Direct UV rays can fade pigments over time, so try to place the canvas away from windows or use UV‑filtering window film. If you love a sunny spot, a sheer curtain can soften the glare while still letting the room feel bright.
Now, let’s talk cleaning. When you notice a speck or a fingerprint, act quickly. Lightly dampen a cloth with distilled water, wring it out thoroughly, and pat the spot—don’t rub. The moisture should evaporate fast, leaving the ink intact.
Stubborn stains, like a kitchen grease splash, need a bit more care. Mix a tiny drop of mild dish soap with distilled water, test the solution on an inconspicuous corner, then gently dab the area. Rinse with a clean damp cloth and dry with a soft towel.
Never reach for abrasive cleaners, ammonia, or bleach. Those chemicals break down the protective coating and can cause the colors to bleed. Stick to water‑based solutions and always wipe in one direction to avoid streaks.
Humidity is another hidden enemy. Excess moisture can cause the canvas fibers to swell, leading to a warped appearance or even mold in extreme cases. Aim for a stable indoor humidity of 40‑55 % and avoid hanging the print in bathrooms or kitchens where steam gathers.
Seasonal shifts can surprise you. In winter, heating can dry out the air, while summer humidity spikes can make the canvas feel sticky. A simple hygrometer on a shelf near the artwork lets you monitor the environment, and a portable dehumidifier or humidifier can smooth out the extremes.
Handling the canvas with clean hands is a must. Oils from your fingers leave invisible marks that show up over months. If you need to move the piece, lift it by the frame or the D‑ring hardware, never by the canvas itself.
When it’s time to relocate or re‑hang, keep the original hardware handy. A picture rail system makes swapping positions painless—just slide the canvas onto a new hook and level it. If you’re using a D‑ring, a small screw‑eye anchor works well for most drywall types.
Consider adding a clear protective coating if you live in a sunny or high‑traffic area. Many print‑on‑demand services offer an optional UV‑resistant varnish that adds a thin shield without altering the finish. It’s a small upgrade that pays off in longevity.
Quick Maintenance Checklist
- Dust weekly with a dry microfiber cloth or soft brush.
- Wipe spills immediately using a lightly dampened distilled‑water cloth.
- Avoid direct sunlight; use UV‑filtering film or curtains if needed.
- Maintain indoor humidity between 40‑55 %.
- Handle by frame or hardware, never by the canvas surface.
- Store original hanging hardware for future moves.
By treating your square canvas prints like a living part of your home—not just a piece of décor—you’ll keep the colors vivid and the memories bright. A few mindful habits now mean that years from now, the canvas will still feel like it was just printed.
Budget‑Friendly Tips for Square Canvas Prints
Let’s be real— a beautiful square canvas doesn’t have to break the bank.
The trick is to think ahead, swap a few habits, and use a few clever shortcuts.
Plan before you print
Before you even click “order,” take a few minutes to visualise the final look.
Grab a piece of cardboard the same dimensions and tape it to the wall.
This cheap mock‑up shows you if the scale feels right, and you avoid costly re‑orders.
While you’re at it, compare the same image in a few different sizes.
Most print‑on‑demand sites let you preview 8‑inch, 12‑inch and 16‑inch options side by side.
The smallest size that still gives you a clear view will save both ink and shipping.
Choose the right size for your budget
Bigger isn’t always better.
A 12‑inch square can look just as striking as a 20‑inch one when you place it at eye level and pair it with complementary décor.
The price jump between 12‑inch and 20‑inch often doubles, so ask yourself if the extra wall‑space is truly needed.
- 8‑inch: perfect for gallery walls, cheap.
- 12‑inch: versatile, fits most rooms.
- 16‑inch: statement piece, higher cost.
DIY framing hacks
A lot of people think they need a professional frame, but you can get a crisp edge for pennies.
Buy a plain wooden frame at a hardware store, strip the backing, and slide your canvas in.
A small bead of hot‑glue at the corners holds it tight without expensive moulding.
If you love the “wrapped edge” look, skip the frame altogether and use picture‑rail hooks that let the canvas sit flat against the wall.
The rail system costs under $15 and can hold multiple pieces, saving you both money and future drilling.
Smart material choices
Not all canvas materials are created equal, and the price gap can be huge.
A basic cotton‑blend canvas will do just fine for indoor use, while a polyester‑coated option is pricier but adds moisture resistance.
If your home is climate‑controlled, the cheaper cotton works perfectly.
Look for services that offer a “no‑gloss” matte finish as standard.
Glossy finishes often carry an extra surcharge, and matte actually hides minor dust spots better— a win‑win for your wallet and your eyes.
Shipping and bulk discounts
Shipping can sneak up on you.
Choose a provider that ships flat‑packed and lets you add a “hold for pickup” option if you have a local post office nearby.
You’ll save a few dollars and avoid the risk of a dented box.
Got more than one canvas in mind?
Many sites give a 5‑10 % discount when you order two or more at once.
Even if you’re only planning one piece now, consider ordering a second size as a future gift; the price drop pays off later.
Maintenance that saves money
The best way to keep costs low is to protect the print from damage.
Dust weekly with a microfiber cloth – it’s free if you already have one – and wipe spills immediately with a damp water cloth.
Avoid harsh chemicals; they can strip the ink and force a replacement.
A simple UV‑filtering film on your windows cuts down fading, extending the life of the canvas by years.
The film costs a few dollars per window but saves you from re‑printing later.
So, with a little planning, smart material picks, and a DIY attitude, you can enjoy gorgeous square canvas prints without draining your gift budget.
Ready to give your walls a fresh look? Start with a cardboard mock‑up, pick the right size, and let the savings surprise you.
Conclusion
If you’ve made it this far, you already know that square canvas prints can turn a simple snapshot into a gallery‑worthy focal point.
Remember the moment Jenna hung her kids’ photo and got that “Is that art?” reaction? That little surprise is exactly what a well‑chosen canvas does for any room.
So, what’s the next step? Grab that favorite image, measure your wall, and build a cardboard mock‑up. It’s cheap, it’s quick, and it lets you see the size before you click “order.”
Pick the finish that matches your lighting – matte for soft rooms, glossy for a pop of colour – and don’t forget a protective coating if sunlight’s a daily guest.
Finally, treat the canvas like a living memory: dust it weekly, avoid harsh cleaners, and hang it level with a simple D‑ring or a picture‑rail if you like to swap pieces later.
Feel that little thrill when you step back and see your memory perfectly framed? That’s the magic of square canvas prints – personal, affordable, and surprisingly easy.
Ready to give your walls a fresh story? Head over to heartful.gifts and start designing your own square canvas today.
Imagine the compliments rolling in as friends notice the personal touch you’ve added – it’s worth every minute.
FAQ
What size square canvas print should I choose for a small living room?
Start by measuring the wall space you have – think of the canvas as taking up roughly a third of the width. In a cozy living room, an 8‑inch or 12‑inch square often feels just right because it adds personality without overwhelming the room. Use a piece of cardboard cut to those dimensions and tape it up; step back and see how it lives with your sofa and coffee table. If the mock‑up feels too tiny, bump up to 14‑inch, but keep the 30‑50 % rule in mind.
Can I use any photo for a square canvas print, or are there limits?
You can technically print any image, but the result hinges on resolution and composition. Aim for at least 150 dpi at the final size – that usually means a 1800 × 1800‑pixel file for a 12‑inch canvas. If the subject is centered and the background isn’t cluttered, the square crop will look natural. For busy shots, consider cropping tighter or applying a simple filter to pull the focus to the main subject before you upload.
How do I hang a square canvas without damaging my walls?
The easiest route is to use the D‑ring that comes pre‑drilled on most canvases. Find a sturdy picture hook or a small nail that can hold the weight (most 12‑inch squares are under 5 lb). For extra confidence on drywall, a simple toggle bolt works well. Before you drive anything in, stick a tiny piece of painter’s tape on the back where the hook will sit – press it to the wall and you’ll see the perfect spot without guesswork.
Will a glossy finish make my colors look better?
Glossy definitely amps up contrast and makes reds pop, which is great for vibrant landscapes or pet portraits with shiny coats. The trade‑off is glare – a lamp or window can create hotspots that wash out details. If your room gets a lot of direct light, a satin or matte finish often gives a softer look while still preserving most of the colour punch. Test a small sample strip if you can; holding it up to the wall will show you the sheen in real time.
How often should I clean my square canvas print?
Dust it once a week with a dry microfiber cloth or a soft paintbrush – that’s enough to keep the surface looking fresh. If you notice a fingerprint or a smudge, lightly dampen the cloth with distilled water, wring it out thoroughly, and gently dab the spot. Never rub, and avoid any cleaners with ammonia or bleach; they’ll eat away the protective coating and fade the ink over time.
Is it worth adding a protective coating if the canvas will sit in a sunny room?
Absolutely. A clear UV‑resistant varnish adds a thin shield that slows fading caused by sunlight, and it also repels dust a bit better. The extra cost is usually just a few dollars per print, but it can extend the life of your colours by years. If you can’t get a coating, consider hanging the canvas away from direct windows or using sheer curtains to diffuse the light.