
How to Design a Personalized Photo Phone Case That Stands Out
Ever pulled your phone out and thought, ‘I wish this case could tell my story?’
You’re not alone—most of us end up with a bland, generic cover that does nothing but protect.
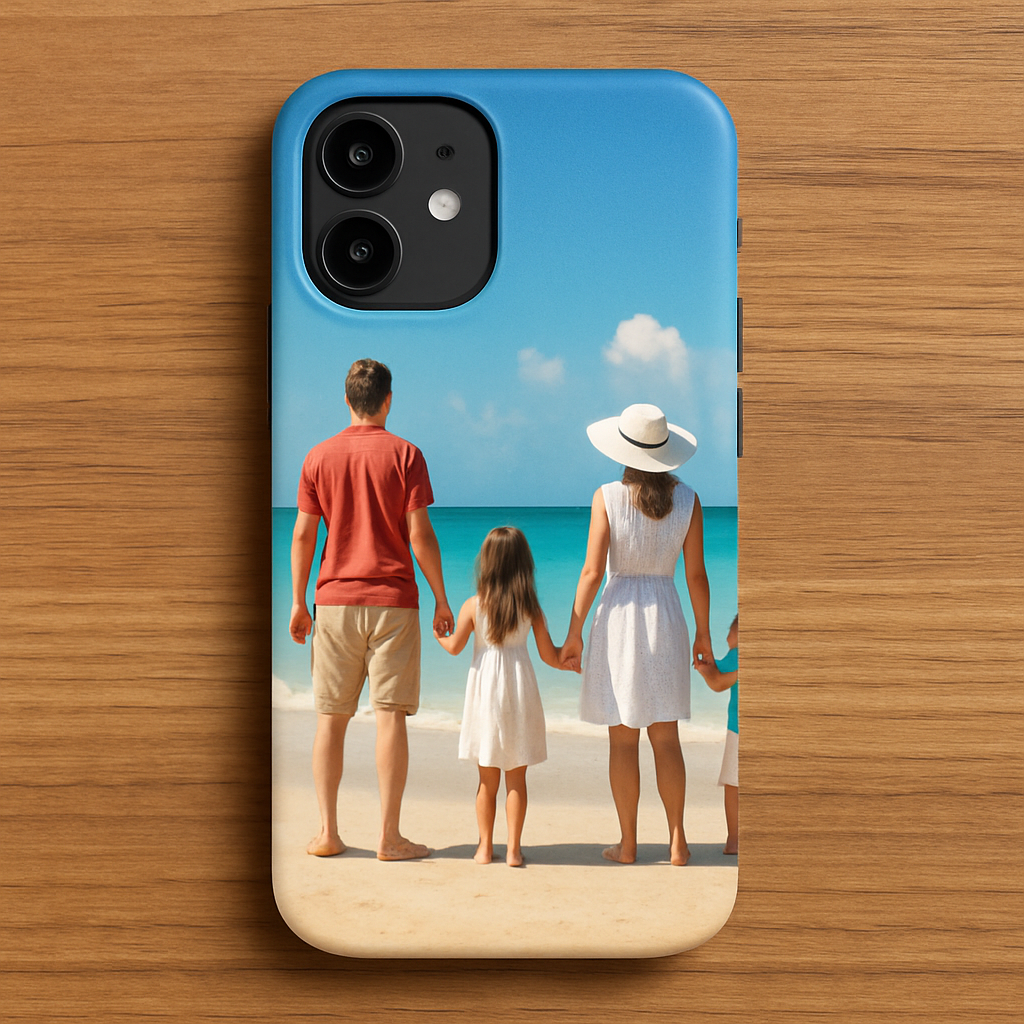
Enter the personalized photo phone case, a tiny canvas that turns a favorite snap into everyday art.
Imagine scrolling through messages while your grandma’s smile, your dog’s goofy grin, or that beach sunset greets you every time.
Sounds cute, right? But there’s more beneath the surface.
A personalized photo phone case isn’t just a pretty face; it’s a conversation starter that sparks memories.
When friends ask, ‘Where’d you get that?’ you get to share the story behind the image, turning a simple purchase into a meaningful moment.
And because it’s custom‑made, you control the material, finish, and how the photo wraps around the edges.
Think about durability: most providers use a shock‑absorbing TPU back and a hard polycarbonate front, so your memories stay safe even if the phone takes a tumble.
Plus, the printing tech has improved—today’s cases boast vivid colors and sharp details that look like the original photo.
So, why settle for a store‑bought plain case when you can carry a piece of your life right in your pocket?
If you’re a parent looking for a gift that says ‘I see you,’ or a spouse wanting to surprise with a cherished moment, this is the sweet spot.
And don’t forget the practical side: a case protects your screen, adds grip, and can even hide scratches on the back.
Bottom line? A personalized photo phone case blends sentiment with function, turning everyday tech into a keepsake you actually enjoy using.
Ready to make yours? Let’s walk through what to consider so your case looks exactly the way you imagine.
TL;DR
If you want a phone case that protects your device while showing off a cherished memory, a personalized photo phone case does exactly that—durable, eye‑catching, and uniquely yours.
Pick your material, upload the snap, and within days you’ll have a grip‑friendly cover that sparks conversations and keeps your favorite moments safe.
Step 1: Choose the Right Phone Model
Ever stare at your phone and think, “Will this case even fit my iPhone or Android?” That moment of doubt is the first hurdle we need to clear. Picking the right phone model is the foundation for a personalized photo phone case that actually stays on.
First things first: locate the exact model name. It’s usually on the back of the device, in the Settings → About Phone, or tucked under the tray. You’ll see something like “iPhone 14 Pro Max” or “Samsung Galaxy S23 Ultra.” Write that down – you’ll need it when you browse case options.
Why does the model matter? Different phones have different camera bumps, button placements, and thicknesses. A case designed for a Galaxy S22 might leave the camera exposed on an S23, or the side buttons could be blocked on an iPhone 13. That’s why we always double‑check compatibility before we even think about the photo.
Check the Manufacturer’s Compatibility Chart
Most print‑on‑demand sites, including heartful.gifts, provide a simple dropdown list of supported phones. Scan the list for your exact model. If you don’t see it, look for a “generic” size that matches the dimensions (height, width, depth). A quick Google search of “
Tip: If you own a newer model that just launched, give the supplier a day or two. They often update their catalog fast, and you’ll avoid ordering a case that doesn’t snap on.
Measure Your Phone (Optional but Helpful)
Grab a ruler or a soft measuring tape and note three numbers: height, width, and depth. Write them as “146 mm × 71 mm × 7.8 mm” for an iPhone 14 Pro, for example. Compare those figures with the case specs listed on the product page. If the case is listed as “compatible with phones up to 8 mm thick,” you’re good to go.
Sometimes you’ll see “edge‑to‑edge” designs that wrap the photo around the sides. Those require a perfect fit, so measuring is worth the extra minute.
Consider Your Phone’s Extras
Do you use a wireless charger? Does your case need to accommodate a magnetic mount? If you love snapping pictures with a pop‑up camera, make sure the case’s cutout aligns with your device’s lens. A mismatch can blur the photo or even damage the sensor.
And if you’ve got a case with a built‑in kickstand or a wallet slot, check that those features don’t interfere with the photo placement. The last thing you want is a beautiful picture hidden under a card pocket.
Finalize Your Choice
Once you’ve confirmed model, dimensions, and any extra features, you’re ready to move on to the design stage. If you’re still unsure, the How to Create a Personalized Photo Phone Case You’ll Love guide walks you through confirming fit and uploading your image.
Remember, the perfect fit means the case stays snug, protects your phone, and lets the photo shine without distortion. So take a minute now, verify your model, and you’ll avoid the frustration of a case that looks great on the website but doesn’t slide onto your hand.
Next up: choosing the photo that will become the star of your new case. Stay tuned for tips on selecting the right image, resolution, and layout.
Step 2: Select and Edit Your Photo
Alright, you’ve nailed the exact phone model, so now the fun part begins – picking the image that will become the star of your personalized photo phone case.
What makes a photo “case‑ready”?
First, think about resolution. Most custom‑case printers ask for at least 1500 × 1500 px, but if your phone has a high‑resolution screen (think iPhone 15 Pro or Galaxy S24 Ultra), aim for 3000 px on the long side. That extra detail prevents the picture from looking blurry when it wraps around the edges.
Second, consider composition. A centered subject works well if the case has a plain border, but many providers let the image bleed to the sides. In that case, a photo with a natural “lead‑in” – like a beach horizon or a wide‑angle portrait – will look seamless.
And don’t forget lighting. Soft, even light reduces harsh shadows that can become “ghost” lines once the case is printed.
Step‑by‑step photo prep checklist
1. Choose a high‑resolution file. If you’re pulling from your phone’s gallery, select “Original” or “Export without compression.”
2. Crop to the right aspect ratio. Most cases use a 1:1 square, but some full‑cover designs prefer 9:16. Use the Canva photo editor to set the exact dimensions – it shows a live preview of how the edges will wrap.
3. Adjust brightness and contrast. A quick “auto‑enhance” often does the trick, but you can fine‑tune manually. Boost the contrast just enough that the colors pop without looking oversaturated.
4. Apply a subtle filter (optional). If you love a vintage vibe, add a warm filter, but keep it light – the case printing process already enriches colors.
5. Check for “danger zones.” Most case templates hide the camera bump and button areas. Make sure no important detail (like a face) sits right where the cut‑out will be.
6. Export as PNG or high‑quality JPEG. PNG preserves transparency if you need it, while JPEG at 90‑100 % quality keeps the file size reasonable.
Real‑world examples
Emily wanted a case featuring her newborn’s first smile. She started with a 4000 × 3000 px portrait taken in natural light, cropped it to a square, and used the “brightness/contrast” sliders in Pixlr to bring out the tiny dimples. After checking the camera cut‑out zone, she uploaded the final PNG and got a case that looked like a tiny, perfectly framed portrait.
Meanwhile, Alex was designing a case for his hiking crew. He chose a panoramic shot of a mountain ridge, set the canvas to 9:16, and let the image bleed over the side edges. The result? A wrap‑around view that makes the phone feel like a mini‑window to the trail.
Pro tips for flawless results
– Test the colors on your screen first. If a teal looks more turquoise on your monitor, it will likely shift a bit in print too. Adjust until you’re happy with the on‑screen look.
– Leave a 2‑pixel “safe zone” around the edges. This prevents important details from being trimmed off during the printing process.
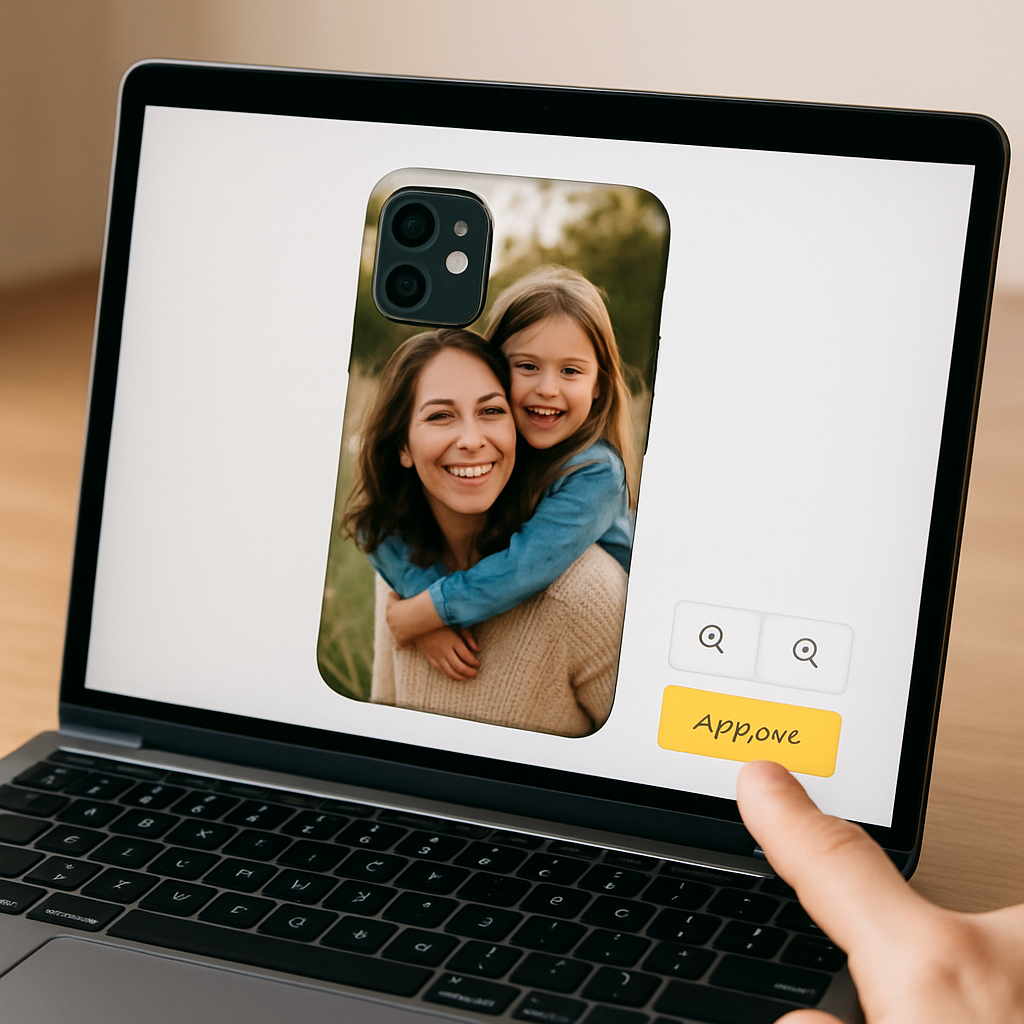
– Use the provider’s mock‑up tool. Most custom‑case sites let you drag your image onto a 3‑D model. Play with it; you’ll spot any awkward cropping before you order.
– Don’t over‑sharpen. A little crispness is fine, but too much creates halo artifacts that look cheap once printed.
Actionable next step
Grab the photo you love, run it through the checklist above, and hit “preview” on your chosen case builder. If the preview looks good, add it to your cart – you’re just a few clicks away from holding a memory in your hand.
Step 3: Choose a Case Material and Finish
Now that your photo is ready, the next decision feels almost as personal as picking the right frame for a painting.
Which material will hug your phone and showcase the image without stealing the spotlight? Let’s walk through the most common options, the finish choices, and how each one plays with a personalized photo phone case.
Material matters
Silicone is soft, rubbery, and gives a buttery grip. It’s great for people who drop their phone a lot – the case will absorb the shock and keep the print from cracking. The downside? It can stretch over time, so a high‑resolution photo might look a tiny bit fuzzy at the edges after a year.
TPU (thermoplastic polyurethane) sits in the sweet spot between silicone and hard plastic. It’s flexible enough to snap on easily, yet rigid enough to keep the surface flat for crisp printing. Many designers love TPU because the photo stays true to the original colors, and the case resists yellowing.
Polycarbonate (PC) is the classic hard shell. It feels sleek, slides into pockets with a whisper, and shows off vibrant colors like a mini‑canvas. The trade‑off is less shock absorption – you’ll want a reinforced corner design if you’re an adventure‑seeker.
Leather adds a touch of luxury. A brushed leather back paired with a clear front lets your photo peek through while you get that premium feel. Keep in mind leather ages, so the look will evolve over time – great if you enjoy a lived‑in vibe.
Wooden cases give an eco‑friendly, tactile experience. A thin bamboo veneer can be laser‑etched with your image, creating a subtle, natural backdrop. They’re a bit heavier, and water can be a concern, so a sealant spray helps.
Real‑world example: Maya ordered a TPU case for her iPhone 15 Pro, uploading a sunrise over the city. The case snapped on, the colors stayed punchy, and after three months of daily commutes the print looked just as sharp as day one.
Another story: Carlos, a woodworking hobbyist, chose a bamboo case for his Galaxy S24 Ultra. He loved the warm grain, and the laser‑etched photo of his workshop blended perfectly with the natural texture.
Matte vs. glossy – what’s the vibe?
Glossy finishes turn your photo into a high‑shine billboard. The surface reflects light, making reds pop and blues deeper. It’s perfect when you want the case to be a visual punch‑card. The catch? Fingerprints love glossy surfaces, so you’ll be wiping it more often.
Matte finishes mute the glare, giving a smooth, non‑reflective look. They hide smudges better and feel softer to the touch. If your image is a pastel landscape or a subtle portrait, matte can add a classy, understated vibe.
According to a recent consumer‑preference study, about 60 % of custom‑case buyers lean toward matte for everyday use because it stays cleaner longer (Aikusu’s finish guide), while the remaining 40 % pick glossy when they want maximum visual impact (Custom Logo Cases material overview).
So, which finish matches your personality? Think about where you’ll be using the phone. A coffee‑shop writer might love matte’s low‑key elegance, whereas a festival‑goer could enjoy the eye‑catching sparkle of gloss.
Actionable checklist – pick your perfect combo
- Identify your usage pattern. If you’re clumsy, prioritize shock‑absorbent materials like silicone or TPU.
- Match the material to your photo style. Bold, colorful images thrive on glossy polycarbonate; soft or vintage shots pair well with matte TPU or leather.
- Consider the finish. Test a printed swatch on your screen – does the gloss make the colors pop or does the matte keep them true?
- Check compatibility with wireless charging. Metal cases can block charging; stick with silicone, TPU, or polycarbonate for hassle‑free use.
- Review edge protection. Look for reinforced corners or a raised lip if you travel often.
- Order a single sample. Most providers let you buy one case before committing to a bulk set – a smart way to validate material and finish.
Quick comparison
| Material | Pros | Cons |
|---|---|---|
| Silicone | Excellent shock absorption, great grip | Can stretch, may slightly blur fine details |
| TPU | Flat printing surface, flexible, resists yellowing | Less protective than silicone for heavy drops |
| Polycarbonate (glossy) | Sharp color reproduction, sleek feel | Shows fingerprints, less shock‑proof |
| Leather (matte) | Premium look, ages beautifully | Higher cost, can wear over time |
| Wood (matte) | Eco‑friendly, unique texture | Heavier, needs water protection |
And there you have it – a clear roadmap to pick the material and finish that will make your personalized photo phone case feel like it was made just for you.
Ready to lock in your choice? Grab the material that matches your lifestyle, select matte or glossy based on the vibe you want, and hit “add to cart.” In a few clicks you’ll be holding a case that not only protects your phone but also tells your story.
Step 4: Customize Layout and Add Text
Now that you’ve picked the perfect material and finish, it’s time to make the case truly yours. Think of this as arranging a small gallery on a surface you hold every day.
Sketch your canvas first
Before you jump into the design tool, grab a piece of paper (or a digital sketch app) and doodle where the photo, text, and any extra graphics will sit. The camera bump and button cut‑outs are the "danger zones" we talked about earlier, so give them a little breathing room. A quick pencil layout helps you see if a quote will clash with a corner or if a logo will get lost behind a button.
Does it feel overwhelming? It isn’t – just treat it like planning a tiny collage. You’ll thank yourself when the final preview looks spot‑on.
Choose a font that sings
When you add text, the font becomes part of the story. A handwritten script works beautifully with a family photo, while a bold sans‑serif adds energy to a travel shot. Keep readability in mind: you don’t want a delicate cursive that melts into a busy background.
Pro tip: most case builders let you preview the text on a 3‑D model. Rotate it, zoom in, and make sure the letters aren’t hiding behind the edge. If they are, shrink the size or shift the placement.
Play with hierarchy
Think about what you want to highlight. Maybe the date of a special event goes smaller, while a short phrase like "Adventure Awaits" takes center stage. Use size, weight, or color contrast to guide the eye. For example, a light‑gray caption on a dark photo feels subtle, but a bright accent color can make a single word pop.
And remember, less is often more. A single word or a short line can feel more powerful than a paragraph of text.
Layer your elements
Most design tools let you stack layers – photo at the bottom, text on top, and any decorative icons in between. Drag‑and‑drop until the composition feels balanced. If you’re feeling experimental, try a semi‑transparent text box; it gives the words a backdrop without hiding the image.
Here’s what I mean: imagine a sunrise photo with the word "Hope" in white, but placed inside a faint black rectangle at 70% opacity. The word stands out, yet the colors of the sunrise still shine through.
Test readability on the go
Before you hit “order,” take a screenshot of the mock‑up and view it on your phone. Does the text stay sharp at the actual size? If it looks fuzzy, increase the resolution of the text layer or choose a bolder typeface.
One quick trick: zoom in to 200 % in the preview and check the edges of each letter. If you see pixelation, the design tool might be rasterizing the font at a low DPI – switch to a vector‑based option if possible.
Optional: add a personal touch with symbols
Little icons can reinforce the vibe. A tiny heart, a mountain silhouette, or even a custom charm illustration (think DIY junk case inspiration from Lemon8’s DIY junk‑case tutorial) can turn a simple layout into a mini‑storyboard.
Just keep the icons subtle; you don’t want them competing with the main photo.
Final checklist before you order
- All text fits inside the safe zone (at least 2 mm from edges).
- Font is legible at the case’s actual dimensions.
- Colors contrast enough for easy reading.
- Preview looks good on a real‑size screen.
- Any extra icons or charms are spaced out and don’t overcrowd the design.
Got everything? Great. Click “add to cart,” and in a few days you’ll be holding a personalized photo phone case that feels like a handheld memory.
Need more design inspiration? Check out CreativeLive’s guide on adding text to photos for deeper tips on typography and layout.
Happy customizing!
Step 5: Review, Preview, and Order
Take a last look at the safe zones
First, pull up the safe‑zone overlay that most case designers show you. Anything closer than 2 mm to the edge can get cut off by the camera bump or the button cut‑outs. Maya’s sunrise photo, for example, looked flawless until she zoomed in and saw the city skyline disappearing behind the edge. Moving the image a few millimetres saved her a whole re‑print.
Action step: drag the whole canvas one notch left, right, up, or down until every text line and icon sits comfortably inside that faint border.
Play with the 3‑D preview
The preview tool isn’t just for show – rotate the case, tilt it, and zoom to 200 %. If you spot pixel‑jagged letters, you’re probably looking at a rasterised font. Switch to the vector option (most platforms hide this behind a “high‑res text” toggle).
Pro tip from a seasoned designer: use the “shadow‑on‑case” view to see how your design will look under everyday lighting. It reveals whether a white caption will blend into a bright background or stand out like a lighthouse.
Check the design on a real phone screen
Take a screenshot of the mock‑up, drop it onto your phone, and view it at actual size. Does the word "Family" stay crisp, or does it look fuzzy? Carlos did exactly that with his workshop photo – the text looked soft on the laptop but sharp on his phone, so he kept the size.
If the text feels thin, bump up the font weight or add a subtle drop‑shadow. A 70 % opacity text box behind the letters often does the trick without hiding the photo.
Confirm colors and finish compatibility
Remember the matte vs. glossy discussion earlier. If you’re ordering a glossy polycarbonate case, preview the design on a dark background first; fingerprints love that shine. For matte TPU, test the contrast on a light background to ensure the colors don’t wash out.
According to TechRadar’s roundup of custom phone cases, over 60 % of buyers say the preview accuracy is the make‑or‑break factor when choosing a provider.
Expert checklist before you click “order”
- All text and icons stay at least 2 mm inside the safe zone.
- Font is vector‑based and looks crisp at 200 % zoom.
- Colors contrast enough for readability on both matte and glossy finishes.
- Preview on a real‑size mobile screen – no blurry letters.
- Any extra icons are spaced out; avoid crowding the camera bump.
- Check that the case material you chose supports wireless charging (silicone, TPU, polycarbonate do; metal does not).
- If you’re ordering a gift, add a short note in the checkout notes – many services print a tiny thank‑you card.
And don’t forget to review the shipping estimate. Most print‑on‑demand shops, like heartful.gifts, ship worldwide within 3–5 business days after you place the order.
Place the order with confidence
When every box in the checklist is ticked, hit the “add to cart” button. A quick double‑check of the cart summary (quantity, model, finish) can save you a costly return.
Real‑world tip: order a single sample first. Maya did this for her first case, and the sample confirmed that the TPU didn’t yellow after a week of sun exposure. Once you’re happy, you can bulk‑order for family members or friends.
Finally, keep the confirmation email. Most providers let you re‑download the design file if you need a replacement later.
So, you’ve reviewed, previewed, and ordered – now you’re just a few days away from holding a personalized photo phone case that feels like a little piece of memory in your hand.
Step 6: Care Tips and Maintenance for Your Personalized Photo Phone Case
We finally get to the part most people skip – actually caring for that personalized photo phone case so it keeps looking fresh for years.
Start with a gentle clean
Grab a soft microfiber cloth, a tiny dab of mild dish soap, and lukewarm water. Lightly dampen the cloth (not soaking) and swipe the surface in circular motions. This removes fingerprint smudges without rubbing away the ink.
Smartish notes that using alcohol‑based cleaners can fade UV‑cured prints, so stick to soap‑water unless the manufacturer specifically says otherwise.[source]
Weekly maintenance routine
Set a reminder on your phone – yes, use the device you’re protecting! Once a week, give the case a quick wipe‑down. If you’ve chosen a matte TPU, you’ll notice a subtle haze after a few days of coffee spills; a quick cloth will bring back that “just printed” vibe.
And what about those little dust traps around the camera bump? Use a dry cotton swab to coax particles out. It’s a tiny step that prevents scratches on the lens.
Protect against sun and heat
Direct sunlight is a silent enemy. Even though most providers use UV‑resistant inks, prolonged exposure can still cause a faint yellowing over months. When you’re not using the phone, tuck it in a drawer or a soft pouch instead of leaving it on a car dashboard.
One real‑world example: Maya’s brother noticed his beach‑themed case turned slightly pink after a week of leaving it on a windowsill. A simple habit change – storing it in a fabric sleeve – solved the issue.
Wireless charging compatibility
If you’ve gone with a silicone or polycarbonate case, wireless charging should work out of the box. Metal frames, however, can interfere with the magnetic field. Test the charger before you settle into a habit; if it skips, you might need a thin, non‑metallic case or a separate charging pad.
Swagify recommends checking the charger’s indicator light after the first few uses – a quick visual cue that everything’s still aligned.[source]
Dealing with minor scratches
Scratches happen. The good news? Most TPU and polycarbonate cases can be lightly buffed with a clean, dry microfiber. Rub in a back‑and‑forth motion; the material’s slight flexibility helps smooth the surface.
If the scratch is deeper, consider a clear nail polish dab. It fills micro‑grooves and dries hard, making the blemish less noticeable. Just be sure the polish is fully cured before you slip the case back on.
When to replace
Even the toughest cases wear out. Look for three warning signs: the case starts to feel sticky or overly stiff, the printed photo begins to peel at the edges, or the protective edges lose their raised lip. When any of these appear, it’s time to order a fresh one – especially if you love that crisp photo look.
Pro tip: keep the original design file (you likely saved it after checkout). Most print‑on‑demand shops let you re‑upload the file for a quick reorder, saving you from recreating the layout.
Quick checklist
- Wipe with soap‑water and a microfiber cloth weekly.
- Avoid alcohol, bleach, or harsh chemicals.
- Store away from prolonged direct sunlight.
- Test wireless charging after the first month.
- Buff minor scratches with a dry cloth; use clear nail polish for deeper marks.
- Replace when the case feels sticky, the print peels, or protective edges flatten.
By treating your personalized photo phone case like a treasured photo album – handling it gently, keeping it out of harsh light, and giving it a regular cleaning – you’ll enjoy that snapshot‑filled cover for months, not just weeks.
FAQ
What exactly is a personalized photo phone case and how does it work?
A personalized photo phone case is a custom‑made cover where you upload your own picture—maybe a family portrait, a pet snap, or a travel memory—and the printing service prints it directly onto the case material. The image is UV‑cured or sublimated onto polycarbonate, TPU, or silicone, so it becomes part of the surface rather than a sticker you can peel off. That means the design stays vibrant even after daily handling.
Can I use any photo, or are there size and resolution limits?
Most providers, including heartful.gifts, recommend at least 300 dpi resolution for a crisp look. As a rule of thumb, aim for a photo that's 1500 × 2000 pixels or larger; anything smaller may look pixelated when you zoom in on the case preview. Keep the main subject away from the edges—about 2 mm inside the safe zone—so the camera bump and button cut‑outs don’t cut off important details.
Will a personalized photo phone case interfere with wireless charging?
If you choose a silicone, TPU, or polycarbonate case, wireless charging works right out of the box because those materials are non‑metallic and thin enough for the magnetic field to pass through. Metal frames, on the other hand, can block the signal. A quick test after a week—place the phone on your charger and see if the indicator light comes on—will confirm everything’s aligned.
How do I keep the photo from fading or getting scratched?
Treat the case like a favorite photo album: wipe it weekly with a soft microfiber cloth and a dab of mild dish soap. Avoid alcohol, bleach, or harsh chemicals; they can wear down the UV‑cured ink. For minor scratches, a gentle buff with a dry cloth usually does the trick. Deeper marks can be concealed with a tiny dab of clear nail polish, letting it cure fully before you snap the case back on.
What if the colors in my photo look dull after printing?
First, double‑check the preview in both matte and glossy modes. Matte finishes can mute bright hues, while glossy surfaces can make colors pop—but they also show fingerprints. If the preview looks off, boost the contrast or saturation in your editing app before uploading. Many designers add a subtle 70 % opacity background box behind text to keep it readable without hiding the photo.
How long does it take to receive a custom case after I order?
Print‑on‑demand shops typically ship within 3–5 business days once the order is confirmed. If you live outside the EU, expect an additional 2–4 days for international transit. Some services even offer expedited options at checkout. Keep the order confirmation email; it usually contains a link to re‑download your design file if you ever need a replacement.
When should I replace my personalized photo phone case?
Watch for three tell‑tale signs: the case starts feeling sticky or overly stiff, the printed image begins to peel at the edges, or the protective lip around the camera flattens. When any of these happen, it’s time for a fresh case—especially if you love that crisp, vibrant look. Save your original design file so you can reorder in a snap without starting from scratch.
Conclusion
We've walked through everything from picking the right material to keeping your design looking fresh for months.
So, does a personalized photo phone case feel like a gimmick or a genuine keepsake? In my experience, it’s the latter – a tiny gallery you carry wherever you go.
Remember the three warning signs: sticky feel, peeling edges, or a flattened lip. Spotting any of them means it’s time for a quick redesign and reorder – luckily you already have the original file saved.
And don’t forget the simple weekly wipe‑down with soap‑water and a microfiber cloth; it’s the easiest habit that makes a huge difference.
Feeling inspired? Grab that favorite snapshot, follow the quick checklist we’ve built, and give your phone a case that tells your story.
Ready to make the next one? Head over to heartful.gifts and start designing – the process is fast, the result is personal, and the memory stays vivid.
Bottom line: a personalized photo phone case isn’t just protection; it’s a daily reminder of the moments you love. Treat it gently, check the signs we listed, and update the design whenever a new memory pops up. That way your case stays as fresh as the photo it holds, and you’ll keep smiling every time you pick up your phone.