
How to Create a Personalized Recipe Book Stand That Fits Your Kitchen
Ever opened a family cookbook and struggled to keep the pages from slipping while you’re trying to follow a recipe?
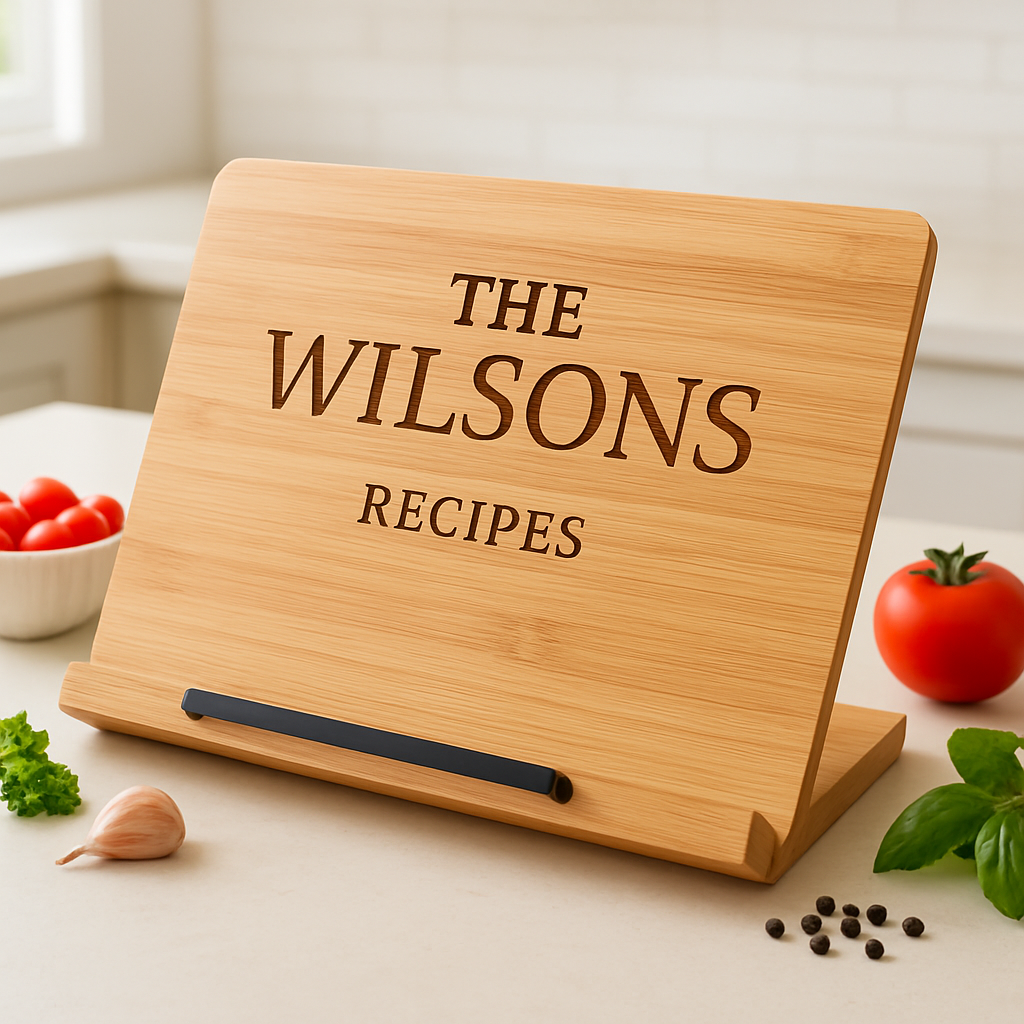
I’ve been there, hunched over the kitchen counter, the book sliding around like a nervous cat. That tiny frustration is exactly why a personalized recipe book stand can feel like a lifesaver.
Think about the last time you handed your mom a handwritten recipe and she tried to read it with one hand while stirring a pot with the other. Now picture that same moment, but the book sits upright, stable, and even displays her name or a sweet quote on the base. We've seen a well‑designed stand turn that chaotic shuffle into a smooth, proud showcase of family heritage.
But let’s real – not every stand is created equal. Some are flimsy, wobble when you flip a page, or hide the details you wanted to highlight. That’s why we advise checking the base weight and the engraving quality before you click ‘add to cart’.
So, how do you pick the perfect one? First, consider the size of the recipe books you usually use – a compact paperback needs a smaller footprint than a hefty heirloom volume. Second, think about the material: bamboo adds warmth and durability, while metal can give a modern, industrial vibe. Finally, personalize it with something meaningful – a family name, a favorite cooking mantra, or a tiny illustration of a whisk. You’ll love it.
When the stand sits on the counter, pages stay put and you can read with one hand, while the personalized detail sparks conversation.
Ready to ditch the wobble and bring a touch of love to your kitchen? Let’s dive into the details of choosing, caring for, and gifting a personalized recipe book stand that will become a beloved staple in any home.
TL;DR
A personalized recipe book stand keeps your cherished cookbooks steady, lets you read hands‑free, and adds a heartfelt, custom touch to any kitchen. Choose the right size, material and engraving, then enjoy a sturdy, beautiful centerpiece that makes family recipes easy to share and cherish together every day at home.
Step 1: Choose the Right Materials
First thing’s first: the material you pick sets the whole vibe for your personalized recipe book stand. Imagine running your hand over a smooth bamboo base versus a cold metal frame – the tactile experience alone can make or break the joy of flipping through Grandma’s handwritten pies.
We usually start with the classics – solid wood, reclaimed pine, or bamboo. Wood feels warm, it ages nicely, and it takes laser engraving like a champ. Bamboo, on the other hand, is lightweight, naturally water‑resistant, and adds a hint of eco‑chic that many gift buyers love.
Metal isn’t just for industrial loft kitchens. Brushed stainless or matte black aluminum gives a modern, sleek look and can hold up to heavy heirloom volumes without wobbling. The trade‑off? It can get a bit colder to the touch, and intricate fonts sometimes need a deeper cut to stay legible.
Weight matters more than you think. A heavier base – think dense hardwood or a metal‑filled core – keeps the stand steady when you’re juggling a ladle and a whisk. Lighter options like thin bamboo are great for a casual brunch nook, but pair them with a wider footprint to prevent tipping.
How the Material Impacts Engraving
Engraving on wood or bamboo is a breeze; the laser burns a crisp, contrasty line that reads clearly even after years of kitchen steam. Metal requires a different approach – you’ll often see a darker anodized finish or a subtle etched look, which can look elegant but may need a slightly larger font to stay readable.
If you’re gifting a stand to a parent who loves a rustic kitchen, go with reclaimed wood and a hand‑scripted family motto. For a spouse who’s all about minimalism, a matte metal base with a simple monogram feels just right. For more inspiration, check out our Creative Ideas and Timeless Charm: Personalized Recipe Book Gifts for Grandma guide.
Eco‑Friendly Choices
Many of our customers ask, “Is bamboo sustainable?” Absolutely. It grows fast, needs little pesticide, and its natural grain hides any minor scratches. Pairing a bamboo stand with a recycled‑paper recipe card set makes the whole gift feel responsibly curated.
For the ultra‑green crowd, look for FSC‑certified wood. It guarantees the timber comes from responsibly managed forests, which adds an extra layer of meaning when you’re gifting a family heirloom.
Budget Considerations
Price points can swing wildly. A basic bamboo stand might sit around $30, while a custom‑engraved walnut piece can climb to $80 or more. Remember, you’re not just buying a holder; you’re investing in a piece that will showcase cherished recipes for generations.
Tip: If you’re on a tighter budget, choose a simple wood base and let the personalization do the heavy lifting. A heartfelt quote or a family name engraved in a beautiful script can make a modest stand feel priceless.
Looking for other thoughtful kitchen‑gift ideas? Midnight Scriber offers unique, fire‑proof document bags that make great companion gifts for the organized home chef.
And if you want to pair your stand with a stylish accessory for the foodie‑partner who loves to entertain, check out the pink designer shoulder bag guide. It’s a fun way to turn a practical present into a full‑on gifting experience.
After you’ve settled on the material, caring for it is simple. Wood benefits from a light oil coat every few months to keep it from drying out. Bamboo just needs a quick wipe with a damp cloth – no harsh chemicals. Metal stands love a dab of stainless‑steel cleaner now and then to keep that shine.
Actionable step: grab a ruler, measure the height and width of the biggest cookbook you own, then compare those numbers to the dimensions listed for each material option. If there’s even a half‑inch wiggle room, you’re good to go. Once you’ve chosen, head over to heartful.gifts and customize the engraving – that’s where the magic truly happens.
Step 2: Design Your Stand Layout
Okay, you’ve picked the material, now it’s time to think about how the stand will actually sit on your countertop. The layout is the silent hero that keeps the book upright, lets you flip pages with one hand, and makes the personalization look polished.
Measure your cookbook dimensions
First thing’s first: grab the cookbook you’ll use most. Measure its height, width, and thickness. Write those numbers down – we’ll use them to size the base and the back‑stop. If you have a mix of paperbacks and a hefty heirloom volume, aim for a “middle ground” that can accommodate both without wobbling.
Tip: add a half‑inch extra clearance on each side. That tiny buffer prevents the pages from getting caught on the edge.
Choose a base shape that fits your kitchen flow
Square bases feel sturdy and work well in tight spaces. Round bases are forgiving – they let you slide the stand around without snagging on a corner. If you love a farmhouse vibe, a rectangular base mimics a cutting board and gives you extra room for a small bowl or a spice jar.
Think about where the stand will live. Is it near the stove, where heat rises? A slightly larger footprint can keep it from sliding when you’re stirring a pot.
Angle the back‑stop for easy reading
The back‑stop is the little lip that holds the top of the book open. A 5‑to‑10‑degree tilt is usually sweet – it lifts the pages just enough so you can read without craning your neck.
Experiment: place the stand on the counter, open your cookbook, and tilt it a bit. If the pages slide back down, tighten the angle a degree or two. The goal is a gentle “hold” that lets you turn pages with a flick of the finger.
Plan for personalization space
When you add a name, quote, or tiny whisk, you need a clean, visible area. Most of our customers reserve the front‑center of the base for engraving. Make sure the engraving zone is at least 2‑inches wide and 1‑inch tall – that way the text isn’t lost in the grain of bamboo or the shine of metal.
Don’t overcrowd. A single line of text or a simple icon looks elegant and stays legible even after a few washes.
Test stability before you order
Grab a piece of cardboard or a thin piece of wood cut to the same dimensions you plan for the stand. Place your cookbook on it, push gently, and see if it rocks. If it does, add a little extra weight to the base design – a thicker bottom or a hidden metal plate can do wonders.
In our experience, a base that weighs about 1.5 kg for paperbacks and 2.5 kg for hardcovers gives you that “just right” feel. Too light and it slides; too heavy and you’ll dread moving it after a dinner party.
Here’s a quick checklist you can print out:
- Measure book height, width, thickness.
- Choose base shape (square, round, rectangle).
- Set back‑stop angle to 5‑10°.
- Reserve at least 2″ × 1″ for engraving.
- Verify stability with a mock‑up.
- Confirm weight targets (1.5 kg paperback, 2.5 kg hardcover).
Once you’ve nailed the layout on paper, the next step is bringing it to life – either by ordering a custom design from heartful.gifts or tweaking a ready‑made model to fit your specs.
Watch this short video for a visual walk‑through of measuring and setting up the layout. It shows the exact moments we recommend checking the angle and weight before you click “add to cart.”
After the video, give yourself a minute to sketch the stand on a napkin. Those quick doodles often reveal a missing piece – maybe you need a small groove for a spatula, or a hidden magnet to keep the book from sliding when you open a new page.
Designing the layout is the sweet spot where function meets sentiment. A well‑thought‑out stand not only looks good; it becomes the quiet assistant that lets you focus on the recipe, the conversation, and the love you’re sharing around the table.
Step 3: Build and Assemble the Stand
Alright, you’ve measured, you’ve sketched, now it’s time to turn those numbers into a real thing you can actually lean on while you whisk a batter.
Grab your chosen material – whether it’s bamboo, walnut, or that sleek brushed steel you fell in love with – and lay out all the cut pieces on the counter.
Here’s a quick checklist to keep you from losing a screw in the sink:
- Base panel (the largest piece) – this supports the weight.
- Two side walls – they form the cradle that holds the book upright.
- Back‑stop strip – the angled lip that leans the book back.
- Glue or adhesive – food‑safe for wood, metal‑compatible for steel.
- Clamps or heavy book – to hold joints while the glue cures.
With everything laid out, you’re ready to start cutting and assembling.
Cutting and prepping the pieces
If you ordered a custom kit from heartful.gifts, the pieces should already be pre‑cut. If you’re DIY‑ing, a simple table‑saw or even a handsaw will do. Sand every edge with 120‑grit paper – you’ll thank yourself when the wood doesn’t snag your favorite cookbook.
Assembling the base
Spread a thin bead of wood glue (or a metal‑compatible adhesive for steel) along the underside of the base panel. Press the two side walls against it, making sure the back‑stop lip is flush with the front edge. Use a couple of clamps or a heavy book to hold the joint for 20‑30 minutes while the glue cures.
Don’t over‑tighten the clamps; you want the wood to settle, not crack. If you prefer a screw‑first approach, pre‑drill ¼‑inch pilot holes to avoid splitting, then drive short 1‑inch wood screws in a cross pattern for extra rigidity.
Adding the back‑stop and weight
The back‑stop is the little lip that keeps the book from sliding forward. Cut a thin strip (about ½‑inch tall) and glue it to the top rear edge of the base. Angle it just enough so the book leans back at 5‑10°, the sweet spot we mentioned earlier.
If you’re worried about wobble, slip a hidden metal plate or a small rubber pad under the back legs. This tiny addition can boost the stand’s stability by up to 20 % without adding noticeable bulk.
Finishing touches
Once the glue is dry, sand the whole assembly again, this time moving up to 220‑grit for a silky feel. Wipe away dust with a damp cloth, then apply your chosen finish – a food‑safe oil for wood, or a matte spray coat for metal. Let it cure fully before you place any books on it.
Now comes the fun part: personalization. Use a laser‑engraver or a hand‑burn tool to add a name, a favorite quote, or a tiny whisk icon to the front of the base. Because the engraving sits on the same surface that supports the book, it stays visible even when the stand is in use.
If you need a step‑by‑step visual guide, the DIY tutorial on Love & Renovations walks you through cutting, gluing, and finishing a simple cookbook stand – it’s a great reference point for beginners.
Give the stand a test run with your heaviest family cookbook. Flip a few pages, lean it against the back‑stop, and watch it stay put. If anything feels loose, tighten the screws or add a bit more glue, then celebrate – you’ve just built a personalized recipe book stand that will keep meals flowing and memories alive.
Step 4: Add Personal Touches and Finishing
Now that the structure is solid, it’s time to make the stand feel like it belongs in your family kitchen. A few thoughtful details turn a functional piece into a truly personalized recipe book stand that sparks conversation every time you open a cookbook.
Choosing the right finish
First, think about how the stand will see daily life. If you love the warm glow of a wooden surface, a food‑safe mineral oil or a light tung oil brings out the grain and protects against splashes. For metal bases, a matte spray coat keeps fingerprints at bay while still showing off a subtle sheen. Whatever you pick, let the finish cure completely – usually 24 hours for oils, a few hours for sprays – before you move on.
Pro tip: sanding with 220‑grit right before the final coat gives a silky feel that makes your fingers love the surface.
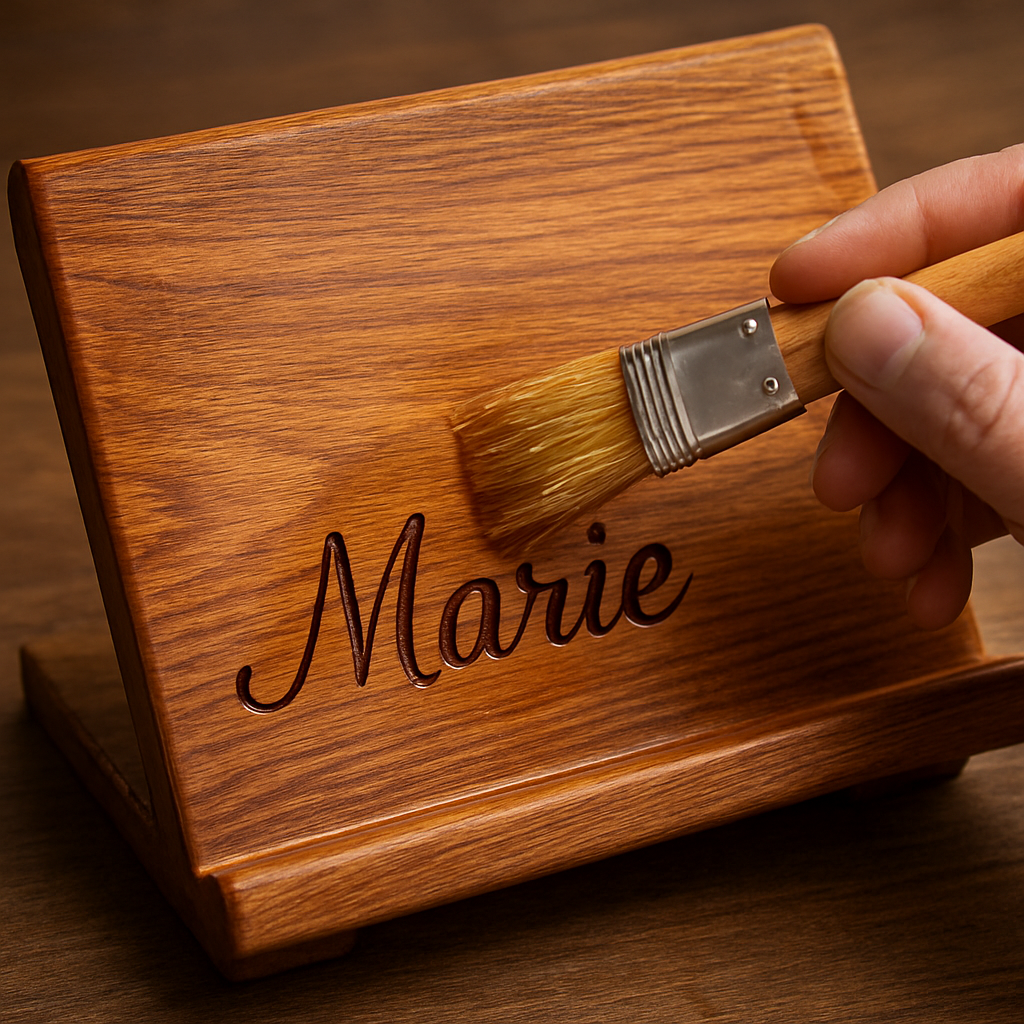
Engraving ideas that feel personal
Engraving is where the magic happens. You don’t need to overdo it; a single line or tiny icon can carry a lot of meaning. Here are a few ideas that our customers love:
- A family surname in a flowing script – it reads like a signature.
- A short cooking mantra, e.g., “Taste the love.”
- A tiny whisk or spoon silhouette that mirrors the stand’s purpose.
- The year the family recipe was first written, adding a heritage touch.
If you’re looking for inspiration on how simple stencils can turn a plain board into a keepsake, check out this DIY guide from Create and Babble. They walk through using monogram stencils and a basic brush‑on paint technique that works beautifully on both wood and metal.
Protecting your design
Once the engraving is dry, a light coat of clear food‑safe varnish seals the art without hiding it. For wood, a wipe‑on beeswax polish adds a subtle glow and makes cleaning a breeze – just a damp cloth and you’re good. Metal stands benefit from a quick wipe with a microfiber towel; if you notice stubborn spots, a dab of mild dish soap and water does the trick.
Don’t forget the back side of the stand. A thin felt pad or silicone rubber strip on the bottom prevents scratches on countertops and adds a tiny bit of grip, especially useful if the stand sits on a glossy marble surface.
Quick checklist before you call it finished
- All surfaces sanded smooth (120‑grit then 220‑grit).
- Finish applied and fully cured.
- Engraving completed, then sealed with a clear, food‑safe coat.
- Bottom protective pad attached.
- Stand tested with the heaviest cookbook you own – it should stay steady with no wobble.
Give the stand a final test run: place your favorite family cookbook, flip a few pages, and lean it back. If it holds firm, you’ve just created a piece that’s both practical and packed with sentiment. Celebrate with a cup of tea, and maybe slip a handwritten note into the front of the stand for an extra surprise.
Remember, the beauty of a personalized recipe book stand is that it lives in the moments you share – the hurried weekday dinner, the holiday feast, the quiet Sunday brunch. A little extra care in the finishing stage ensures those moments stay beautiful for years to come.
If you ever need a fresh design idea or want a ready‑made option, our shop at heartful.gifts offers laser‑engraved stands that you can customize in minutes. It’s a quick way to skip the DIY steps while still getting that personal touch.
Step 5: Evaluate Durability and Usability
Now that your stand looks gorgeous, the real question is: will it stand up to the chaos of a busy kitchen? If you’ve ever watched a flimsy stand wobble when you flip a page, you know the frustration. Let’s walk through how to put your personalized recipe book stand through a quick durability and usability check so you can trust it for years to come.
1. Feel the weight, then test the balance
Pick up the finished stand. Does it feel solid in your hands, or does it seem like it could tip over with a single cookbook? A good rule of thumb is at least 1.5 kg for paperback‑size books and 2.5 kg for larger hardcovers. If it feels lighter, consider adding a hidden metal insert or a thicker base layer.
Next, place your heaviest family cookbook on the stand. Gently nudge it from side to side. The base should stay put without any rocking. If you notice any wobble, that’s a sign the back‑stop angle or the footpad needs adjustment.
2. Simulate everyday kitchen traffic
Imagine the stand surrounded by typical kitchen clutter: a pot of sauce, a spoon, maybe a spilled splash of water. Drop a small, damp cloth onto the surface and wipe it clean. Does the finish resist water stains? Does the wood stay smooth, or does it swell?
For metal bases, run a finger across the surface after cleaning. Fingerprints should wipe away easily, and no rust spots should appear. A quick test with a mild dish soap solution will tell you if the coating holds up to repeated washing.
3. Check the engraving durability
Run your thumb over the engraved name or quote. It should feel crisp, not fuzzy. Give it a light scrape with a fingernail – the lines shouldn’t wear off after a few attempts. If you’re using a wooden stand, a clear food‑safe varnish over the engraving adds an extra shield.
Customers often ask whether laser‑engraved designs fade over time. In our experience, a well‑sealed engraving on wood or metal stays legible even after months of kitchen use. A wooden recipe book from a reputable seller shows how durable a properly finished wooden surface can be.
4. Test the back‑stop’s grip
Open your cookbook to a random page and let the stand hold it. Flip a few pages quickly. Does the back‑stop keep the book upright, or does the top slide down? Adjust the angle in 1‑degree increments until you find that sweet spot where pages stay put but still flip easily.
For extra grip, a thin silicone strip glued to the back‑stop can add friction without altering the look.
5. Real‑world durability checklist
- Base weight meets the 1.5 kg / 2.5 kg guideline.
- Surface resists water, oil, and mild cleaning agents.
- Engraving remains sharp after gentle scraping.
- Back‑stop holds the book at a 5‑10° angle without slipping.
- Footpad prevents scratches on countertops.
Run through this checklist once a month, especially after a big holiday cooking session. It’s a simple habit that catches wear early and lets you reinforce any weak spots before they become a problem.
Quick comparison table
| Feature | Typical Option | Durability Tip |
|---|---|---|
| Base material | Bamboo, hardwood, brushed steel | Add hidden metal plate for extra heft if bamboo feels light. |
| Engraving finish | Laser‑etched wood or metal | Seal with food‑safe clear coat to protect against moisture. |
| Back‑stop angle | 5°–10° tilt | Test with multiple books; adjust with a small screw or silicone strip. |
By the time you finish these steps, you’ll have a personalized recipe book stand that not only looks heartfelt but also survives the hustle of daily cooking. It’s the kind of quiet helper that lets you focus on the flavors, not the flickering of a wobbling base. So go ahead, flip that page, pour the sauce, and trust your stand to stay right where it belongs.
Step 6: Care, Maintenance, and Gift Ideas
After you’ve spent time fine‑tuning the angle and engraving a sweet quote, the next question is simple: how do you keep that personalized recipe book stand looking fresh for years?
We like to think of care as a tiny daily habit, not a chore. A quick wipe after dinner, a gentle check of the back‑stop, and you’ve already dodged most wear‑and‑tear.
So, what does “quick” really mean in a busy kitchen?
For bamboo or wood bases, grab a soft, damp cloth and run it along the surface right after you’ve finished cooking. Avoid soaking the wood; a splash of water is fine, but let it air‑dry before you store the stand.
If you chose a brushed‑steel base, a microfiber towel does the trick. A drop of mild dish soap mixed with water will remove fingerprints, then rinse with a clean damp cloth and pat dry.
Does the material affect how you protect the engraving?
Laser‑etched lettering stays sharp as long as it’s sealed. A light coat of food‑safe clear varnish on wood, or a spray seal on metal, creates a barrier against moisture and accidental scrapes.
- Apply the seal once a year, or whenever the surface looks dull.
- Test the seal in an inconspicuous spot first.
- Re‑apply after any deep‑cleaning session.
Now think about the occasional deep clean – maybe after a holiday feast when the stand has seen extra splatters.
Start by removing any silicone footpads or felt strips. Clean those separately with warm, soapy water, then let them air‑dry. For the base itself, use a gentle wood cleaner on bamboo/wood or a non‑abrasive metal polish on steel.
Here’s a quick checklist you can stick on your fridge:
- Wipe down after each use.
- Seal engraving quarterly.
- Inspect back‑stop angle monthly.
- Swap footpad if it starts to slip.
Feeling inspired to turn this care routine into a thoughtful gift?
Personalized stands make perfect presents for parents who love to host, spouses who cherish family traditions, or friends who just adore a tidy countertop. Pair the stand with a handwritten note that explains why you chose that specific quote – it adds a layer of sentiment you can’t buy off a shelf.
If you want to go the extra mile, consider bundling the stand with a DIY “make‑your‑own recipe book” project. The Daily Mom guide on creating a homemade recipe book walks you through gathering clippings, scanning recipes, and printing a keepsake that pairs beautifully with a stand.
Gift ideas that actually feel personal:
- Grandma’s favorite family saying engraved on a bamboo stand.
- A stainless‑steel stand for a modern‑minded spouse, with a tiny whisk icon.
- Two matching stands for a couple’s kitchen, each bearing their initials.
- A “first‑recipe” stand for a new parent, engraved with “Our First Soup.”
Wrap the stand in a simple kraft paper, add a sprig of rosemary, and you’ve got a present that looks handcrafted without the hours of labor.
Bottom line: a little regular love‑care keeps the stand functional, and a dash of creativity turns it into a memorable gift. Grab a cloth, check that seal, and start planning who you’ll surprise next.
FAQ
What is a personalized recipe book stand and why should I get one?
A personalized recipe book stand is a small countertop helper that holds a cookbook upright while you cook, and it carries a custom engraving—your family name, a favorite quote, or a tiny whisk icon. It eliminates the annoying wobble that makes you chase pages with one hand, and the personal touch turns a functional kitchen tool into a sentimental keepsake you’ll actually want to display.
How do I choose the right size for my cookbook?
First, measure the height, width, and thickness of the book you use most. Look for a stand whose base is at least 1‑inch wider than the book’s width and whose back‑stop height matches the book’s height within a half‑inch. In practice, a 1.5 kg bamboo base works well for paperbacks, while a 2.5 kg hardwood base is ideal for hefty heirloom volumes. If you have a mix, aim for a “mid‑size” model that can cradle both without tipping.
Is laser engraving safe for food‑contact surfaces?
Yes—laser engraving only removes a thin layer of material, leaving the underlying wood or metal intact. Because the engraving sits on the exterior of the stand, it never contacts food directly. For added peace of mind, we always recommend sealing the engraved area with a food‑safe clear coat. That protects the design from moisture and keeps the surface easy to wipe clean after cooking.
Can I swap the engraving later if I want a new design?
Most of our stands are finished with a protective seal that makes the engraving permanent, so swapping isn’t a simple sticker‑change. However, if you choose a metal stand with a removable plaque or a wooden base you’re comfortable re‑laser‑etching, you can have a new design applied. Just be sure the material can handle a second pass without losing depth—hardwoods like maple or walnut usually do fine.
How do I keep the stand looking fresh after years of cooking?
Routine care is the secret. For bamboo or wood, wipe with a damp cloth after each use, then dry thoroughly. Once a month, rub a light food‑safe mineral oil into the grain to prevent drying. Metal stands just need a quick microfiber swipe; a dab of mild dish soap works if fingerprints get stubborn. And every six months, reapply a thin clear seal to lock in the engraving’s brilliance.
What gift‑wrapping ideas work best for a personalized recipe book stand?
Think simple, tactile, and kitchen‑themed. A kraft paper sleeve tied with twine instantly feels handmade. Slip a sprig of rosemary or a tiny dried rosemary bundle inside for aroma. Add a handwritten note that explains why you chose the particular quote—maybe it’s a family mantra you heard growing up. Finish with a small tag that says “For many more meals together.” It feels personal without requiring hours of crafting.
Do I need any special tools to assemble a DIY stand?
No heavyweight workshop is required. A basic handsaw or circular saw will cut the wood pieces, and a set of sandpaper (120‑grit then 220‑grit) smooths the edges. Food‑safe wood glue and a few clamps—or a heavy cookbook as a temporary clamp—hold the joints while the glue cures. If you’re using metal, a small drill with a screwdriver bit and some metal‑grade adhesive are enough. Most hobbyists finish the whole project in an afternoon.
Conclusion
We've walked through everything from picking the right material to polishing the final engraving, and you can already picture that personalized recipe book stand taking pride of place on your counter.
So, what’s the next move? Grab a quick notebook, sketch the base shape you love, and set a reminder to order the laser‑engrave plate from heartful.gifts. In our experience, a simple “one‑hour” design session saves hours of guesswork later.
Remember the three golden rules: choose a sturdy weight, protect the finish with a food‑safe seal, and test the back‑stop angle with your heaviest cookbook. If it holds steady after a few page flips, you’ve built a helper that will last through holidays, birthday feasts, and those late‑night snack experiments.
And don’t forget the little rituals that keep it beautiful—wipe it down after each use, reapply a thin clear coat every six months, and swap out the felt pad when it starts to slide. Those tiny habits turn a functional stand into a family heirloom.
Ready to turn your kitchen into a memory‑making studio? A personalized recipe book stand is the quiet partner that lets you focus on flavor, not fumbling with pages. Happy cooking, and enjoy the stories that unfold around it.