
How to Create a Personalized Photo Sweatshirt: A Complete Resource
Ever stared at a pile of plain sweatshirts and thought, “There’s got to be a way to make this cozy thing actually mean something?”
Maybe you’ve got a goofy family photo from last summer, a snapshot of your kid’s first art masterpiece, or a candid selfie that captures the exact vibe you want to wear. That’s where a personalized photo sweatshirt swoops in like a friendly reminder that gifts can be both snuggly and sentimental.
Think about the moment you slip that shirt on and instantly feel a rush of nostalgia – the beach day, the graduation grin, the dog’s goofy tongue‑out pose. It’s not just fabric; it’s a portable memory you can hug.
So, why settle for a generic gift when you can turn a favorite picture into a wearable keepsake? You’re not just giving a present; you’re sharing a story that will be told every time someone asks, “Where did you get that?”
And if you’re a parent hunting for a birthday surprise, imagine your child’s eyes lighting up as they see their own doodle printed across a soft, warm sweatshirt. Or picture a spouse unwrapping a shirt that features the exact moment you proposed – a tiny, perfect reminder of that night.
Here’s the thing: creating a personalized photo sweatshirt is easier than you think. Most print‑on‑demand shops let you upload an image, pick a color, and preview the layout in seconds. No design degree required, just a photo that means something to you.
But you might wonder about quality. Will the print fade after a few washes? Will the fabric feel itchy? Most reputable services use durable, fade‑resistant inks and soft, pre‑shrunk cotton blends, so you get a shirt that stays vibrant and comfy wash after wash.
Ready to turn that favorite snap into a cuddle‑ready piece? Let’s dive in and explore how you can make a personalized photo sweatshirt that looks great, feels amazing, and becomes a beloved part of anyone’s wardrobe.
TL;DR
A personalized photo sweatshirt lets you wear a cherished memory on fade‑resistant cotton, turning a simple gift into a hug of nostalgia.
Pick your picture, choose a color, and order in minutes—then enjoy a cozy keepsake that stays vibrant wash after wash, perfect for kids, partners, or anyone you love.
Choosing the Right Sweatshirt Fabric
When you’re picking a personalized photo sweatshirt, the fabric is the foundation of the whole experience – it decides whether the shirt feels like a warm hug or an itchy reminder.
Most folks think “cotton is cotton,” but there’s a whole family of blends out there. A classic 100% ring‑spun cotton gives that buttery softness you crave, yet it can shrink a bit after the first wash. If you want zero‑shrink confidence, look for a pre‑shrunk cotton‑poly blend – usually 80/20 or 60/40 – that keeps the size steady and adds a bit of durability.
So, what should you do next? Think about the person you’re gifting. A kid who’ll wear the shirt to the playground probably needs the tougher poly blend, while a partner who’ll lounge with a book might appreciate the plush feel of a 100% combed cotton.
Another factor is weight. Light‑weight hoodies (around 5‑6 oz) are great for layering in spring, but for that “cozy‑as‑a‑blanket” vibe in winter, aim for 8‑10 oz fabric. The heavier the material, the richer the print will sit, which helps your photo stay vivid longer.
Ever wonder how the fabric affects the print itself? Ink adheres differently to cotton versus polyester. Cotton absorbs the dye, giving a softer look, while polyester can make colors pop brighter but sometimes feel a bit slick. If you’re after that museum‑quality saturation, a cotton‑poly blend often offers the best of both worlds.
And here’s a tip that trips up a lot of first‑timers: check the fabric’s finish. A brushed‑inside gives that fuzzy, comforting texture, while a smooth interior feels more like a T‑shirt. For a personalized photo sweatshirt that you want to reach for on a chilly evening, the brushed option wins hands‑down.
Want a deeper dive into fabric choices and how they impact your design? Our How to Design and Order a Custom Photo T Shirt: A Step‑by‑Step Resource walks you through the nitty‑gritty of material selection, sizing, and care.
Speaking of care, the right fabric also makes washing easier. Pre‑shrunk cotton‑poly blends usually survive machine cycles without fading, especially when paired with the fade‑resistant inks most print‑on‑demand shops use. Hand‑washing a pure‑cotton piece can extend its life, but it’s a hassle most people want to avoid.
Now, let’s talk about the vibe of the fabric. If you’re pairing your sweatshirt with a cozy coffee ritual, imagine sipping a smooth brew from Chilled Iguana Coffee Co. while wrapped in that soft, brushed‑inside material. It’s the kind of moment that turns a simple gift into a daily ritual.
On the flip side, if your gift is for a night‑owl friend who loves quirky treasures, a midnight‑themed design printed on a sleek polyester blend pairs nicely with a visit to Midnight Scriber for other unique finds.
And if you’re feeling extra creative for the holidays, consider adding a matching set of photo magnets – a tiny, decorative nod to the main sweatshirt. Check out some Creative Holiday Photo Magnets ideas to keep the memory buzzing on the fridge.
Here’s a quick checklist to lock in your fabric choice:
- Determine the wearer’s activity level – active (poly blend) vs. lounge (cotton).
- Pick weight: 5‑6 oz for layering, 8‑10 oz for standalone warmth.
- Choose finish: brushed‑inside for coziness, smooth for a sleek look.
- Confirm pre‑shrink or wash‑care instructions.
When you line up all those pieces, the result is a personalized photo sweatshirt that not only looks amazing but feels right every time you pull it on.
Ready to feel that soft embrace? Pick your fabric, upload your favorite snap, and watch the magic happen.
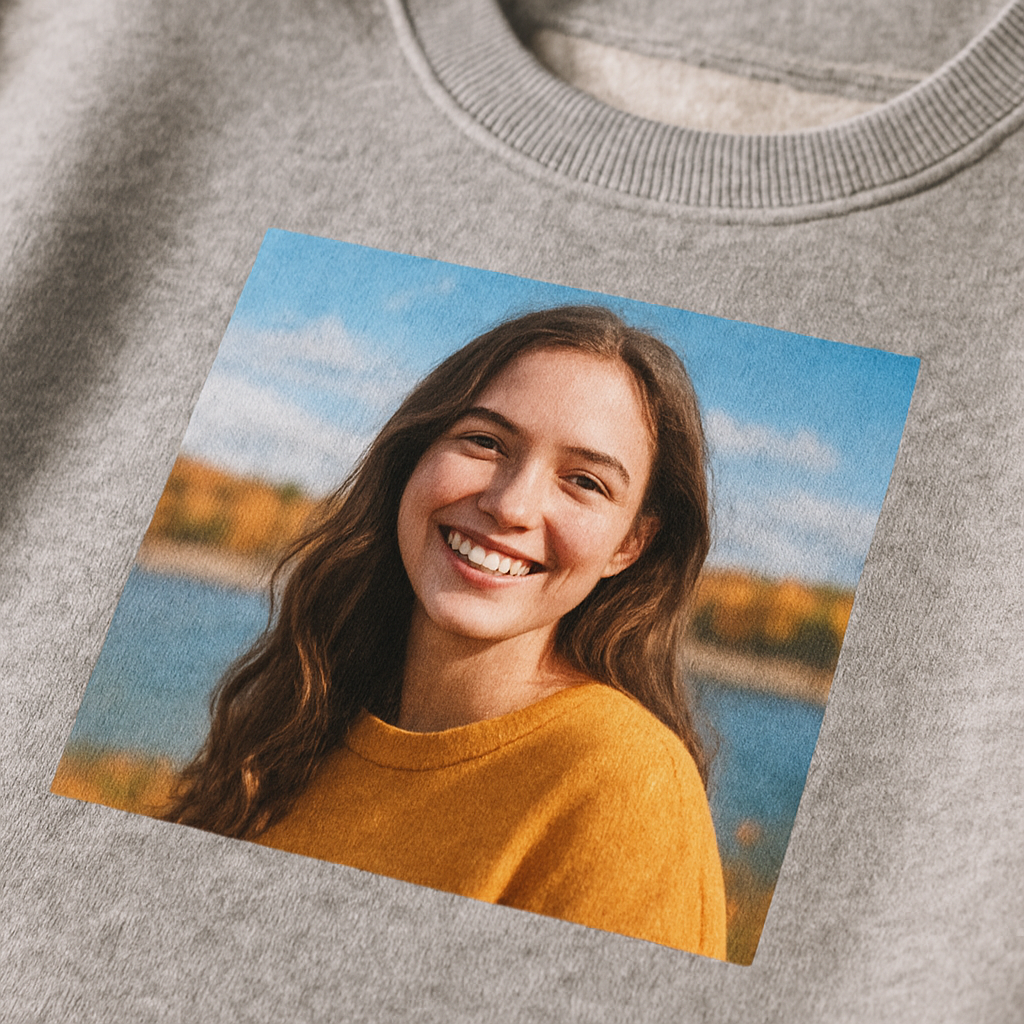
Preparing Your Photo for Printing
Got a favorite snap but not sure if it will survive the heat of a sweatshirt?
Before you hit “order,” a few tiny details can mean the difference between a crisp memory and a blurry regret.
Pick a photo that tells a story
Look for a picture where the subject’s face is clear, the eyes are open, and there’s a little space around the edges. A candid beach wave works great, but a photo taken through a window or with a lot of glare will lose its punch when it’s stretched over fabric.
Does your photo have a busy background? If you can, choose something simple – a solid wall, a clear sky, or a plain backdrop. The less the printer has to fight with noise, the sharper your print will be.
Check resolution and size
Most print‑on‑demand shops ask for at least 300 DPI at the final print size. That translates to roughly 1800 × 2400 pixels for a standard adult‑size sweatshirt (12 × 16 inches). If you’re working from a phone, open the image in your gallery and look for the pixel dimensions.
Need a quick sanity check? Divide the pixel width by the inch width you want – you should land close to 300. If you’re under, consider a larger photo or a tiny up‑scale using a tool like Photoshop’s Preserve Details 2.0.
For official guidance on photo dimensions, the Oklahoma state photo requirements outline common DPI standards that apply to most print projects.
Mind the background and lighting
Natural light is your friend. Shoot near a window or outdoors on a cloudy day – the soft light reduces harsh shadows and keeps skin tones true.
If you can’t avoid a background, use a photo‑editing app to blur it slightly. A subtle Gaussian blur (about 5‑10 px) can make the main subject pop without looking fake.
Edit for print, not for Instagram
Turn off any heavy Instagram filters. Those vibrant overlays look great on a screen but can become garish when printed on cotton.
Adjust contrast just enough so the whites stay white and the darks stay dark. A 10‑15 % boost in contrast usually does the trick.
Export the final file as a JPEG with maximum quality (90‑100 %). PNGs are fine too, but they’re larger and not always needed for a single‑color print.
Final checklist before you upload
- ✅ Image is at least 300 DPI at the size you need.
- ✅ Subject is centered with a little breathing room.
- ✅ Background is simple or subtly blurred.
- ✅ Colors look natural – no over‑saturated filters.
- ✅ File saved as high‑quality JPEG or PNG.
Got all that? Great! You’re ready to upload and see your memory come to life on a cozy sweatshirt.
One last tip: after you receive the first sample, wash it inside‑out on a gentle cycle. If the print stays vibrant after a few washes, you’ve nailed the prep.
Step-by-Step Customization Process (Video Walkthrough)
Alright, you’ve picked the perfect photo and you’ve already checked the resolution – now it’s time to actually bring that memory to life on a sweatshirt.
1. Open the design tool and upload
Most print‑on‑demand sites have a simple drag‑and‑drop window. Click “Upload,” find your high‑resolution JPEG, and watch it pop onto a virtual blank hoodie.
Does it look a little off? No worries. Most tools let you zoom in, rotate, or flip the image with a single click.
2. Positioning the image
Think of the sweatshirt as a canvas you’re framing. Aim for the sweet spot – roughly the middle of the chest, leaving a half‑inch buffer all around so the print doesn’t get cut off.
And if you’re feeling fancy, try a slight offset. A tiny shift to the left can make the design feel more dynamic, especially for landscape shots.
3. Resize without losing detail
Grab the corner handles and drag until the photo fills the space you want. Remember, you’re working with a 300 DPI file, so you have wiggle room.
If you see pixelation, pull back a little – the tool usually warns you when you’re stretching beyond the safe zone.
4. Choose a print method
Heat‑transfer is the most common for photo sweatshirts. It gives crisp colors and holds up well in the wash.
Some platforms also offer direct‑to‑garment (DTG) printing. That’s great for all‑over designs, but for a single centered photo, heat‑transfer is usually the smoother, more affordable route.
5. Pick your sweatshirt color
Contrast matters. A dark photo on a light shirt can look washed out, while a bright image on a charcoal tee makes the colors pop.
Take a quick screenshot of the preview, then flip it to see how it reads on both light and dark backgrounds. Trust your gut – you’ll be wearing this, so go with what feels right.
6. Add optional text or graphics
If you want a date, a name, or a tiny heart, most editors have a “Text” tab. Choose a simple sans‑serif font, keep it under 12 pt, and place it either below the photo or in a corner.
Pro tip: set the text color to match one of the shades in your picture. It ties everything together without looking forced.
7. Review the mock‑up
Take a moment to scroll through the 360° view if the tool offers it. Look at the back, the sleeves – you’ll notice if the design is accidentally spilling over the seam.
Does everything still feel balanced? If a detail looks cramped, go back and nudge it a millimeter. Small tweaks now save disappointment later.
8. Save and name your design
Give your project a clear name like “Mom’s Beach Day 2024.” That way, if you ever want to reorder or order a matching hoodie, you’ll find it instantly.
Some sites let you share a preview link – handy if you want a second opinion from a spouse or a friend.
9. Add to cart and double‑check settings
Before you click “Buy,” verify the size, color, and quantity. If you’re ordering a gift, consider adding gift‑wrap or a handwritten note – it’s the little touches that turn a custom shirt into a keepsake.
And yes, double‑check the shipping address. Nothing kills excitement faster than a mis‑delivered package.
10. Hit “Order” and relax
Once the order’s placed, the printer’s magic kicks in. You’ll get an email with a production timeline – usually 3‑5 business days.
While you wait, why not start brainstorming the next family photo? A set of matching sweatshirts for a reunion can become a tradition.
So, what’s the next step? Grab your favorite snap, follow these ten moves, and watch your memory transform into a cozy, wearable hug.
Comparing Top Custom Printing Services
Alright, you’ve picked the perfect photo and you know you want it on a cozy sweatshirt. The next big question is: which service will actually give you the quality, speed, and price that feels right for your gift?
What to look at first
When you start scrolling through options, pause and ask yourself a few quick questions. Do they use heat‑transfer or direct‑to‑garment (DTG) printing? How thick is the fabric – 8 oz or 10 oz? What’s the typical turnaround time? And most importantly, do they let you see a proof before the ink hits the cotton?
These are the three pillars that keep your personalized photo sweatshirt from turning into a disappointing surprise.
Service snapshot
Below is a quick side‑by‑side look at three popular players that keep popping up when you search “personalized photo sweatshirt.” I’ve boiled the info down to the bits that matter most for a gift‑giver.
| Provider | Print method | Fabric weight | Proof & edits | Typical turnaround |
|---|---|---|---|---|
| Heartful.gifts | Heat‑transfer (photo‑grade) | 8–10 oz cotton‑poly blend | Live preview + unlimited edits | 3–5 business days |
| VistaPrint | Heat‑transfer or DTG (depends on product) | Pre‑shrunk 8 oz cotton | Static mock‑up, limited edits | 4–7 business days |
| Custom Ink | Heat‑transfer (most photo tees) | 9 oz cotton‑poly blend | Digital proof, two revisions | 5–8 business days |
Notice how Heartful.gifts stands out with unlimited edits. That little flexibility can be a lifesaver when you spot a stray pixel after the first preview.
Real‑world examples
Take Jenna, a busy mom who wanted a birthday sweatshirt for her teen. She tried a big name that only offered one round of proof. The first mock‑up missed a tiny logo on the sleeve, and the service charged extra to fix it. Switching to Heartful.gifts let her tweak the design twice for free, and the shirt arrived on schedule.
Then there’s Carlos, a small business owner ordering bulk shirts for his team. He needed a sturdy 9 oz fabric that wouldn’t shrink after washes. Custom Ink’s heavier blend fit the bill, but their edit policy meant he had to lock in the design early – something he wishes he’d known before ordering.
Actionable checklist before you click “order”
- Confirm the print method: heat‑transfer gives crisp detail for photos; DTG is better for all‑over patterns.
- Check fabric weight: 8 oz feels light and breathable, 9–10 oz feels premium and less prone to sag.
- Look for a live preview tool that lets you move, resize, and rotate the image.
- Make sure the provider offers at least one free edit – you’ll thank yourself if a tiny detail is off.
- Note the stated production time and compare it to your deadline (holiday gifts need a buffer!).
If any of those boxes are unchecked, pause. A quick chat with customer support can clarify the missing piece before you commit.
Tips for getting the best value
Bulk discounts can be a game‑changer. Heartful.gifts rolls out a 5% discount at 10 + shirts, while VistaPrint only kicks in at 25. So, if you’re ordering for a family reunion, the smaller threshold might save you a few bucks.
Don’t forget about shipping. Some services bundle free shipping over a certain order size – a handy trick if you’re already buying a dozen or more.
Lastly, ask about the ink type. Photo‑grade, fade‑resistant inks are the standard for lasting vibrancy. If a site mentions “standard plastisol,” you might see the colors dull after a few washes.
Bottom line? The best service for your personalized photo sweatshirt is the one that aligns with your fabric preference, gives you enough proof room, and fits your timeline without hidden fees. Take a moment to compare the three columns above, run through the checklist, and you’ll feel confident that the shirt arriving at your door will be a memory you can actually wear.
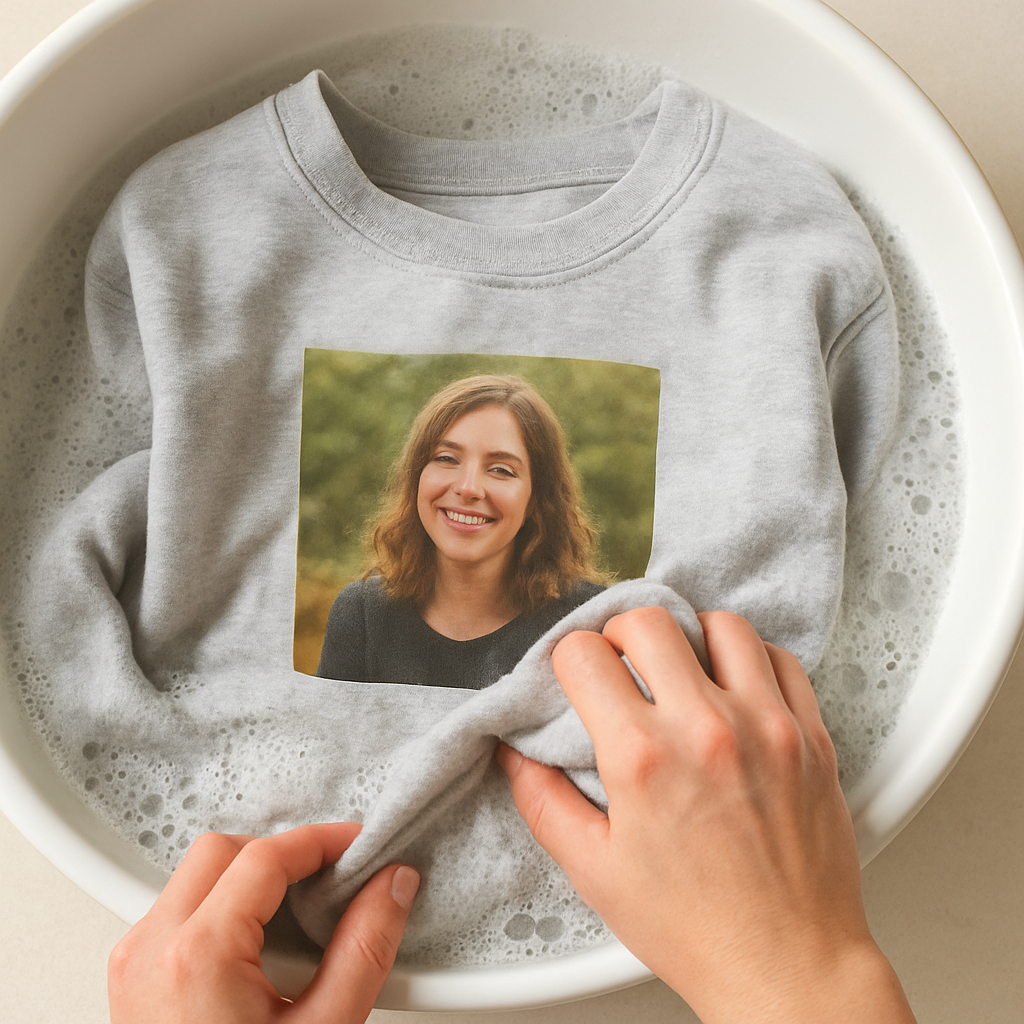
Caring for Your Personalized Photo Sweatshirt
Okay, you’ve got that perfect photo printed on a soft cotton‑poly blend, and you’re already picturing the warm hugs it’ll deliver. But before you toss it straight into the dryer, let’s talk about keeping the colors bright and the fabric buttery soft for years to come.
Start with the gentlest wash possible
Do you remember the last time a favorite tee shrank after a hot wash? Yeah, that’s the nightmare we want to avoid. Turn the sweatshirt inside‑out, zip or button any closures, and slip it into a mesh laundry bag. Cold water + a mild detergent is the sweet spot – it protects the heat‑transfer ink while still getting rid of everyday grime.
So, what should you use? A fragrance‑free liquid detergent works best because powders can leave residue on the print. If you’re into eco‑friendly options, a plant‑based detergent is fine, just make sure it’s “low‑sudsing.”
Avoid the spin cycle frenzy
High‑speed spins can stretch the fabric and stress the printed area. Set the machine to the “gentle” or “delicate” cycle – usually a 600‑rpm spin is enough to rinse without pulling the fibers.
And if you have the time, hand‑washing is the gold standard. Fill a basin with cool water, add a dollop of detergent, swirl gently, then let the sweatshirt soak for five minutes. No scrubbing the print; just a light press‑and‑release motion.
Drying: give it air, not heat
Here’s a rule of thumb: never toss a personalized photo sweatshirt into the dryer. The high heat can cause the ink to crack or fade. Instead, lay it flat on a clean towel, reshape the shoulders, and let it air‑dry away from direct sunlight. Sun can also fade the colors over time, so a shady spot is ideal.
If you’re in a hurry, a low‑heat tumble on a “fluff” setting for 10‑15 minutes is a compromise, but keep an eye on it – you’ll hear the fabric “crackle” if it’s getting too hot.
Ironing? Do it with care
Most heat‑transfer prints survive a light iron, but you need a barrier. Place a thin cotton cloth or parchment paper over the design and set the iron to the lowest “synthetic” or “dry” setting. A quick press for a few seconds smooths out any wrinkles without scorching the ink.
Never steam directly on the print – the moisture can seep into the adhesive layer and cause bubbling later.
Storing your memory‑shirt
When the sweatshirt isn’t on your back, fold it gently instead of hanging it. Hanging can stretch the shoulders and pull at the printed area. If you’re stacking several, slip a piece of tissue paper between each to prevent the prints from rubbing together.
Got a special occasion coming up? Slip the shirt into a breathable garment bag (no plastic) and store it in a cool, dry closet. This keeps dust away and preserves the vibrancy.
What about those inevitable spills? Act fast. Blot (don’t rub) the spot with a clean, damp cloth, then rinse with cool water. Avoid bleach – it’ll turn the photo into a ghostly silhouette.
If you notice the print looking a shade duller after several washes, it’s often the detergent or water hardness. Switching to a color‑safe formula and adding a cup of white vinegar to the rinse can restore some of that original pop without harming the fabric.
One more tip: give the sweatshirt a “reset” every few months by hand‑washing it with a splash of baking soda. This helps lift any lingering soap film that can make the image look hazy over time.
Finally, a quick checklist you can print and stick on your laundry room door:
- Turn inside‑out and use a mesh bag.
- Cold water, mild detergent, gentle cycle.
- Air‑dry flat, avoid direct sun.
- Iron low, with a protective cloth.
- Fold, don’t hang; store in breathable bag.
Follow these steps and your personalized photo sweatshirt will stay as vivid as the day you first saw it printed. Ready to wear that memory again tomorrow? You bet.
FAQ
What kind of fabric is best for a personalized photo sweatshirt?
Most of us want something that feels like a hug, so look for a pre‑shrunk cotton‑poly blend – typically 80% cotton, 20% polyester. The cotton gives you that soft, breathable feel, while the polyester helps the ink bond and stay vibrant after wash cycles. A weight of 8–10 oz is a sweet spot: sturdy enough for the print, yet still cozy for everyday wear.
Will the photo fade after washing?
Good news: the inks used for heat‑transfer prints are designed to be fade‑resistant. To keep the image looking fresh, wash the sweatshirt inside‑out in cold water with a mild, fragrance‑free detergent. Skip the bleach and high‑heat dryer – air‑dry flat or tumble on a low “fluff” setting. If you follow those steps, the colors should stay bright for dozens of washes.
How do I choose the right size for a custom sweatshirt?
Start with the size you usually wear and add a little room for layering – most people go one size up if they plan to wear a tee underneath. Check the retailer’s size chart; measure your chest, shoulders, and sleeve length, then compare. If you’re between sizes, the larger option will feel more relaxed, while the smaller gives a snug, fitted look.
Can I add text or multiple photos to the same sweatshirt?
Absolutely. Most design tools let you drop a short line of text below the main image or place a tiny logo on a sleeve. Keep any extra elements under 12 pt so they don’t overwhelm the photo. If you want a collage, limit it to two or three images and make sure each one meets the 300 DPI requirement – otherwise the details can get mushy.
How long does it take to get my personalized photo sweatshirt after ordering?
Production usually runs in 3–5 business days once the design is approved. Shipping adds another 2–7 days depending on your location and the carrier you choose. If you’re ordering for a birthday or holiday, it’s safest to add a few extra days as a buffer – most shops will let you upgrade to expedited shipping if you’re in a pinch.
What should I do if the print looks off when I receive it?
First, double‑check the design proof you approved – sometimes a tiny shift shows up only after the fabric stretches. If the issue is clear (like a misaligned image or wrong color), contact customer support right away and ask for a reprint. Most reputable printers offer a free replacement for any printing errors, so don’t hesitate to reach out.
Conclusion
So you've walked through fabric choices, photo prep, design tools, and care tips—now the biggest question is simple: are you ready to turn that favorite memory into a wearable hug?
When you slip on a personalized photo sweatshirt, you’re not just covering up; you’re wrapping yourself in a story that only you and the people you love get to share. That little moment of nostalgia every time you pull the hoodie over your head? It’s worth every extra second you spent tweaking the layout.
Remember the checklist: pick a soft pre‑shrunk cotton‑poly blend, upload a 300 DPI image, double‑check the preview, and give the garment a gentle wash. Follow those steps and the colors stay vivid, the fabric stays buttery, and the gift stays unforgettable.
What’s next? Head over to heartful.gifts, pick your photo, and let the print‑on‑demand magic do the rest. If you’re ordering for a birthday, a holiday, or just because, add a quick note in the checkout – it’s those tiny details that turn a shirt into a keepsake.
We’re excited to see which memory you’ll wear next. Grab that photo, hit “order,” and enjoy the cozy reminder of why personalized gifts matter.
And remember, a great gift keeps on giving long after the first wash.
Design Inspiration Ideas for Your Personalized Photo Sweatshirt
Okay, you’ve already picked the perfect fabric and prepped the photo – now let’s have some fun. Below are nine fresh ideas that turn a plain sweatshirt into a story you’ll actually want to wear.
1. The “Memory‑Map” Collage
Take three to five tiny snapshots from a single trip (think beach sunrise, sandcastle, sunset dinner) and arrange them like a mini‑map on the chest. The trick? Keep each image under 300 DPI and give a thin white border so they don’t blend together. When you wear it, you’ll be tracing the day step by step.
2. “Family Tree” Silhouette
Upload a group photo, then use the design tool’s cut‑out feature to turn the faces into a simple silhouette. Place the silhouette across the back and add each name in a playful script on the sleeves. It’s a low‑key way to celebrate every member without clutter.
3. “Seasonal Snapshot”
Swap the background color of your photo to match the season – pastel pink for spring, deep orange for fall. A subtle hue change makes the same picture feel brand‑new each year. Bonus: you can reuse the same image for a whole set of seasonal sweatshirts.
4. “Quote‑Overlay” Inspiration
Pick a line that captures the moment ("Our best adventure yet") and overlay it in a semi‑transparent font over the image. Keep the text under 12 pt so it doesn’t dominate the picture. The result feels like a personal mantra you’re literally wearing.
5. “Pet‑First” Feature
Everyone loves a pet cameo. Crop your dog’s face, enlarge it slightly, and place it at the lower‑right corner of the sweatshirt. Pair it with a tiny paw‑print pattern that repeats on the sleeves. It’s a sweet nod that makes the shirt instantly recognizable to anyone who knows the fur‑baby.
6. “Monogram‑Mix”
Combine a large initial (your family’s first letter) with a tiny version of your favorite photo tucked into the corner of the initial. This design works especially well on a dark‑colored sweatshirt because the monogram pops, while the photo stays a quiet detail.
7. “Travel Badge” Series
Turn the photo into a badge‑style emblem – think airport luggage tag. Add the city name, date, and a small icon (like a palm tree for Hawaii). Print the badge on the left chest and repeat a smaller version on the back near the neckline for a cohesive travel‑journal vibe.
8. “Comic‑Strip” Narrative
Split a short video‑clip or burst of photos into three panels, then add speech bubbles with inside jokes. This works best with high‑resolution images; each panel should be at least 800 × 800 px. When you pull the sweatshirt over your head, you’re literally wearing a mini comic strip.
9. “Minimalist Frame”
Sometimes less is more. Take a single, high‑impact portrait, add a thin white or gold frame around it, and leave the rest of the sweatshirt blank. The clean look feels gallery‑ready and lets the photo breathe.
So, which of these ideas speaks to you? Maybe you love the “Memory‑Map” because it captures a whole day in one glance. Or perhaps the “Pet‑First” cameo is the perfect shout‑out to your furry friend.
Here’s a quick checklist to turn any of these concepts into a printable reality:
- ✅ Choose a high‑resolution image (300 DPI minimum).
- ✅ Keep text under 12 pt for readability.
- ✅ Use a cotton‑poly blend that feels soft and holds ink – custom photo hoodie reviews show the material feels soft and the print stays vibrant.
- ✅ Preview the design on both light and dark shirt colors.
- ✅ Take advantage of platforms that let you add names, dates, and icons – customization options include adding names and graphics directly on the sweatshirt.
- ✅ Order a single sample first if you’re planning a bulk run.
When you finally get that shirt in the mail, picture yourself slipping it on and instantly recalling the memory you just captured. That little “aha!” moment is why we spend a few extra minutes on design – it turns a simple garment into a wearable hug.
Ready to start? Open your favorite design tool, pick one of the ideas above, and let the magic happen. Your personalized photo sweatshirt is only a few clicks away from becoming your new favorite piece of nostalgia.