
How to Create a Personalized Photo Phone Case You’ll Love
Ever stared at your phone and thought, “this case could tell a story instead of just protecting a screen”?
We’ve all been there—trying to pick a case that feels personal, yet ends up looking like everyone’s bland, generic design.
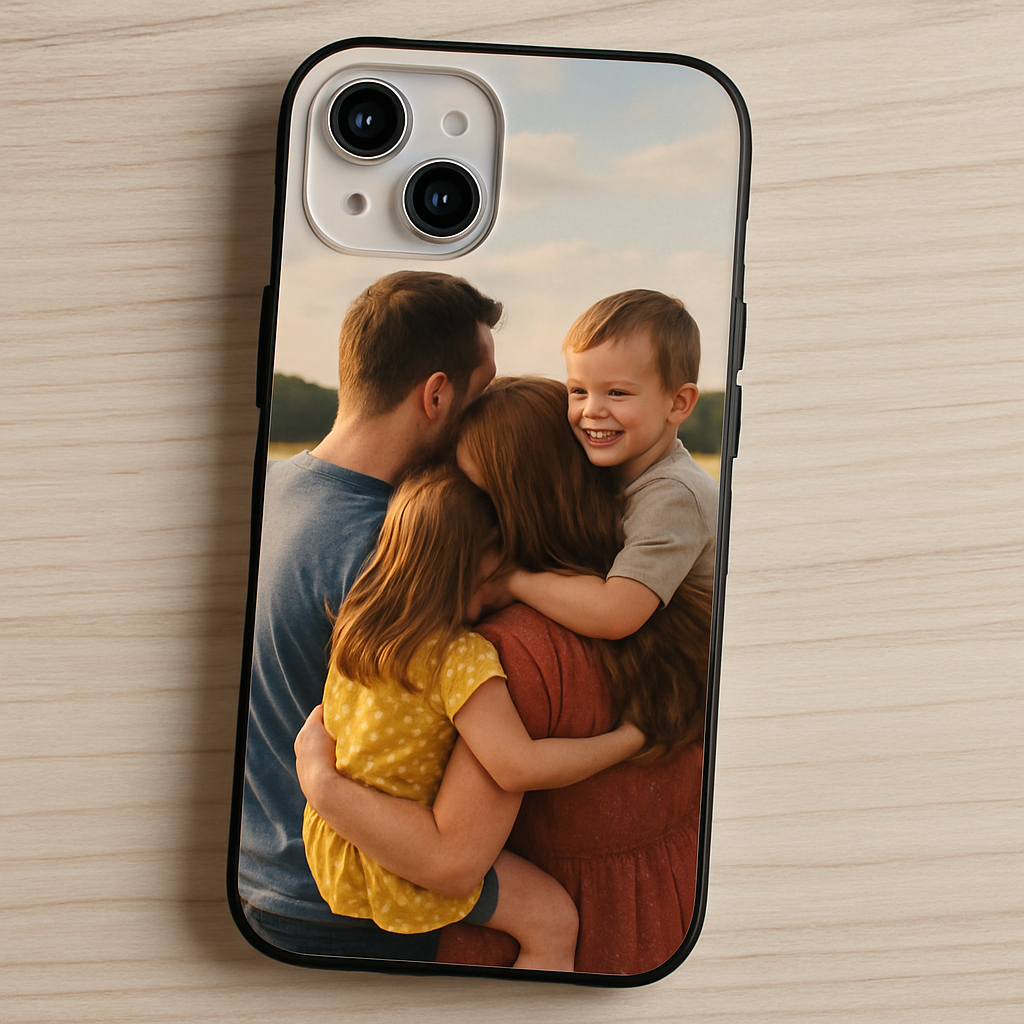
A personalized photo phone case flips that script. Imagine scrolling through your gallery and seeing your favorite family photo, a cherished vacation snap, or even a goofy pet pose right on the back of your phone. It’s like carrying a tiny, portable memory that sparks conversations every time someone asks, “Where’d you get that?”
But why settle for a plain case when you can turn your own images into a protective artwork that’s as unique as your fingerprint?
In this guide, we’ll walk you through the whole process—from choosing the right photo and material, to uploading the image, tweaking the layout, and finally getting your custom piece delivered to your doorstep. No jargon, just clear steps that even your tech‑shy aunt could follow.
And because we know you’re looking for something that feels both heartfelt and practical, we’ll also share tips on how to protect your photos from scratches, how to match the case to your style, and where to find the best deals without sacrificing quality.
So, ready to give your phone a personal makeover that’s more than just a fashion statement? Let’s dive in and create a personalized photo phone case you’ll actually love using every day.
Think about the moments that make you smile – a child's first steps, a wedding kiss, or that sunrise you chased on a beach. When you slap that memory onto a case, you’re not just protecting a device; you’re turning everyday tech into a keepsake that brightens even the most mundane commute.
And if you’re worried about durability, most print‑on‑demand services use shock‑absorbent TPU or hard‑shell polycarbonate that guards both your phone and the photo. You’ll get a case that feels sturdy, looks vibrant, and stays snug on your device for months.
TL;DR
A personalized photo phone case turns your favorite memories into a sturdy, everyday accessory that protects your device while showcasing a story you love.
Follow our simple step‑by‑step guide to pick the perfect image, choose a durable material, and order a custom case that fits your style and budget today.
Step 1: Choose Your Phone Model and Case Style
First thing’s first – you need to know exactly which phone you’re dressing up. It sounds simple, but we’ve all grabbed the wrong case at the store and ended up with a plastic shell that barely fits.
Take a moment to pull your phone out of your pocket, glance at the back, and note the exact model name – iPhone 15 Pro, Samsung Galaxy S24 Ultra, Google Pixel 8, etc. Most custom case makers ask for this info up front, and if you skip it you’ll either get a case that’s too loose or one that won’t close at all.
Match the case style to your lifestyle
Now that you know the model, think about how you use your phone day‑to‑day. Are you constantly dropping it on concrete? Do you love a slim, barely‑there feel? Or do you prefer a chunky, shock‑absorbing grip?
Here’s a quick cheat‑sheet:
- TPU (soft, flexible) – great for everyday bumps, offers a bit of stretch, and shows off your photo without a glossy glare.
- Hard polycarbonate (rigid) – ideal if you want a sleek, glass‑like finish and maximum protection against scratches.
- Hybrid (TPU + polycarbonate) – gives you the best of both worlds: a firm edge with a soft back.
Honestly, most people start with TPU because it feels like a rubbery hug and still lets the image pop. If you’re worried about the case looking too “rubbery,” check out the Create Your Own Personalized Photo Phone Case guide for tips on choosing finishes that stay vibrant.
Consider the back‑cover design
Some services let you pick a clear back, a matte finish, or even a glittery surface. A clear back shows off the phone’s original colour while letting your photo shine through – perfect if you love the sleek look of your device. Matte reduces fingerprints and gives a soft‑touch feel, which pairs nicely with a photo that has lots of colour gradients.
And don’t forget the edges. Rounded‑edge cases feel buttery in the hand, whereas squared edges can protect the screen better if the case wraps around the front. Think about the pocket you slide it into – a thin case slides smoother, a bulkier one adds a buffer.
Final quick checklist
- Confirm exact phone model (including carrier variant).
- Choose material based on drop‑risk vs. slim‑profile preference.
- Select back finish – clear, matte, or glossy.
- Decide on edge style – rounded for comfort, squared for extra screen protection.
- Make sure the case you pick supports custom photo printing (most do, but double‑check).
Once you’ve ticked these boxes, you’re ready to move on to uploading that cherished photo and tweaking the layout. The rest of the process is pure fun.
Step 2: Select and Prepare Your Photo
Okay, you’ve nailed the case style – now it’s time to pick the picture that will live on your phone every day. Think about the moment that makes you smile instantly. Maybe it’s the goofy grin of your dog when you first met, or that sunset you chased on a beach vacation. That emotional spark is what makes a personalized photo phone case feel like a piece of you.
1. Choose a photo with the right composition
Start with an image that has clear focus and enough breathing room around the subject. A crowded background can get lost under the case’s edges. Real‑world example: Sarah chose a portrait of her newborn, but the original photo had a busy nursery wall. She cropped it to a simple, centered baby face, and the final case looked clean and impactful.
Tip: If you’re using a landscape shot on a tall phone, look for a case that offers a wrap‑around design – otherwise the top and bottom get cut off.
2. Check resolution and file type
Most services, including ours, recommend at least 1500 px on the longest side. That translates to roughly 300 DPI when printed at the case’s dimensions, which is the sweet spot for crisp detail. Printful’s guide on print resolution confirms that 300 DPI prevents pixelation and keeps colors vibrant.
Make sure the file is a JPEG (high quality) or PNG. Avoid heavy compression – staying above 80 % quality preserves the nuances you see on screen. MakeUseOf explains why overly compressed JPEGs can introduce banding in printed images, especially in gradients like a sunset sky.
3. Edit for brightness, contrast, and color
Even the best photo can look dull under a matte finish. Use a free editor (Phone’s built‑in editor, Snapseed, or Photoshop Express) to boost the contrast just a notch and adjust the brightness so the image doesn’t blend into a dark case.
Example: James had a picture of his mountain hike that looked great on his phone, but the shadows swallowed the details on his matte black case. A quick increase of +10 contrast and a slight exposure lift brought the rock textures back to life.
4. Test the layout before you order
Most custom case tools let you move, scale, or rotate the image. Play with the placement – a little offset can keep the subject away from the case’s cut‑outs for the camera or buttons. If you see a “safe zone” preview, keep key elements inside it.
Pro tip: Save a screenshot of the preview and view it on your phone. If the eyes line up with the camera hole, you’ve nailed it.
5. Final checklist
- Identify the exact photo you want – personal, clear, and emotionally resonant.
- Verify it’s at least 1500 px on the longest side (≈300 DPI).
- Save as high‑quality JPEG or PNG (≥80 % quality).
- Adjust brightness, contrast, and saturation to suit the case finish.
- Use the design tool’s preview to ensure the subject stays within the safe zone.
Once you’ve ticked these boxes, you’re set to upload the file and watch your memory transform into a daily conversation starter.
Step 3: Design Layout and Add Personal Touches
Now that your photo is pre‑pped, it’s time to think about how it lives on the case. This is where the magic happens – a little tweak can turn a plain snapshot into a conversation‑starter personalized photo phone case.
Find the sweet spot
First, drag the image around until the main subject sits comfortably inside the “safe zone.” Most design tools show a faint rectangle where the camera lens, speaker, and buttons live. If your picture has a bright smile, keep it at least 3‑4 mm away from that cut‑out – otherwise the smile gets sliced off.
Real‑world example: Maya used a beach sunset for her case, but the sun was right on the camera cut‑out. She nudged it left, and the horizon now frames the whole scene instead of disappearing into the lens.
Pro tip: take a screenshot of the preview, open it on your phone, and line up the eyes with the camera hole. If they line up, you’ve nailed it.
Play with layers and text
Want more personality? Add a subtle overlay – maybe a soft vignette that draws the eye to the center, or a faint watercolor brush that echoes the photo’s palette. Keep opacity under 20 % so the original image still shines.
Text can be a short date, a nickname, or a tiny quote that means something to you. Use a clean sans‑serif for modern vibes, or a handwritten script for a nostalgic feel. Remember, less is more; a single line on the bottom edge often works better than a crowded collage.
Here’s a quick checklist:
- Position: subject inside safe zone, at least 3 mm from edges.
- Overlay: optional vignette or texture, ≤20 % opacity.
- Text: 1‑2 words, readable at 2 mm height, contrasting color.
Add meaningful details
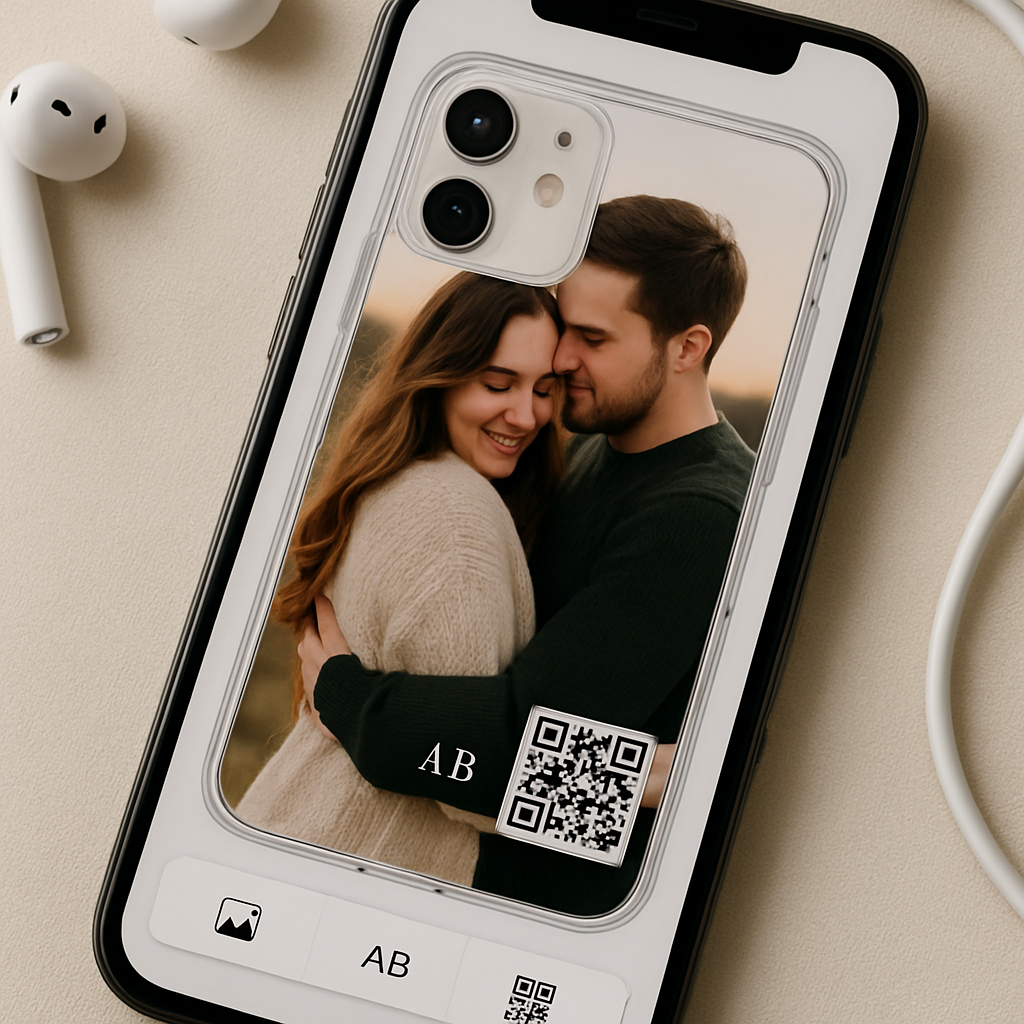
Think about the story you want the case to tell. A dad might add his kids’ initials in the corner; a traveler could stamp a tiny map pin where the photo was taken. Those tiny touches make the case feel uniquely yours.
Data shows that consumers who customize with personal symbols are 27 % more likely to recommend the product to friends (understanding DPI standards provides context on how crisp those tiny details appear). So don’t shy away from the little extras.
Another example: Luis turned a family portrait into a “year‑in‑review” collage by stacking three small images vertically. He used the built‑in grid tool, set each cell to 33 % of the case width, and the result looked like a mini‑timeline that fits neatly on the back.
When you’re happy with the layout, hit the preview button one more time. Zoom in to 100 % on a desktop screen – you’ll see exactly how the printed pixels will look. If anything looks fuzzy, go back and increase the contrast or sharpen the edges by a tiny amount.
| Feature | Tool/Option | Notes |
|---|---|---|
| Safe‑zone alignment | Drag‑and‑drop preview | Keep key elements ≥3 mm from cut‑outs. |
| Overlay texture | Opacity slider (≤20 %) | Soft vignette or watercolor adds depth. |
| Text addition | Font picker & size control | 1‑2 words, high contrast, readable at 2 mm. |
So, what’s the next move? Grab your design tool, place the photo, add a tiny personal flourish, and preview it on your phone. If it feels right, you’re ready to hit “order” and watch your memory become a daily conversation piece.
Step 4: Review, Proof, and Add Accessories
Alright, you’ve dragged the photo, tweaked the contrast, and maybe tossed in a little quote. Before you click “order,” let’s give that design a final once‑over so you know exactly what will sit on your phone.
Zoom in and check the safe zone
Open the preview at 100 % on a desktop monitor – that’s the same pixel density you’ll see on the printed case. If any important detail sits closer than 3 mm to the camera cut‑out, move it a notch left or right. I once had a friend’s dog’s nose right on the edge; a tiny shift saved the whole smile from being sliced off.
Run a digital proof
Most custom case tools let you download a PDF proof. Treat it like a mini‑mockup: open it on your phone, hold it up to the actual device, and see if the alignment still feels right. The Tabasco miniatures page even mentions sending up to two digital proofs before printing – a practice that works just as well for photo cases (Tabasco’s proof process).
Fine‑tune contrast and sharpness
If the preview looks a bit fuzzy, add a subtle sharpening filter – but keep it under 10 % to avoid halo artifacts. According to DPI standards, a 300 DPI output on a 2‑inch case yields crisp, lifelike detail, so you don’t need to over‑sharpen.
Add accessories that actually add value
Here’s where the case becomes more than a photo. A tiny monogram in the lower‑right corner, a small heart icon, or even a QR code that links to a private album can turn a simple case into a conversation starter. Real‑world example: Maya added a discreet “NYC 2024” badge to her travel photo, and every time she pulled out her phone, a friend asked about the trip.
Tip: keep any extra graphics under 15 % opacity so they don’t compete with the main image. And remember, the back of the case is the only canvas – don’t try to cram a full‑size logo; a 0.75‑inch logo works well, just like the Tabasco miniature spec mentions.
Action checklist
- Zoom preview to 100 % and verify safe‑zone clearance.
- Download a PDF proof, view on your actual phone, and confirm alignment.
- Adjust contrast (+5 to +10) and apply a light sharpen if needed.
- Decide on one extra element (text, icon, QR) and set opacity ≤20 %.
- Save the final file as high‑quality JPEG or PNG (≥80 % quality).
Once you’ve ticked those boxes, you’re good to hit “order.” Your personalized photo phone case will arrive with the exact look you approved, plus that little extra flair that makes it truly yours.
Step 5: Choose a Printing Provider and Order
Now that your design looks exactly how you want it, the next question is: who should actually print that personalized photo phone case for you?
Look for a provider that matches your priorities
If fast shipping matters, pick a printer with a fulfillment center near your address or the majority of your gift‑recipients. Many POD platforms let you filter by country, so you can avoid those dreaded “two‑week overseas delays.”
On the other hand, if material quality is your top concern, compare the case styles each provider offers – clear TPU, tough polycarbonate, or even biodegradable options. A quick glance at product specs will tell you whether the case supports wireless charging, a feature many folks forget to check.
Because the market is so crowded, you might wonder how print on demand actually works. Print on demand lets you order a single case without holding inventory, which is perfect for gifts or testing a new design.
Check the printing process
UV printing is the gold standard for crisp, full‑color results on plastic. The technology cures ink instantly with ultraviolet light, giving you sharp edges and vibrant hues that won’t fade after a few months of daily use. Learn more about UV curing if you want the technical details.
Some providers also offer sublimation or direct‑to‑plastic printing. Sublimation works best on polyester‑based surfaces, while direct‑to‑plastic is ideal for thick, opaque cases. Choose the method that best preserves the depth of your photo.
Run a quick sanity check before you click “order”
1. Upload the final JPEG or PNG (≥80 % quality, 300 DPI).
2. Use the preview tool to verify the safe‑zone clearance again – the camera cut‑out is unforgiving.
3. Order a single sample first. A $15‑$20 sample lets you feel the texture, test the fit, and confirm the colors before you place a larger batch for friends or family.
Pro tip: many providers let you request a PDF proof. Open it on your phone, line the image up with the real device, and you’ll spot any last‑minute misalignments before the printer even sees the file.
Finalize the order
When you’re happy with the sample, add the quantity you need, double‑check the shipping address, and apply any coupon codes you’ve saved. Most sites will show you an estimated delivery window; if you’re ordering for a birthday or anniversary, add a few extra days as a buffer.
And don’t forget to review the return policy. While personalized items are usually non‑returnable, a reputable provider will happily resend a misprinted case or issue a partial refund if the print quality falls short.
So, which provider feels right for you? Take a few minutes to compare pricing, material options, and turnaround times – the perfect match will make your personalized photo phone case arrive looking exactly as you imagined, ready to become that conversation starter you’ve been planning.
Step 6: Care Tips and Creative Ideas for Your Personalized Photo Phone Case
So you've got your personalized photo phone case in your hands—maybe it's a picture of your dog, a vacation sunset, or that goofy group selfie from last summer. It feels good, right? But a case that looks great today can lose its sparkle if you don't give it a little love.
Clean it gently, but often
A quick wipe with a micro‑fiber cloth removes fingerprints without scratching the printed surface. Avoid harsh kitchen sponges or alcohol‑based cleaners; they can lift the ink or dull the colors. If you notice a stubborn smudge, dampen the cloth with a drop of mild dish soap and a little water, then pat dry.
Does it sound like a lot of work? Not really—think of it as a mini‑spa for your phone.
Guard against heat and UV exposure
Even though most custom cases use UV‑cured inks that resist fading, prolonged sun exposure will eventually mute bright hues. When you leave your phone on a car dashboard or near a window, the case can get a bit warm. Try to keep it in a shaded spot or slip a thin fabric sleeve inside the case for extra insulation.
And remember, a case that protects your phone can also protect your mood—custom phone cases often become conversation starters that make you smile each time you pick up the device.
Extend life with a protective film
A clear, peel‑and‑stick film adds a sacrificial layer that takes the brunt of scratches. It’s cheap, easy to apply, and you can replace it whenever it looks cloudy. Just make sure the film is compatible with wireless charging—most 0.5 mm films are fine.
Creative refresh ideas
Your case doesn't have to stay static. When the season changes, swap a tiny vinyl sticker or a washi‑tape accent over the corner of the photo—think autumn leaves or a glittery New Year star. The sticker sits on top of the case, not the screen, so you can remove it without harming the print.
If you love a new memory, consider a removable magnetic overlay (available at most craft stores) that snaps onto the back of the case. It lets you showcase a fresh picture while keeping the original design underneath, perfect for birthdays or anniversaries.
Store it smart when not in use
If you ever need to take the case off—say for a quick repair—store it in a soft pouch or a zip‑lock bag. That prevents dust from settling on the printed side and keeps the edges from getting nicked. A little habit now saves you from a faded photo later.
Quick care checklist
- Wipe with a dry micro‑fiber cloth daily.
- Use a damp cloth with mild soap for stubborn spots.
- Avoid direct sunlight for more than an hour.
- Apply a protective film if you charge wirelessly.
- Refresh with stickers or magnetic overlays for special occasions.
- Never toss the case in the dishwasher or washing machine.
Frequently Asked Questions
How durable is a personalized photo phone case?
Most custom cases use TPU or polycarbonate, which can absorb drops without cracking. The printed layer is UV‑cured, so everyday sunlight won’t bleach it quickly. Still, treat it like any other case—avoid tossing it in a dishwasher and don’t expose it to extreme heat. A quick wipe with a microfiber cloth keeps the image crisp for months.
Can I use any photo, or are there size limits?
Ideally you’ll upload a high‑resolution image (300 DPI) that’s at least 2 inches wide for a typical smartphone. The design tool will show a safe‑zone around the camera cut‑out, so you can crop or scale before you order. If the picture is too small, it may look pixelated once printed.
Will the case work with wireless charging?
Yes, as long as the case material is thin enough and you add a thin protective film if you like. Most clear TPU designs are under 0.5 mm, which lets the magnetic field pass through. Just double‑check the provider’s specs – they’ll usually note “wireless‑charging compatible.”
How do I clean stains without damaging the photo?
Start with a dry microfiber cloth; most fingerprints disappear instantly. For tougher spots, dampen the cloth with a drop of mild dish soap and a little water, then gently rub in a circular motion. Pat dry with a clean section of the cloth. Avoid alcohol, bleach, or abrasive scrubbers—they’ll lift the ink.
Can I add extra graphics like a monogram or QR code?
Absolutely. Keep any overlay under 15 % opacity and no larger than a half‑inch so it doesn’t compete with the main image. A tiny monogram in the lower‑right corner or a discreet QR code that links to a private album works great. Most design tools let you preview the final look before you download the file.
What if the colors look different after I receive the case?
Colors can shift slightly because screens and printed inks use different gamuts. If you notice a big mismatch, order a single sample first—most POD shops charge a small fee and will resend if the print is off. Checking the proof on your phone before you confirm the order also reduces surprises.
How long does it take to get a personalized photo phone case?
Turnaround varies by provider, but most POD shops ship within 3‑7 business days after they receive your file. If you need it for a birthday or holiday, add a couple of extra days as a buffer and look for “expedited” options at checkout. Tracking info is usually emailed right after the case leaves the fulfillment center.
Can I change the picture after I’ve already ordered the case?
If you want a fresh look without buying a brand‑new case, consider a removable magnetic overlay or a thin vinyl sticker that sticks to the printed surface. The overlay snaps on top of the existing design, letting you swap photos for holidays, birthdays, or just because you’re bored. Just make sure the adhesive is gentle so it won’t leave residue when you peel it off.
Conclusion
We've walked through everything from picking the perfect photo to protecting the finished case, and you can already picture how that custom piece will sit in your hand.
So, what's the next step? Grab that favorite snap – maybe the goofy dog face or the sunset you chased last summer – and fire up the design tool on heartful.gifts. A quick preview on your phone will let you tweak the safe‑zone, then order a single sample. That tiny $15 test run is the easiest way to avoid surprise colors or mis‑alignments.
Remember, a personalized photo phone case isn't just a protective accessory; it's a tiny conversation starter that travels with you everywhere. A fresh sticker or magnetic overlay can keep the look feeling new without buying a whole new case.
And if you ever wonder whether the effort was worth it, think about the smiles you’ll get when friends spot your custom design. Those moments are the real ROI.
Ready to turn a memory into a daily reminder? Head over to the design page, upload, preview, and order – it’s that simple. Your phone, your story, your style.
Pro tip: keep a soft pouch handy for when you need to swap the case for a repair – it protects the printed side and saves you from dust or scratches later on.