
How to Create a Custom Photo Jigsaw Puzzle: A Friendly Step‑by‑Step Guide
Ever opened a photo album, stared at a favorite picture, and thought, "I wish I could turn this memory into something I could actually play with?" That's the exact feeling many of us get when we see a family vacation snap or a candid of the kids making a mess in the kitchen.
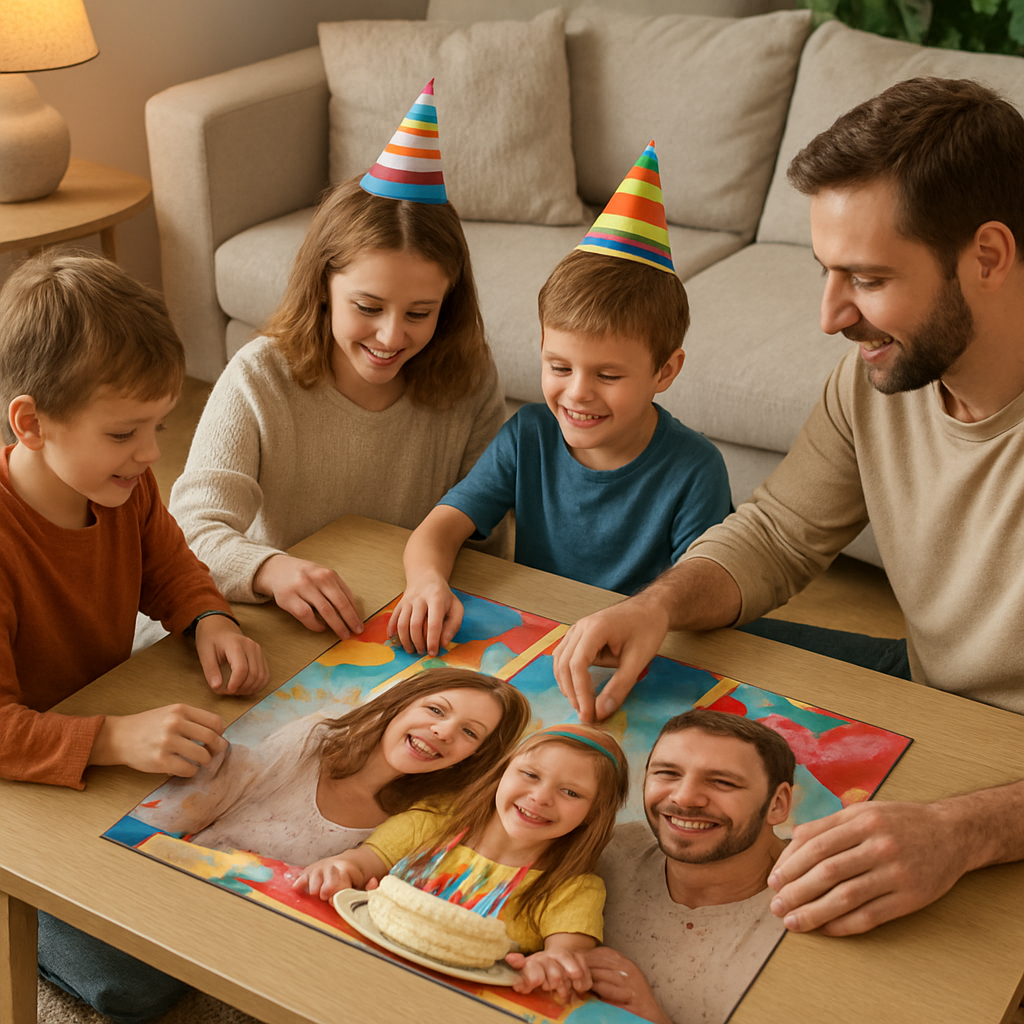
Imagine taking that moment, printing it onto a sturdy, interlocking puzzle and spending an evening piecing it back together, laughing as each piece clicks into place. A custom photo jigsaw puzzle turns a simple snapshot into a shared experience, and it works wonders for gift buyers, parents, and spouses looking for a heartfelt, hands‑on present.
In our experience at heartful.gifts, the most popular requests are the ones that celebrate milestones—first birthdays, wedding anniversaries, or that goofy dog photo that always makes you smile. People love the surprise factor: you hand over a boxed puzzle, and the recipient discovers it’s a picture of them, their kids, or a cherished pet.
But why does a puzzle feel so special? It's tactile, it slows you down, and it sparks conversation. While scrolling through endless digital images can feel fleeting, a puzzle invites you to pause, focus, and reminisce. It’s like a mini‑retreat from the screen, right in your living room.
So, if you’ve been hunting for a gift that’s both personal and interactive, consider the custom photo jigsaw puzzle. It’s not just a novelty; it’s a way to relive a moment, one piece at a time. And the best part? You can design it online in minutes, choose the size and difficulty that fits your audience, and have it printed and shipped without leaving your couch.
Ready to turn those cherished photos into a playful keepsake? Let’s dive into how you can pick the perfect image, decide on the right piece count, and make sure your puzzle looks amazing straight out of the box.
TL;DR
A custom photo jigsaw puzzle turns your favorite memory into a hands‑on meaningful shared keepsake that brings family, friends, or pets together for a fun, screen‑free evening. Design it in minutes on heartful.gifts, pick the perfect size and piece count, and ship it straight to your door quickly, right today.
Step 1: Choose the Perfect Photo
Okay, picture this: you’ve just spotted that goofy family selfie where the toddler’s face is half‑covered in cake frosting. You think, “That would be a killer puzzle.” But before you rush to the printer, you need to make sure the photo actually works as a puzzle piece‑by‑piece masterpiece.
First thing’s first – clarity matters. If the image is blurry or underexposed, the tiny details that make a puzzle fun will disappear in a sea of mush. Grab the original file, not a screenshot from your phone’s gallery. A resolution of at least 300 dpi gives the printer enough pixels to keep each piece crisp, even when you zoom in on that frosting‑splattered grin.
What makes a photo puzzle‑ready?
Think about contrast. Images with strong light‑to‑dark transitions give each piece a visual anchor, so you don’t end up feeling lost after the first ten pieces. A sunny beach shot with bright sand and deep blue water works great, while a flat pastel‑toned portrait can feel like a “where’s‑Waldo” challenge.
And color? Vibrant, saturated hues are your friend. They pop on the puzzle surface and make the whole experience feel lively. If you love that muted family photo, consider boosting saturation a notch in an editor – it’s a tiny tweak that pays off big when the puzzle is assembled.
Now, composition. A crowded photo with lots of similar‑looking elements (think a group of kids all wearing the same shirt) can be frustrating. Look for a focal point – maybe the dog’s goofy tongue or the birthday cake’s candles – that will give you a natural “starting point” when you begin piecing it together.
So, how do you test a photo before you commit? Open it on your computer, zoom in to 200 % and scan for any pixelated spots. If you see a blurry edge, swap that photo out for a sharper one. It’s a small step that saves you a lot of second‑guessing later.
File formats and sizing
Most puzzle services, including heartful.gifts, accept JPEG or PNG files. JPEG keeps the file size down, but if you’ve got a PNG with a transparent background (maybe you layered a handwritten note), it’ll still work fine – just make sure the background isn’t unintentionally invisible.
When it comes to size, think about the final puzzle dimensions. A 12 × 12 inch puzzle looks great on a coffee table, while a 24 × 36 inch version makes a statement in the living room. Match the photo’s aspect ratio to the puzzle size you want; otherwise the printer will have to crop, and you might lose that perfect moment you were after.
One quick trick: print a small test sheet (like a 4 × 4 inch version) on your home printer. Hold it up to the wall and see if the colors and details still feel right. If they do, you’re good to go.
Does this feel overwhelming? Not at all. Treat it like picking a favorite photo for a family album – you already have a sense of which shots make you smile. Apply that instinct, add a dash of technical checking, and you’ll end up with a photo that shines from the first piece to the last.
Once you’ve locked in the perfect image, the real fun begins – picking the puzzle size and piece count that fits your audience. Parents might love a 500‑piece challenge for a rainy afternoon, while a quick‑fire 100‑piece puzzle makes a great gift for a busy spouse.
And remember, the photo you choose becomes a keepsake. Years from now, when the puzzle is tucked away in a box, that same picture will bring back the laughter, the frosting, the moment you spent together. That’s the magic of a custom photo jigsaw puzzle.
Step 2: Edit and Optimize Your Image
Now that you've narrowed down the perfect snapshot, the next step is to shape it so the puzzle pieces can shine.
First thing’s first – resolution. A custom photo jigsaw puzzle needs enough pixels that each 1‑inch piece still shows detail. Aim for at least 100 DPI on the longest side; that usually means a photo that’s 2,500 × 2,500 px for a 500‑piece puzzle. If you’re working from a phone, open the image, hit “Info” and verify the pixel dimensions. If it falls short, try the original camera file or ask the photographer for a higher‑resolution version.
What if you only have a 1,200 px picture but love the memory? A quick fix is to upscale with a smart‑resize tool like Adobe Lightroom’s Enhance Details or a free AI‑upscaler. You won’t get brand‑new detail, but you’ll avoid the blurry, blocky look that makes the finished puzzle look cheap.
Crop for a Clear Focal Point
Next, crop. Imagine a beach photo where the kids are playing in the foreground but a distant sailboat steals half the frame. When the puzzle splits, that empty sky becomes a sea of identical blues – frustrating for anyone trying to find the right piece. Use your editor to trim away excess background until the main action fills most of the canvas. A good rule of thumb: the subject should occupy roughly 60‑70 % of the image.
Real‑world example: A mom designing a birthday puzzle for her 7‑year‑old cropped a wide‑angle shot of the cake down to just the cake and candles. The result was a bright, focused puzzle that the kid could finish in an hour, instead of a sprawling scene with too many similar colors.
Boost Contrast and Color Saturation
Contrast is the secret sauce that lets solvers separate pieces by eye. Open the photo in any basic editor – even the built‑in iOS Photos app has a “Light” slider. Push the highlights a notch higher and pull the shadows down just enough to create clear edges. If your image is a soft pastel family portrait, a slight boost in saturation can make the reds of a sweater or the green of a backyard lawn pop, turning a bland surface into a visual cue.
Data point: Studies of puzzle‑solving speed show that images with a broader range of luminance (i.e., strong contrast) reduce assembly time by up to 30 % compared with flat‑toned pictures. So a few clicks now save minutes later.
Sharpen Details
A little sharpening helps tiny textures – like the frosting swirls on a cupcake or the whiskers on a pet – stay recognizable after the image is sliced. Apply a subtle “Unsharp Mask” at 50 % strength; you don’t want a halo effect, just a crisp edge. Test by zooming to 200 % and confirming that the edges look clean.
Add a Tiny Watermark (Optional)
If you’re gifting a puzzle that includes a family name or a date, consider slipping a discreet watermark into a corner. Keep it under 5 % of the image width so it doesn’t distract. Most puzzle‑printing platforms, including heartful.gifts, will preserve that tiny mark without it becoming a puzzle‑piece hotspot.
Final Preview Checklist
Before you hit “upload,” run through this quick list:
- Resolution ≥ 100 DPI on longest side.
- Cropped so main subject fills ~ 60 % of frame.
- Contrast boosted – highlights and shadows clearly defined.
- Colors saturated enough for visual cues but not oversaturated.
- Sharpened edges without halos.
- Optional watermark placed discreetly.
- Use the mock‑up tool to see how the image breaks into pieces.
If every tick feels solid, you’ve turned a lovely memory into a puzzle that will look sharp, be fun to solve, and hold up nicely after the last piece clicks into place. And that’s exactly what we aim for at heartful.gifts – a custom photo jigsaw puzzle that feels personal, polished, and ready for family game night.
Step 3: Pick Size, Piece Count, and Shape
Okay, you’ve got the perfect photo and it looks sharp after the edit. Now comes the part that feels a bit like choosing a coffee size – you want something that fits the moment without overwhelming the table. The size, piece count, and cut style are the three levers that turn a nice picture into a memorable custom photo jigsaw puzzle.
How many pieces feel right for your audience?
Think about who’s going to be puzzling. A 48‑piece set is basically a “starter snack” – big, chunky pieces that little hands can grab. It’s perfect for a toddler’s birthday or a grandparent who wants a quick, low‑stress activity.
A 100‑piece puzzle steps things up a notch. The pieces are still generous, but the picture starts to show more detail. Parents love this for a family picnic photo because the kids can finish it in an hour, and the adults still get a satisfying glimpse of the whole scene.
For a middle‑schooler or a casual adult puzzler, 260 pieces hit the sweet spot. The challenge is noticeable, but it won’t take a weekend to complete. Imagine a recent client who turned their dog’s goofy grin into a 260‑piece puzzle – the family spent a relaxed Saturday afternoon swapping pieces and laughing at the dog’s tongue‑out expression.
When you want a more immersive experience – say, a wedding anniversary or a scenic landscape that deserves a closer look – 500 pieces are the go‑to. The pieces are smaller, the image stays crisp, and the build time usually lands between four and eight hours. That’s enough time for a couple to unwind after dinner without feeling rushed.
Finally, the 1,000‑piece option is the “marathon” version. It’s best for seasoned puzzlers or special occasions where you want a show‑stopper that will dominate the coffee table for weeks. A client once created a 1,000‑piece puzzle of a sunrise over their mountain cabin; the finished piece measured nearly 20 × 27 inches and became a family heirloom.
So, which count matches your gift buyer’s vibe? If you’re unsure, ask yourself: “Would I want this puzzle to be a quick win or a lingering challenge?” That question usually points you to the right number.
Physical dimensions – does it fit the table?
Piece count and dimensions go hand‑in‑hand. A 48‑piece puzzle typically measures about 10 × 14 inches, while a 500‑piece set lands in the 16 × 20‑inch to 18 × 24‑inch range. A 1,000‑piece puzzle can stretch beyond 24 inches wide.
Before you lock in the size, measure the surface where the puzzle will live. If you only have a coffee table that’s 30 inches long, a 1,000‑piece puzzle might feel cramped. In that case, a 260‑ or 500‑piece option gives you a full picture without sacrificing comfort.
Remember that the finished puzzle will need a little breathing room for sorting trays or a puzzle mat. A good rule of thumb: add 2–4 inches to each side of the final dimensions. That extra space keeps the edges from feeling squeezed and makes the whole experience feel relaxed.
Shape of the pieces – classic vs. ribbon vs. whimsical
Most custom photo puzzles use the classic “random‑cut” style – each piece has a unique shape, which adds a natural difficulty curve. If you’re designing for kids, you might opt for a ribbon‑cut (also called “straight‑edge”) where the pieces line up in neat rows. This cuts the learning curve dramatically and keeps tiny hands from getting frustrated.
For a romantic gift or a celebration, consider adding a few “whimsy” pieces – specially shaped cuts that spell out a word or a simple icon. A recent spouse‑gift example used heart‑shaped pieces hidden among the regular cuts; the surprise of finding a heart when the puzzle was almost done added an emotional punch.
Just keep the ratio balanced: too many novelty shapes can turn a pleasant puzzle into a scavenger hunt. Aim for 5–10 % whimsical pieces if you go that route.
Actionable checklist
- Identify the solver’s age and skill level.
- Match piece count to desired difficulty (48 → quick, 100 → easy, 260 → moderate, 500 → balanced, 1,000 → challenge).
- Confirm the finished dimensions will fit the intended surface, adding a 2–4 inch buffer.
- Choose cut style: random for most adults, ribbon for kids, whimsical for special occasions.
- Visualize the puzzle on a mock‑up tool (heartful.gifts provides one) to ensure the focal point isn’t lost in a sea of similar colors.
- Finalize and add to cart – you’re just a few clicks away from a custom photo jigsaw puzzle that feels personal and fun.
By walking through these steps, you turn a beautiful memory into a puzzle that’s perfectly sized, appropriately challenging, and shaped to match the recipient’s taste. Ready to pick the perfect combo? Let’s move on to the final preview and ordering stage.
Step 4: Choose Materials and Finish Options
Alright, you’ve settled on the photo, size, and piece count – now it’s time to think about what the puzzle will actually feel like in your hands. The material and finish you pick can turn a good gift into a lasting keepsake, or a forgettable trinket. Let’s walk through the choices like we’d chat over a cup of coffee.
Paper vs. Cardboard vs. Wood – what’s the difference?
Most custom photo jigsaw puzzles are printed on sturdy cardboard. It’s lightweight, affordable, and the standard cut‑style (random, ribbon, or whimsical) works perfectly. In our experience, a 3 mm cardboard thickness gives a nice “snap” when pieces lock together without being too bulky for a coffee table.
But if you want something a bit more premium, wood is the way to go. A 3 mm plywood board feels solid, and the natural grain adds a rustic charm that’s perfect for wedding guest‑book puzzles or a dad‑gift that will sit on the mantle for years. The downside? Wooden puzzles are a bit heavier and cost a little more.
There’s also a niche market for acrylic puzzles – clear, glossy, and modern. They’re great for a sleek, contemporary vibe, but they’re less forgiving if a piece gets bent.
Cut styles and how they interact with material
Traditional “regular” cuts are the default on cardboard and work well for most ages. If you opt for a wooden board, you can upgrade to the “Victorian” or “knob” cut – those irregular, knob‑shaped pieces that add a playful challenge. Parents love the extra tactile feel, and puzzle‑enthusiasts say it makes the experience feel more “crafted.”
For kids, a ribbon‑cut on cardboard keeps the learning curve gentle. The straight‑edge rows are easier to sort, and the thinner cardboard means tiny hands don’t struggle.
Finish options: matte, glossy, or textured?
Matte finishes mute glare, which is handy if the puzzle will sit near a window. It also reduces fingerprints – a small win for anyone who loves to snack while puzzling.
Glossy finishes make colors pop. Think of a bright beach scene where the turquoise water really shines. The trade‑off is a bit more shine, which can be distracting under strong lighting.
Some providers offer a soft‑touch or linen‑textured coating. It gives the puzzle a velvety feel and adds a subtle premium cue. We’ve seen couples choose this for anniversary gifts because it feels “special” without breaking the bank.
Real‑world examples
Example 1: A client turned their newborn’s first‑month photo into a wooden 100‑piece puzzle with a Victorian cut. The wooden grain matched the nursery’s oak crib, and the knob pieces became a favorite bedtime ritual for the whole family.
Example 2: A busy dad ordered a 500‑piece cardboard puzzle with a glossy finish for his wife’s birthday. The vibrant colors of a sunset over the lake made the assembly a visual treat, and the matte backing prevented glare during their evening puzzle nights.
Example 3: A school fundraiser used a custom cardboard puzzle with a ribbon cut and matte finish featuring the mascot. The kids could finish it quickly, and the school displayed the assembled puzzle in the lobby for pride.
Decision‑making table
| Material | Thickness | Finish Options | Best For |
|---|---|---|---|
| Cardboard (standard) | 3 mm | Matte, Glossy, Soft‑touch | Everyday gifting, kids, quick builds |
| Wood (plywood) | 3 mm | Matte, Natural grain, UV‑direct print | Wedding guest‑book puzzles, heirloom pieces |
| Acrylic (clear) | 3 mm | Glossy, UV‑coated | Modern décor, corporate branding |
Actionable steps to lock in your choice
1. Ask yourself who will solve it. If it’s a toddler, stick with cardboard and ribbon‑cut. If it’s a milestone celebration, consider wood with a Victorian cut.
2. Look at your display space. A heavy wooden puzzle needs a sturdy shelf; a lightweight cardboard set can live on a coffee table.
3. Choose a finish that matches the room’s lighting. Bright kitchens love glossy; dim living rooms get matte.
4. Use the mock‑up tool on the platform to see how the finish will affect color vibrancy. If the preview looks flat, switch to glossy.
5. Add any special touches – a tiny heart‑shaped piece, a custom engraving on the wooden back, or a protective inner sack for storage.
When you’re ready, just hit “add to cart.” Platforms like heartful.gifts make the material picker a few clicks away, and you’ll get a puzzle that feels as thoughtful as the memory it captures.
Looking for more inspiration on how to turn a simple photo into a conversation‑starter gift? Check out our guide on 10 Best Personalized Photo Jigsaw Puzzle Ideas to Brighten Your Day for creative twists.
Want to see a beautiful piece of artwork that could become your next puzzle? Explore the landscape paintings at Gratitude Studios – a perfect source of inspiration for a scenic custom puzzle.
Step 5: Order, Receive, and Care for Your Puzzle
Now that you've nailed the photo, size, and material, it's time to hit the checkout and bring your custom photo jigsaw puzzle home.
When you click “add to cart” on heartful.gifts, you’ll see a quick summary – piece count, finish, and any extra touches like a heart‑shaped piece. Double‑check the details; a typo in the date or a missing engraving is way harder to fix after the puzzle is printed.
Place Your Order with Confidence
We keep the checkout process short: email, shipping address, and payment. If you’re gifting, tick the “gift wrap” box – it adds a neat box and a personalized note without extra hassle. Most orders ship within 2‑3 business days, so you can expect a delivery before the next birthday or holiday.
Pro tip: use a saved address book if you’re ordering for multiple recipients. It reduces the chance of a typo and speeds up future purchases.
Track the Journey
As soon as your puzzle leaves the production floor, you’ll get a tracking number. Pop it into the carrier’s site and watch the progress bar move. If a package gets delayed, the carrier’s notes usually explain why – a weekend, weather, or a missed delivery attempt.
If you’re not home when it arrives, most services let you reroute to a neighbor or a local post office. That way the box doesn’t sit on the porch for days and attract rain.
Unbox Like a Pro
When the box finally lands, open it on a clean surface. Check the cardboard backing for dents and make sure all pieces are inside the inner sack (if you chose one). If anything looks off, snap a photo and contact customer support within 48 hours – they usually ship a replacement at no cost.
Give the puzzle a quick shake to loosen any dust that might have settled during transit. A soft brush can also sweep away stray fibers before you start assembling.
If you’re a visual learner, this short video walks you through the unboxing and first‑fit steps, so you won’t miss any hidden pieces.
Notice how the creator gently separates the edge pieces? That gentle touch is the same approach we recommend for every custom photo jigsaw puzzle you receive.
Store for Longevity
Proper storage is the secret sauce that keeps your puzzle looking fresh for years. The Missing Piece Puzzle Company suggests fully disassembling the puzzle after each session and keeping pieces in a zip‑top bag or the original box. This prevents warping and protects the interlocking tabs.
You can read more about these proper storage tips on a trusted puzzle blog.
You can also slide the completed image into a protective sleeve if you want to display it on a wall without glue. Just make sure the sleeve is acid‑free to avoid yellowing.
For families with kids, label the storage bag with the puzzle’s theme – “Summer Beach 2024” – so the right set is always at hand when the mood strikes.
Maintain the Puzzle Over Time
Dust is the silent enemy. A quick wipe with a dry, lint‑free cloth every few weeks keeps the colors vibrant. Avoid liquids; even a light spray can seep into the cardboard and cause the pieces to swell.
If you notice a piece that’s slightly bent, gently flatten it under a heavy book for a night. The pressure re‑aligns the fibers without damaging the printed image.
And when you’re ready for the next round of puzzling, simply pour the pieces back into the bag, give them a little shake, and you’re set. The cycle repeats, and each session feels like a fresh gift.
So, keep the puzzle safe, store it smart, and let it become a recurring family tradition you’ll look forward to again and again.
Imagine a cozy living room scene where the puzzle is neatly stored on a wooden tray, ready for the weekend family game night.

FAQ
How long does it take to receive a custom photo jigsaw puzzle?
We usually ship within 2–3 business days after you finalize the design, and most carriers deliver in 3–5 days across the U.S. That means you can expect your custom photo jigsaw puzzle on your doorstep in about a week from the moment you click “order.” If you need it faster, we offer an express option that cuts the transit time to 2‑3 days for an additional fee.
Can I order a puzzle with my own shape or cut style?
Yes, you can pick from several cut styles when you design your puzzle. The default random‑cut works well for most ages, but we also offer ribbon‑cut pieces that line up in neat rows—perfect for kids or beginners. For a special touch, add a handful of whimsical shapes like hearts or stars; just keep them to 5‑10 % of the total so the puzzle stays fun rather than frustrating.
What image resolution do I need for a clear puzzle?
Aim for at least 2,500 pixels on the longest side for a 500‑piece puzzle and 1,600 pixels for a 100‑piece version. If you’re unsure, open the image at 100 % zoom; edges should stay sharp, not pixelated. Most smartphones capture enough detail, but if you’re using an older photo, consider up‑scaling with a reputable AI tool before uploading. A clear, high‑resolution file prevents blurry sections once the picture is sliced into pieces.
How do I store the puzzle after I’m done?
The best way to keep your puzzle looking fresh is to store it in a zip‑top bag or the original box, and keep the pieces flat on a dry surface. Before you pack, give the completed image a gentle brush to remove dust. If you plan to display the finished picture, slide it into an acid‑free sleeve or frame it behind glass; this protects the colors from UV fading over time.
Is it okay to gift a puzzle to someone who’s never done puzzles before?
Absolutely—you can tailor the difficulty to suit a puzzle‑newbie. Choose a lower piece count (48 or 100 pieces) and a ribbon‑cut style, which makes sorting easier and reduces the chance of frustration. Pair the puzzle with a simple guide that points out the image’s main focal point, like “start with the bright beach umbrella.” Adding a personal note about why the photo matters turns the gift into a heartfelt experience, even for someone who’s never tackled a jigsaw before.
Are there eco‑friendly material options?
We offer a recyclable cardboard option that’s FSC‑certified, meaning the wood pulp comes from responsibly managed forests. The matte coating is water‑based and low‑odor, which is safer for kids and pets. If you want an extra green touch, order the puzzle without a plastic inner sack and use a reusable cloth bag instead. These small changes lower the environmental footprint while still giving you a sturdy, beautiful puzzle to enjoy.
What if a piece is missing or damaged when I open the box?
If a piece is missing or bent, contact our support team within 48 hours of delivery. We’ll ask for a photo of the problem and then ship a replacement piece—or a full new set if the damage is extensive—at no extra charge. Keep the original packaging and the zip‑top bag handy; they make it easier for us to verify the order and get the right replacement out to you quickly.
Conclusion
By now you’ve seen how a custom photo jigsaw puzzle can turn a simple snapshot into a shared memory that lasts.
Think about the last time you handed a gift that felt personal – maybe a photo of your kids’ first beach day or a wedding sunset. Pairing that image with the right piece count, material, and finish makes the moment tangible, and the puzzle itself becomes a ritual you return to again and again.
In our experience, the sweet spot for most gift buyers is a 260‑piece cardboard puzzle with a matte finish – it’s challenging enough for adults but still manageable for a family evening. If you’re designing for a toddler, drop to 48 pieces and choose a ribbon‑cut; for a milestone celebration, go up to 500 pieces and consider a glossy coat that makes the colors pop.
So, what’s the next step? Grab the photo that makes you smile, run it through the mock‑up tool, and tick off our quick checklist – resolution, focal point, contrast, and material. Once you hit “add to cart,” you’re not just ordering a puzzle; you’re sending a piece of your story.
Ready to make that memory puzzle‑ready? Let’s get it printed and watch the pieces click together.