
Creative Ideas for Designing a Custom Face T Shirt
Ever looked at a photo of your kid, your partner, or even yourself and thought, “What if I could wear that smile?”
We’ve all had that moment when a memory feels too good to keep just on the screen, and the idea of a custom face t shirt sneaks in like a perfect excuse to turn a fleeting feeling into something you can hug all day.
But why settle for a plain tee when you can literally print a face onto the fabric? Imagine pulling on a shirt that shows your baby’s cheeky grin during a family brunch, or rocking a shirt with your own goofy expression at a casual Friday – it’s instant conversation starter and a tiny bit of personal magic.
So, here’s the promise: by the end of this guide you’ll know exactly how to pick the right photo, choose a style that flatters the image, and avoid the common pitfalls that turn a great idea into a faded disappointment.
Think about it this way: a custom face t shirt is like a wearable photo album, except you only need one piece of paper – the shirt – to carry the whole story. You don’t have to be a design guru; the process is as simple as uploading, tweaking, and hitting “order.”
And if you’re wondering whether the print will survive a wash or look cheap, rest assured – modern printing tech means the colors stay vivid, the fabric stays soft, and the design stays where you want it, right on the chest.
Now, let’s dive in. We’ll walk through choosing a photo that translates well onto cotton, sizing the image so it doesn’t look stretched, and picking the perfect shirt colour that makes the face pop. You’ll also get a quick checklist to avoid the “oops” moments that many first‑time creators face.
Ready to turn that favorite snapshot into a statement piece? Grab a cup of coffee, open your photo library, and let’s start turning memories into wearable art.
TL;DR
A custom face t shirt lets you wear a cherished memory—your kid’s grin, a goofy selfie, or a favorite pet—on soft, washable cotton that stays vivid wash after wash.
Just upload your photo, pick a shirt colour, and order; we’ll handle the printing so you can focus on showing off that personal piece of art.
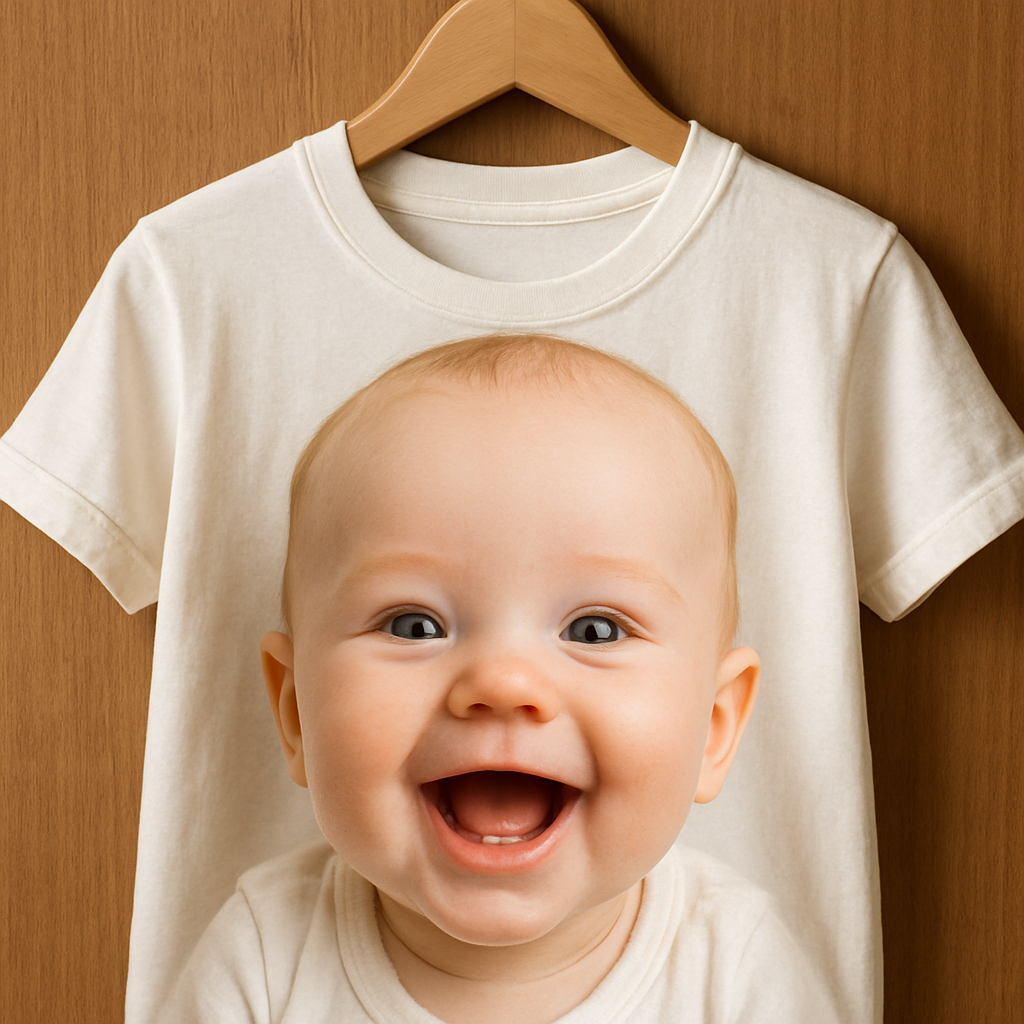
Idea 1: Turn Your Photo Into a Custom Face T Shirt Design
Imagine pulling on a tee that shows your child's cheeky grin right on the chest. That moment of surprise—‘Is that really my kid?’—is the magic behind a custom face t shirt. It turns a fleeting selfie into something you can hug all day.
First, hunt for a photo that feels alive. Choose one where the face is centered, eyes are in focus, and lighting is even. A candid laugh works better than a blurry group shot, because the printer needs clear edges to reproduce the expression without looking like a smudge.
Resolution matters more than you think. Aim for at least 300 dpi on a photo that's 1500 × 2000 px or larger. If you only have a phone snap, zoom in to check pixelation; a pixel‑perfect image will stay sharp after the ink‑sublimation process, while a low‑res pic will turn mushy after the first wash.
Next up: shirt colour. A neutral base like heather grey or soft white lets the facial tones pop, but don’t be afraid to match the vibe. If the photo has warm hues, a cream tee amplifies that sunshine feeling; for cooler tones, a navy shirt adds depth without drowning the image.
The quick video below walks you through the actual upload interface, showing where to crop, how to preview the print, and which file formats are safest. Watching it once saves you a trip back to the editor later, so you can focus on picking the perfect outfit to match.
The printing technology has come a long way. Most services use dye‑sublimation, which bonds the ink to the fibers so the colors won’t crack or fade. That means you can toss the shirt in the dryer a few times and still see that grin looking as fresh as the day you uploaded it.
Caring for your new piece is easy. Turn it inside out, wash cold, and skip the bleach. Hang‑dry or tumble on low heat; the sublimated ink stays locked in, so the face won’t peel after the fifth birthday party. A quick spot‑clean with mild soap works for stubborn stains.
If you’re wondering exactly how to size the image and pick the right tee, our step‑by‑step guide walks you through every click. Check out How to Design and Order a Custom Photo T Shirt: A Step‑by‑Step Resource for a cheat sheet you can bookmark while you experiment with filters.
Looking for a place to celebrate your new favorite shirt? A cozy home setting makes the perfect backdrop, and if you’re on the hunt for a new nest, real‑estate pro Fitumi Bako can help you find a house where you’ll love showing off that personalized tee at every family gathering.
Pro tip: order two shirts in complementary colors—one for yourself and one as a gift. Your partner will love the surprise of seeing your face on a shirt, and kids adore matching family tees. Pair the tees with simple jeans or a denim jacket, and you’ve got an effortless look that sparks conversation wherever you go.
Ready to start? Grab your favorite photo, fire up the design tool, and hit “order.” Within days you’ll have a wearable memory that feels just as personal as a handwritten note.
Idea 2: Use Graphic Design Tools for a Unique Custom Face T Shirt
Ever feel like the perfect photo is just sitting on your phone, waiting for a magic wand to turn it into something you can actually wear? That’s where graphic design tools step in – they’re the secret sauce that lets you turn a simple selfie into a custom face t shirt that looks like it was made by a pro, not a hobbyist.
Pick the right tool for your comfort level
If you’ve never opened Photoshop, don’t panic. There are browser‑based options that let you drag, drop, and tweak without a steep learning curve. Printful’s free Design Maker, for example, gives you ready‑made templates, a massive clipart library, and an automatic image‑upscaling feature that boosts low‑resolution photos to print‑ready quality (Printful’s Design Maker overview).
For the design‑savvy, Adobe Illustrator or Photoshop give you pixel‑perfect control, but they do cost a bit more and take time to master. If you’re somewhere in the middle, Canva’s drag‑and‑drop interface is a solid middle ground – you can remove backgrounds, add text, and export a high‑resolution PNG in minutes.
Step‑by‑step workflow that actually works
1. Upload your photo. Make sure the file is at least 1500 px on the longest side. If it’s a bit dark, crank up the exposure in the editor – you’ll notice the difference once it’s printed.
2. Crop to the face. Most tools let you draw a quick circle or square around the portrait. Keep the eyes and mouth away from the edge; you don’t want them cut off during printing.
3. Adjust contrast. A little boost in contrast makes the facial features pop, especially on darker tees. Some platforms even have a “pop‑color” preset that auto‑enhances skin tones.
4. Choose a shirt style. Look for a tee that matches the vibe of your photo – a soft‑cotton Gildan Softstyle for a cozy family gift, or a performance blend if you want something sportier. RushOrderTees offers a wide range of brands and fits, from XS to 5XL, so you can pick the perfect canvas (RushOrderTees shirt selection).
5. Place the design. Most design studios show a “safe zone” overlay. Aim for an 8‑10 inch width on the chest; anything smaller looks like a logo, anything larger can stretch the fabric.
6. Preview with a mockup. Both Printful and RushOrderTees generate realistic product mockups. This is your chance to see how the face looks on a real‑world shirt before you click “order.”
Real‑world examples that spark ideas
• Mom’s milestone birthday. One mom uploaded a candid of her teen blowing out candles. She chose a navy tee, added a subtle gold spark‑effect, and the shirt became the surprise centerpiece at the party.
• Pet memorial. A dad turned a goofy picture of his Labrador sticking out its tongue into a charcoal‑gray shirt. The monochrome look gave the design a classy vibe that works even in a video call setting.
• Team spirit. A youth soccer league used a simple headshot of each player, layered it over the team’s colors, and handed out the shirts at the season‑ender. Parents said the kids felt “like real pros.”
Tips from the pros
– Mind the resolution. Aim for at least 300 dpi; otherwise the print will look pixelated after a few washes.
– Test color contrast. Light faces on dark shirts (or vice‑versa) create the biggest visual impact. Use your phone’s editing app to flip the background color and see which combo feels right.
– Keep it simple. Too many extra graphics can distract from the face. A single‑line caption or subtle border often does the trick.
– Order a single sample first. Even if you’re planning a bulk run, a test shirt lets you confirm fabric feel, print placement, and wash durability.
Bonus: Quick checklist before you hit “order”
- Photo resolution ≥ 1500 px
- Face centered, eyes > 1 inch from edge
- Contrast tested on both light and dark backgrounds
- Design size set to 8–10 inches wide
- Mockup reviewed on a real‑world shirt model
So, what’s the next move? Grab that favorite snap, fire up your chosen design tool, and follow the steps above. In under an hour you’ll have a mockup that feels ready to wear. And when the shirt arrives, you’ll see why a custom face t shirt feels like a tiny, personal piece of art you can actually hug.
After you’ve tried the first one, consider branching out – maybe a matching hoodie for cooler evenings, or a set of matching tees for a family reunion. The tools are the same, the possibilities only grow.
Idea 3: Choose the Right Fabric and Print Method for Your Custom Face T Shirt
Alright, you’ve got the perfect smile ready to hit the chest of a tee. Now comes the part that feels a bit like choosing a dance partner – the fabric and the way it gets printed. The right combo makes your custom face t shirt feel comfy, look sharp, and survive the laundry without fading.
1️⃣ Think about the fabric first
Most people reach for the classic 100% cotton without a second thought, and that’s often a solid bet. Cotton is soft, breathable, and gives the print a nice “blank canvas” to sit on. If you want something a little warmer or a bit more structured, a cotton‑polyester blend gives you the best of both worlds – the natural feel of cotton plus the durability of polyester.
For active folks or hot summer days, a moisture‑wicking polyester blend can keep sweat at bay while still showing off the face clearly. And if you’re after a luxe vibe, a lightweight jersey or interlock knit feels smoother against the skin and holds colour a touch longer.
Here’s a quick look at the most common options, lifted from a fabric guide that breaks down what each material actually does (see the fabric rundown):
| Fabric | Feel & Warmth | Best Print Method |
|---|---|---|
| 100% Cotton (ring‑spun) | Soft, breathable, classic | Screen printing or DTG |
| Cotton‑Polyester Blend | Balanced softness + slight stretch | DTG or sublimation (light colours) |
| Performance Polyester | Moisture‑wicking, cool to touch | Sublimation or heat‑transfer vinyl |
Does any of that sound like what you need? If you’re still on the fence, ask yourself: “Will I be wearing this shirt on a lazy weekend or during a weekend hike?” Your answer will point you to the right fabric.
2️⃣ Choose the print method that fits the fabric
Screen printing is the old‑school hero. It works wonders on cotton and bright colours, giving you vibrant inks that sit on top of the fabric. The downside? It’s less ideal for tiny colour gradients – you’ll see a bit of a “layered” look if the face has many shades.
Direct‑to‑Garment (DTG) sprays the ink right into the fibres, which means you get photo‑realistic detail on cotton or cotton blends. It’s perfect for a face with subtle shading. Just remember that DTG can fade a bit faster than screen printing, so you’ll want to wash inside‑out in cold water.
Sublimation basically turns the whole shirt into a canvas. The ink becomes part of the fabric, so it won’t crack or peel. This method shines on polyester‑based shirts, especially when you want the design to cover the whole front or even the back.
And then there’s heat‑transfer vinyl (HTV), which is great for single‑colour outlines or text but not for full‑colour faces. Most folks skip HTV for photo tees because you lose the nuance of the smile.
Quick rule of thumb: cotton + screen = bold, durable; cotton + DTG = photo‑realistic; polyester + sublimation = all‑over, fade‑proof.
3️⃣ Practical tips to avoid “oops” moments
- Order a single sample before a bulk run. It’s the cheapest way to see how the fabric feels against your skin and how the print holds up after a wash.
- Check the “safe zone” on the mockup. Keep eyes and mouth at least an inch away from the shirt’s seams so nothing gets cut off.
- Prefer a matte finish on the fabric. Glossy tees can make the print look slick, but they also attract fingerprints and show wear faster.
- When you receive the shirt, turn it inside‑out and wash in cold water with a gentle cycle. Hang‑dry if you can – the heat of a dryer can shrink polyester blends and affect print sharpness.
So, what’s the next move? Grab a swatch of the fabric you like, compare a couple of print samples, and let the one that feels right and looks sharp become the home for that cherished face.
Once you’ve nailed the fabric and method, you’re basically set to turn a memory into a piece of wearable art that feels as good as it looks. Happy printing!
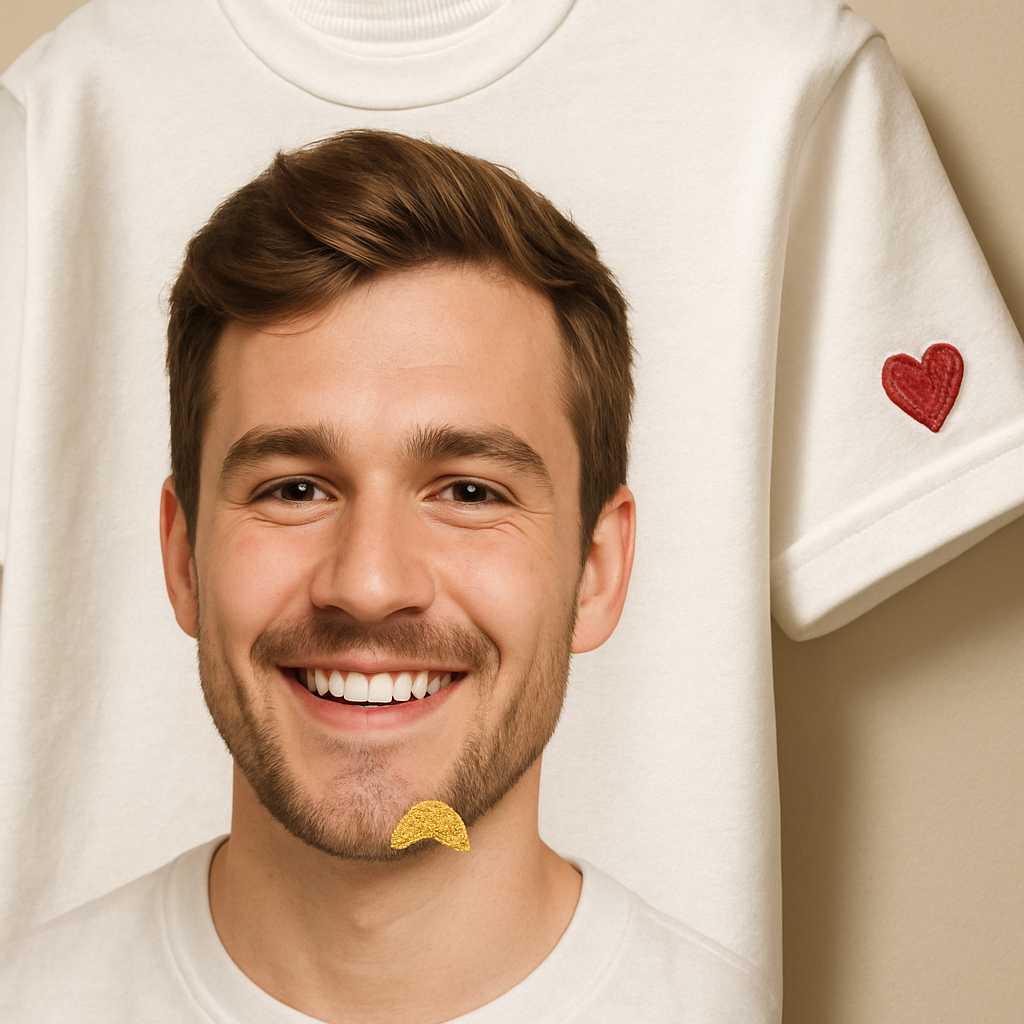
Idea 4: Add Creative Touches and Accessories to Your Custom Face T Shirt
So you’ve got the perfect grin printed on a soft tee – but why stop there? A little extra flair can turn a simple custom face t shirt into a conversation‑starter that feels totally you.
1️⃣ Slip in a cheeky tagline or quote
Think about the moment the photo was taken. Maybe it was your kid’s first bike ride, and they shouted, “Look at me!” Adding that exact phrase in a playful font on the back or near the hem makes the shirt feel like a snapshot of memory, not just a static image.
Keep the text tiny – about 1‑2 inches high – so it doesn’t compete with the face. A subtle script or handwritten style feels personal, like a note you’d scribble on a birthday card.
2️⃣ Layer with embroidered patches
Embroidery is the tactile cousin of a printed design. A small embroidered heart, star, or even a tiny version of the same face on the sleeve adds texture you can feel. It also gives the shirt a premium vibe without breaking the bank.
Because embroidery sits on top of the fabric, it won’t fade with washes the way ink sometimes does. Just pick a thread colour that complements the shirt – think soft pastel for a baby photo, bold red for a sports‑team vibe.
3️⃣ Try iron‑on decals or fabric paint accents
If you love a DIY touch, iron‑on vinyl letters or tiny paint splashes can highlight the eyes, add a sparkle, or underline a cheeky smile. The trick is to keep it minimal; a single gold‑foil star over the nose can make the whole design pop.
Test the decal on a scrap piece of the same fabric first – you’ll see how it adheres and whether it wrinkles when you wash.
4️⃣ Get creative with placement – sleeves, back, or hem
Most people stick the face right in the center of the chest, but think about using the other real estate on the tee. A tiny silhouette of the same face on the left sleeve feels like an inside joke you’re sharing with anyone who notices.
Or place a complementary element – like a small “2025” year badge – on the lower back. It turns the shirt into a mini‑timeline of that moment.
5️⃣ Pair with matching accessories
When you wear your custom face t shirt, why not let the rest of your outfit echo the theme? A cap with the same photo, a tote bag with a matching color palette, or even a pair of socks printed with the same grin can make the whole look feel intentional.
It’s especially fun for family gatherings: everyone gets a tee, and you all wear coordinating hats. The result? A sea of smiles that looks like a coordinated photo shoot without the hassle.
Remember, the goal isn’t to overload the shirt – it’s to add just enough personality that the piece feels uniquely yours. A little detail here, a tiny accent there, and you’ve turned a simple custom face t shirt into a wearable memory album.
Ready to experiment? Grab a spare tee, play with one of the ideas above, and see how a small tweak can make the whole garment feel brand‑new. You’ll be amazed at how those little touches turn heads and spark stories.
FAQ
What size should I choose for a custom face t shirt?
First, think about who’ll wear it. If you’re ordering for yourself, pick the size you normally buy – the shirt’s cut won’t change just because there’s a face on it. For gifts, check the recipient’s favorite brand or look at the store’s size chart; a snug fit can make the print pop, while a relaxed tee keeps the design relaxed. And remember to leave at least an inch of margin around the eyes and mouth so nothing gets trimmed.
How do I make sure the photo looks sharp after washing?
Start with a high‑resolution image – aim for 300 dpi or at least 1500 px on the longest side. Before you upload, boost the contrast a touch and straighten the face so it’s centered. Once printed, turn the shirt inside‑out, use cold water, and skip the dryer if you can. A gentle cycle and low‑heat tumble keep the ink from fading, and you’ll still see that grin after dozens of washes.
Can I print a custom face t shirt with a dark‑colored shirt?
Absolutely, but you’ll need a photo with good lighting and a light‑colored background. Dark fabrics absorb ink, so a bright smile or a white‑balanced portrait will stand out. If the original picture is dim, brighten it in a free editor before uploading. Many print‑on‑demand services also let you add a thin white outline around the face – that little border can make the image pop on navy, black, or charcoal tees.
Is it okay to add text or a tagline to the design?
Sure thing, just keep it subtle. A short phrase like “Little adventurer” or the date of the moment works best when it’s under 2 inches tall and placed near the hem or on the back. Too much text competes with the face and can look cluttered. Use a script or handwritten font that feels personal, and preview the mock‑up to make sure the lettering doesn’t overlap the eyes or mouth.
How long does it take to receive a custom face t shirt?
Most print‑on‑demand shops ship within 5‑7 business days after you place the order, plus standard delivery time. If you need it sooner, look for rush‑order options – many providers can crank out a shirt in 2‑3 days for an extra fee. Keep an eye on the production timeline on the checkout page; it usually updates in real time so you know exactly when to expect the package.
What fabric is best for a comfortable, long‑lasting custom face t shirt?
If you want that soft, lived‑in feel, go for 100 % ring‑spun cotton like Gildan Softstyle. It holds colour well and stays breathable. For a bit of stretch or moisture‑wicking, a cotton‑poly blend works nicely and still prints crisp details. Avoid glossy polyester if you love that shirt‑on‑skin feel, because the fabric can feel slick and the print may feel less natural over time.
Do I need to order a sample before buying in bulk?
Getting a single sample is a smart move, especially if you’re planning a family reunion or a corporate gift run. The sample lets you feel the fabric, check the print placement, and see how the colors hold up after a wash. Once you’re happy with the sample, you can confidently order the larger quantity knowing the final shirts will look exactly how you imagined.
Conclusion
So, you’ve made it to the end of our little deep‑dive into custom face t shirts, and I hope you’re feeling a mix of excitement and confidence.
Remember the core steps: pick a clear, well‑lit photo; choose a soft‑cotton tee that matches the vibe; size the face so it lands comfortably in the “sweet spot” of 8‑10 inches; and order a single sample before you go bulk. Those moves keep the print sharp, the fabric comfy, and the whole process stress‑free.
What’s the biggest win? Turning a fleeting smile into something you can literally hug all day. Whether you’re surprising a kid at a family reunion, gifting a partner a goofy selfie, or creating a team‑spirit shirt for a birthday bash, the custom face t shirt becomes a conversation starter that feels personal.
And here’s a quick checklist to keep in your back pocket:
- High‑resolution image (≥1500 px, 300 dpi)
- Ring‑spun cotton or cotton‑poly blend for comfort
- Design width 8‑10 inches, keep key features away from seams
- Order one sample, wash inside‑out in cold water
- Enjoy the reactions when people spot that familiar grin
If you’re ready to turn that favorite snapshot into wearable art, head over to heartful.gifts and start designing your own custom face t shirt today. Let’s make those memories a little more tactile.