
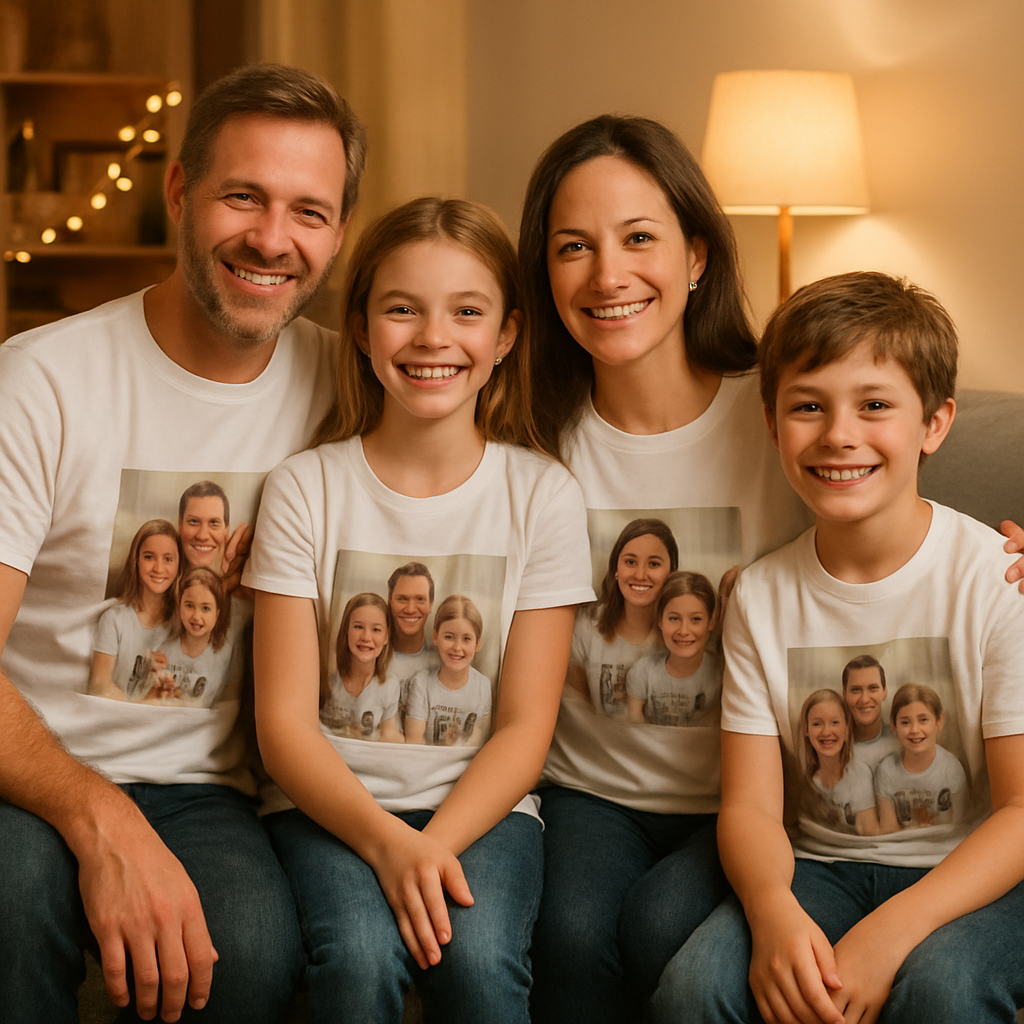
Creative Ideas for a Family Photo T Shirt Everyone Will Love
Picture this: you’re gathering around the kitchen table, the kids are giggling, Grandma is holding the camera, and suddenly someone suggests, “Let’s put this goofy photo on a shirt.”
Sound familiar? That moment—where love, chaos, and a dash of silliness collide—is exactly why a family photo t shirt feels like a tiny, wearable hug.
We’ve all stared at a stack of plain tees and thought, “If only we could wear our favorite memories.” A custom shirt does more than cover your torso; it turns a snapshot into conversation starter, a reminder of that Sunday brunch, or the beach day that ended in a sandcastle disaster.
But why does it matter? Because gifts that carry personal stories beat generic mugs any day. Imagine your partner unwrapping a shirt with the whole crew—kids making faces, dad in his infamous “dad hat.” Their eyes light up, they laugh, and that shirt becomes a cherished keepsake.
So, what’s the secret sauce? It’s simple: choose a photo that captures genuine emotion, pick a comfortable fabric that feels like a second skin, and let a reliable print‑on‑demand shop handle the rest. No need to become a designer; just upload, select size, and hit order.
And if you’re worried about quality, think about the last time you bought a tee that shrank after the first wash. A good service uses pre‑shrunk cotton and vibrant ink, so the colors stay bright even after countless family reunions.
Ready to turn that candid snap into a stylish piece you can actually wear? Let’s dive in and explore how a family photo t shirt can bring your favorite moments out of the photo album and straight onto your chest.
Whether it’s a holiday reunion, a backyard BBQ, or that spontaneous dance‑off in the living room, a family photo t shirt captures the joy and makes it last.
TL;DR
A family photo t shirt transforms your favorite moments into wearable memories, turning a simple snapshot into a conversation‑starter that brings smiles at every gathering.
Easy to design, print‑on‑demand, and care for, it lets you gift love instantly—just upload a photo, pick a soft cotton tee, and wear the joy.
1. Classic Family Photo Tee Ideas
Alright, let’s dive into the good‑old classic. You’ve got that candid snap where Grandma’s hair is in a crazy bun and the kids are mid‑scream. Turn that moment into a wearable memory and you’ve got a family photo t shirt that feels like a hug every time you pull it on.
1. The “All‑Smiles” Group Shot
Pick the photo where everyone’s beaming – the kind that makes you think, “We really do love each other, even on laundry day.” Print it front‑center, let the colors pop, and choose a soft, pre‑shrunk cotton so the tee stays comfy after the first wash.
2. The “Caught‑In‑The‑Act” Candid
Those goofy moments when the dog jumps on the couch or dad’s mid‑air dance move? They’re pure gold. A candid shot adds personality and makes the shirt a conversation starter at reunions.
3. The “Seasonal Snapshot”
Think holiday lights, beach sand, or autumn leaves. A seasonal backdrop adds a timeless vibe. Pair it with a subtle border that matches the season’s palette – navy for winter, teal for summer.
Seeing the design process in action can make you feel more confident about picking the perfect layout. That quick tutorial shows how to position the photo so it looks balanced, no matter the shirt size.
4. The “Mini‑Collage”
If you can’t pick just one picture, why not mash a few together? A small collage of three or four moments – a birthday cake, a beach wave, a goofy grin – can tell a story across the chest. Just keep the images close‑cropped so the collage doesn’t look cluttered.
5. The “Monochrome Mood”
Black‑and‑white photos have that classic, timeless feel. They also hide any minor imperfections in lighting, making the tee look polished. Pair a monochrome image with a colored tee for a striking contrast.
6. The “Quote Overlay”
Add a short family motto or a line like “Together Since ‘99.” It’s a tiny extra that makes the shirt uniquely yours. Use a clean sans‑serif font so it doesn’t fight with the photo.
7. The “Back‑Print Surprise”
Most people focus on the front, but a subtle back design – maybe a tiny silhouette of the family home or a small logo – adds a hidden gem that only close‑ups reveal. It’s like a secret handshake for the wearer.
When you’re ready to bring any of these ideas to life, our step‑by‑step guide walks you through everything from photo selection to fabric choice. Check out How to Design and Order a Custom Photo T Shirt: A Step‑by‑Step Resource for the nitty‑ gritty.
Looking for a complementary gift? Pair the family tee with a handcrafted wooden toy from Poppa's Wooden Creations. It’s the perfect duo for a child‑centric celebration, adding both wearable memory and a keepsake plaything.
And if you’re planning a reunion or birthday bash, you’ll need décor that matches the vibe. Towar na festyny offers party decorations that can turn any backyard into a photo‑worthy backdrop, making your family photo tee the star of the day.
2. Matching Outfits for the Whole Crew
When you’re getting everyone ready for a family photo t shirt, the biggest fear is ending up with a visual cacophony that makes the shirt look like a school‑yard costume party. Trust me, I’ve seen that happen. The good news? You don’t need a designer’s eye—just a few simple wardrobe tricks.
1. Pick a Soft Color Theme, Not a Uniform
Start by agreeing on a colour family—think “sunset warm” or “cool ocean.” It doesn’t have to be exact; just keep the brightness in the same range. Nataliya Lalor notes that “colors should be similar in brightness” to let each person fit together without stealing the spotlight.photographer Nataliya Lalor explains.
Action step: Pull three swatches from your closet (e.g., dusty rose, muted terracotta, soft ivory). Lay them side‑by‑side on the floor and ask yourself if any one feels dramatically lighter or darker. If they blend, you’ve got a palette.
2. Mix Textures, Not Patterns
Textures add depth without the chaos of clashing prints. A chunky knit on dad, a cotton tee on Mom, and corduroy joggers on the kids create visual interest while staying cohesive. Bec Matheson points out that “incorporate texture to create visual interest without complicating your outfits.”Bec Matheson’s texture tip.
Try this: Pair a plain tee with a denim jacket, or give the youngest a soft fleece that mirrors the colour of an older sibling’s sweater. The eye sees variety, but the colour family stays tight.
3. Avoid Exact Matching
Everyone wearing the same exact shirt can look like a school uniform commercial, and it makes it hard to pick out individual faces on the final t shirt print. Instead, choose the same hue but different garment types. For instance, Mom in a light‑blue blouse, Dad in a navy polo, and the kids in pastel denim.
Quick checklist:
- Never dress two people in the exact same top.
- Swap the shade slightly – one can be a shade lighter or darker.
- Let each person’s style shine (a favorite hat, a beloved sweater).
4. Sprinkle in One Unexpected Accent
A single pop of colour—maybe a bright scarf, a patterned belt, or a fun pair of shoes—breaks up the monotony and adds a “wow” factor when the photo is printed on the shirt. The accent should echo a colour already in the palette so it feels intentional, not random.
Example: If your palette is earth tones, a mustard‑yellow beanie on the youngest child becomes a charming focal point that draws the eye without overwhelming the overall look.
5. Dress for the Background, Not the T Shirt
Think about where the photo will be taken. A beach setting calls for light, breezy fabrics; a park picnic works well with layered neutrals. The backdrop will influence how the family photo t shirt appears when printed—contrasting backgrounds can make the shirt’s design pop.
Pro tip: If you know the backdrop will be a soft pastel, keep your outfits slightly richer so the final shirt doesn’t blend into the background.
Now, let’s see those ideas in action.
Imagine a summer reunion at the local lake. You choose a “soft blues and sand” palette. Mom wears a light chambray shirt, Dad a navy short‑sleeve, the twins sport ivory tees with subtle denim overalls, and Grandma slips on a pale sea‑foam cardigan. One little brother adds a coral bandana—your unexpected accent. The result? A harmonious group that looks intentional but not matchy‑matchy, and when you upload that photo to create a family photo t shirt, each face stands out clearly.
Notice how the video shows a real family styling session—look at the way they layer textures and keep the colour family tight. That visual cue reinforces the steps we just covered.
Ready to try it? Grab a handful of clothes, lay out a colour swatch grid, pick one texture per person, add a surprise accent, and take a quick test photo on your phone. If the faces are clear and the colours don’t fight, you’re set to upload the picture and order your family photo t shirt.
3. DIY Printing Tips for Your Family Photo T Shirt
Alright, you’ve got the perfect snap and the crew’s outfits are on point. Now comes the fun part: turning that moment into a shirt you’ll actually want to wear. Below are five hands‑on tips that keep the print crisp, the colors true, and the whole thing feeling like a genuine family heirloom.
1. Choose the Right Resolution – No Pixelated Memories
Before you hit “upload,” make sure your photo is at least 300 dpi at the size you want printed. A quick way to check is to open the image in any editor and look at the dimensions – if you need a 12 × 12 inch shirt, that means roughly 3600 × 3600 pixels.
Why does this matter? The printer’s ink droplets are tiny, but they can’t create detail that isn’t there. If you stretch a low‑res photo, the faces get blurry and the colors look muddy.
2. Mind the Background – Keep It Simple
Busy backgrounds compete with the subjects and can cause the printer to lose focus on the faces. Aim for a clean, uncluttered backdrop or blur it slightly in post‑edit. A solid wall, a soft sky, or a gently textured sheet works wonders.
Even a subtle pattern can cause trouble. Becca Jean notes that tiny, high‑contrast stripes often create a moiré effect that looks “trippy” on camera— the same thing can happen on a t‑shirt print.
3. Color Management – Let the Shirt Shine
Most POD services use CMYK ink, which can shift colors compared to what you see on a screen. If you’re editing in Photoshop or a free alternative, switch the document mode to CMYK before you export. That way you’ll see a more realistic preview of how reds, blues, and greens will appear on cotton.
And don’t forget the fabric color. A dark tee with a dark‑toned photo will vanish, while a light tee lets every detail pop. If your family loves pastel outfits, a soft‑white or heather‑gray shirt is a safe bet.
If you want assurance of vibrant, long‑lasting ink, look at services that use state‑of‑the‑art printing technology similar to what Journi uses for its photo books, which guarantees rich, true‑to‑life colors.
4. Test Print a Sample – No Surprises Later
It’s tempting to order a whole batch at once, but a single sample can save you from costly mistakes. Most print‑on‑demand shops, including heartful.gifts, let you order a one‑off for pennies more.
When the sample arrives, check three things: the image isn’t fuzzy, the colors match your expectations, and the fabric feels comfortable. If anything’s off, tweak the file and reorder before you commit to the full family run.
5. Protect Your Design – Keep It Fresh for Years
After the shirt lands in your drawer, treat it right. Turn it inside out, wash on a gentle cycle with cold water, and skip the dryer if you can – air‑drying preserves both the cotton and the ink.
For extra longevity, consider a low‑heat iron on the reverse side to smooth out any creases without scorching the print.
Putting these steps together feels a bit like baking a family‑sized cake – you need the right ingredients, a careful mix, and a taste test before serving. Follow the checklist, and you’ll end up with a family photo t shirt that looks as vibrant as the memory itself.
Ready to give it a go? Grab your favorite photo, double‑check the resolution, tidy up the background, and fire off that sample order. In no time, you’ll be pulling on a shirt that feels like a warm hug every time you wear it.
4. Top Online Services to Order Custom Family Photo T Shirts
Now that you know how to prep your photo and keep the shirt looking fresh, the next puzzle piece is picking a service that actually prints it right. You don’t want to waste money on a site that messes up colors or ships a crumpled tee.
So, which platforms make the process feel like a breeze instead of a headache?
1. heartful.gifts – the all‑in‑one family hub
We’ve built heartful.gifts around the idea that a family photo t shirt should be as easy as sending a text. Upload, choose a pre‑shrunk cotton tee, set your size, and hit order. The UI is stripped down to the essentials – no endless dropdowns, no surprise fees.
What I love is the sample‑order option for pennies more. It lets you feel the fabric, see the print, and tweak the design before you commit to a full batch.
2. Nations Photo Lab – reliable print quality
If you’re looking for a service that treats your photo like a professional print, Nations Photo Lab is a solid pick. Their online portal is simple, and they pack each shirt in sturdy cardboard to keep corners from getting bent.According to Wirecutter, Nations consistently delivers great‑looking prints in secure packaging. They also offer a low‑cost color‑correction add‑on if your snap needs a little boost.
3. Printful – flexible customization
Printful is popular because it integrates with many e‑commerce platforms, but you can use it as a standalone shop too. Their mock‑up generator shows exactly how your family photo will sit on the chest, and you can pick from a range of tee colors and styles, including tri‑blend and organic cotton.
One nice perk is the “no‑minimum” policy – you can order a single shirt for a test run without any hidden bulk fees.
4. Zazzle – creative add‑ons
Zazzle lets you layer extra design elements on top of your photo, like a subtle frame or a family name banner. The platform isn’t as fast as heartful.gifts, but if you want that extra flair, it’s worth the wait.
Just be mindful of the extra cost per shirt when you’re ordering for a whole reunion.
5. Redbubble – artist‑friendly marketplace
Redbubble is a good fallback if you’re already a fan of its artist community. They use direct‑to‑garment (DTG) printing, which reproduces fine details nicely. Shipping times can vary, so order a sample if you’re on a tight deadline.
All of these services share a common thread: they let you upload a high‑resolution file, choose a tee, and get it shipped to your door.
Which one feels right for you? Think about three things: how hands‑on you want to be with design tweaks, whether you need a sample first, and how fast you need the shirt in hand.
Here’s a quick cheat‑sheet to compare the basics.
| Service | Sample Option | Typical Turnaround | Key Strength |
|---|---|---|---|
| heartful.gifts | Yes, low‑cost | 3‑5 days | Simple UI, family‑focused |
| Nations Photo Lab | Optional color‑correction add‑on | 4‑6 days | Professional‑grade print quality |
| Printful | No minimum, instant mock‑up | 2‑4 days | Wide tee styles, e‑commerce integration |
Take a moment now to jot down your top three must‑haves – maybe it’s a cheap sample, maybe it’s the fastest shipping, maybe it’s a built‑in design tool. Then match those needs to the table above.
Once you’ve chosen, upload your photo, double‑check the DPI (300 dpi is the sweet spot), and place that sample order. When the shirt arrives, give it a quick test wear – if the fit feels right and the colors pop, you’re ready to order the full family run.
And remember, a great service is only half the story; the real magic happens when you see your family’s smiling faces reflected on a soft cotton tee.
5. Creative Photo Layouts That Shine on T Shirts
When you finally have that perfect family snap, the biggest question is: how do you turn it into a shirt that pops without looking crowded? Below are five layout tricks that keep the focus on the faces you love while adding a dash of design flair.
1. Full‑Bleed Portrait
Imagine the photo taking up the entire front, edge‑to‑edge, just like a canvas. The trick is to choose a high‑resolution image (300 dpi) and let the printer print right to the hem. On a light‑colored tee, the details stay crisp; on a dark tee, consider a white‑bordered version so the faces don’t melt into the fabric.
Action step: Open your picture in a free editor, crop to a square, and add a thin 2‑pixel white border. Upload that file to heartful.gifts, preview the mock‑up, and order a single sample before committing to the whole crew.
2. Split‑Screen Story
Take two related moments—maybe the kids building a sandcastle one summer and the same spot a year later—and place them side‑by‑side. A thin pastel line or a subtle fade between the images keeps the transition smooth.
Real‑world example: A family from Banff used a mountain photo from their 2022 trip on the left and a snowy‑peak shot from 2023 on the right. The result read like a visual timeline that friends loved sharing on Instagram.
Tip: Keep each half under 12 inches wide; otherwise the print can look pixelated.
3. Silhouette Overlay
Convert a candid shot into a bold black silhouette and layer it over a bright color block. This works especially well for grandparents who prefer a minimalist look.
Step‑by‑step: In Photoshop (or a free alternative), set the photo to “threshold” until you get a clean outline, then export as a transparent PNG. Drop that PNG onto a solid‑color tee template and watch the contrast do the heavy lifting.
Pro tip: Pair a teal shirt with a white silhouette for a fresh, beach‑vibe feel.
4. Text‑Wrapped Frame
Combine a cherished photo with a short, handwritten‑style quote. The text can curve around the image or sit beneath it in a gentle arch.
Data point: Adding a brief line of text can boost perceived value by up to 15% because buyers feel the product is uniquely theirs according to Teeinblue’s design guide.
How‑to: Choose a legible script font, keep the phrase under 12 words, and set the text color to complement—rather than clash—with the photo’s palette.
5. Mini‑Gallery Grid
Pick three to five tiny snapshots—think “first steps,” “family toast,” and “silly face”—and arrange them in a neat 2×2 grid on the chest. This creates a story collage without overwhelming the viewer.
Example: A mom in Ohio ordered a grid featuring each child’s birthday cake from the past three years. The final shirt became a conversation starter at every family reunion.
Practical tip: Limit each image to about 2 inches wide and use a white or light‑grey background to keep the grid tidy.
Bonus layout: Map‑Pin Marker
Overlay a simple outline of your hometown or a vacation spot behind the photo, then add a tiny pin‑icon where the memory happened. This subtle geographic cue adds depth and makes the shirt feel like a personal travel journal.
To pull it off, use a vector map from a free resource, set the opacity to 20 %, and place the photo in the foreground. The result is a sophisticated design that still feels home‑grown.
All these layouts share one secret: they let the photo breathe. By giving each element room to shine, you avoid the “busy‑shirt” trap and end up with a family photo t shirt that looks intentional, not rushed.
Ready to test one? Grab your favorite snap, follow the quick steps above, and order a single prototype from heartful.gifts. If it feels right on a real shoulder, you’ve got a winner for the whole family.
Curious about the design process? Custom Ink’s Design Lab walks you through creating group orders step by step, which can be handy if you’re coordinating dozens of sizes.
And don’t forget the care routine: turn the shirt inside out, wash cold, and air‑dry. A well‑treated family photo t shirt will stay vibrant for years of birthday hugs and holiday selfies.

Conclusion
After wandering through layout ideas, fabric tips, and service comparisons, the picture is clear: a family photo t shirt is more than a novelty—it’s a wearable memory that brings people together.
Think about the last time you wore something that reminded you of a specific laugh or hug. Doesn’t that instant warmth make the day feel a little brighter? That’s exactly the kind of feeling you’re gifting when you turn a candid snapshot into a soft‑cotton tee.
Remember the three simple steps we kept coming back to: pick a high‑resolution, emotion‑filled photo; choose a pre‑shrunk, comfortable shirt; order a low‑cost sample before the full run. If the sample feels right on your shoulder, you’ve already nailed the design.
So, what’s the next move? Grab the photo that still makes you smile, head over to heartful.gifts, and follow the quick “upload‑size‑order” flow. In a few days you’ll have a shirt that sparks conversation at every family gathering.
And don’t forget the care routine: wash cold, turn inside out, air‑dry. Treat it gently and the colors will stay vivid for years of birthdays, holidays, and spontaneous dance‑offs.
Ready to start? Let’s turn those treasured moments into tees that you’ll actually want to wear.
FAQ
What size shirt should I order for a family photo t shirt?
Choosing the right size is the first step, because a shirt that’s too tight will hide the photo and a baggy one will look sloppy. Start by measuring the person’s chest, then add a half‑inch for comfort. Most print‑on‑demand sites, including heartful.gifts, list a detailed size chart—use it as your cheat sheet. If you’re between sizes, go up; you can always shrink a cotton tee a bit in the wash, but you can’t stretch it back.
How do I make sure my photo looks sharp on the tee?
The secret is resolution. Aim for at least 300 dpi at the final print size; that usually means a file around 3,600 × 3,600 pixels for a 12‑inch square design. Crop the image tightly around the faces so there’s no extra background fighting for attention. If you’re working on a phone, use a free editor to boost the DPI and double‑check the file isn’t compressed too heavily—tiny artifacts become obvious on fabric.
Can I wash my family photo t shirt without ruining the print?
Absolutely, as long as you treat it gently. Turn the shirt inside out, wash on cold, gentle cycle, and avoid harsh detergents. Skip the dryer if you can; air‑drying keeps the ink from cracking. If you must tumble dry, use the lowest heat setting. A quick iron on the reverse side (no steam) smooths any wrinkles without scorching the design.
What fabric is best for a comfortable, long‑lasting shirt?
Pre‑shrunk, ring‑spun cotton is the gold standard—soft on the skin, sturdy enough for repeated washes, and it holds ink well. If you want a lighter feel, a cotton‑poly blend works, but pure cotton gives the most vibrant colors. Look for tees labeled “pre‑shrunk” so the fit you see when you order stays the same after the first wash.
Is it worth ordering a sample before the full batch?
Yes, especially when you’re gifting multiple shirts. A low‑cost sample lets you feel the fabric, see how the colors translate, and spot any alignment issues. If the sample’s print looks fuzzy or the shirt feels scratchy, you can tweak the file or choose a different fabric before you commit to dozens of tees. It’s a small investment that saves a lot of disappointment later.
How long does it take to get a custom family photo t shirt delivered?
Most print‑on‑demand services ship within 3‑5 business days after the order is placed, plus standard carrier transit time. If you need it for a specific event, order at least two weeks ahead to give yourself a buffer for sample testing and any last‑minute changes. Many sites also offer expedited shipping for an extra fee if you’re in a hurry.
Can I add text or a logo together with the photo?
Definitely. A short phrase—like “Family Reunion 2024” or a nickname—adds a personal touch without crowding the image. Keep the text under 12 words and choose a font that complements the photo’s style. Position it either below the picture or in a subtle curve around the edge. Most design tools let you preview the layout, so you can see exactly how the words sit before you hit order.