
Creating a Custom Photo Sequin Pillow: Step‑by‑Step Guide
Picture this: you’ve just finished scrolling through a flood of generic gift ideas, and you feel that nagging sense that nothing really captures the moment you want to celebrate.
We’ve all been there—searching for something that feels personal, that makes a loved one pause and say, “Wow, you really get me.” That’s where a custom photo sequin pillow steps in, flipping from a calm, solid surface to a glittering snapshot of your favorite memory with just a swipe of your hand.
Imagine a cozy couch night with your partner. You’re curled up, and with a playful flick, the pillow’s sequins reveal a candid beach photo from your last vacation. Suddenly, the room feels more intimate, the memory more vivid. It’s not just décor; it’s an experience that lives and breathes with you.
But why choose a sequin pillow over a regular printed one? First, the interactive element turns a simple photo into a conversation starter. Second, the plush fabric adds comfort, making it perfect for parents looking for a bedtime companion that also showcases a family portrait, or for grandparents wanting to showcase a grandchild’s smile in a fun, tactile way.
And if you’re a spouse hunting for a unique anniversary surprise, think about the surprise factor: a pillow that hides a hidden message or a hidden photo that only appears when you’re in the mood for a little sparkle.
So, how do you get that perfect custom photo sequin pillow without the hassle? In our experience, the best approach is to pick a high‑resolution image, decide on the sequin color that matches your décor, and let a reliable print‑on‑demand service handle the rest. The result is a soft, washable pillow that looks great whether it’s on a bedroom headboard or a living‑room sofa.
Ready to add a touch of magic to your gift‑giving routine? Let’s dive in and explore how you can create a custom photo sequin pillow that feels as personal as a handwritten note.
TL;DR
A custom photo sequin pillow transforms a beloved photo into a plush, interactive keepsake that flips from solid color to glittering image with a swipe.
We’ll guide you in picking a high‑resolution picture, matching sequin colors to décor, and ordering a washable, gift‑ready pillow that delights parents, spouses, and gift‑buyers.
Step 1: Choose Your Photo and Design Theme
Okay, let’s face it – the photo you pick is the heart of the whole custom photo sequin pillow. If the image feels flat or blurry, the magic of the sequins won’t shine through. So start by scrolling through your camera roll and looking for a picture that feels alive, like that moment when your kid’s giggle lights up the room or your partner’s grin after a long hike.
First tip: go for a high‑resolution image, at least 1500 px on the longest side. Anything lower will look pixelated once the sequins flip, and nobody wants a fuzzy surprise. If you’re unsure, zoom in on the photo on your phone – you should still see the details clearly.
Next, think about the vibe of the room where the pillow will live. Are you aiming for a cozy, neutral‑toned bedroom or a bold, colorful living‑room corner? The sequin colors you choose should either blend with the décor or pop as an accent. A soft ivory or pastel sequin works beautifully with muted tones, while electric teal or bright gold adds drama against darker walls.
Here’s a quick sanity check: hold the photo up to the wall where the pillow will hang. Does the color palette complement the paint, curtains, or rug? If it feels off, swap the photo or adjust the sequin hue. This little visual test saves a lot of “what‑if” later.
And remember, you don’t have to limit yourself to portraits. Landscapes, pet snapshots, or even a favorite quote rendered as text can become stunning sequined reveals. If you’re into art, you might pair your pillow with a piece from Gratitude Studios’ abstract landscape collection for a coordinated gift set that feels curated.
Now, a note for parents planning a nursery surprise: consider a gender‑neutral color scheme. Pairing a pastel‑sequin pillow with soft, unisex onesies makes a sweet bundle. This mom’s guide to gender neutral onesies can give you extra ideas for a cohesive gift package.
Once you’ve zeroed in on the picture and sequin palette, it’s time to upload. Our platform walks you through cropping and positioning so the focal point lands right in the middle of the sequined area. If you’re feeling adventurous, try a collage of two photos – one for the solid side and another that appears when the sequins flip. That extra layer of surprise often becomes the conversation starter you’re after.
Need a deeper dive into photo‑selection strategy? Check out our detailed guide on How to Choose and Create the Perfect Personalized Photo Pillow Cover Gift. It walks you through lighting, composition, and even file‑format quirks.
Below is a short video that walks you through the upload process step‑by‑step. Pause it whenever you need to double‑check your file size or experiment with different sequin colors.
Take a breath, then head back to the design screen. When you’re satisfied, hit “preview” – you’ll see a quick animation of the sequins flipping, giving you a taste of the final product.
Finally, give yourself a quick checklist before you click “order”:
- High‑resolution photo (1500 px minimum)
- Sequin color matches room palette
- File format is JPEG or PNG
- Preview animation looks right
- Optional: paired gift ideas (wall art, onesies) for a complete set
Crossing off each item means you’re set for a pillow that not only looks great but also feels personal and purposeful. Ready to hit that order button? Let’s keep the momentum going to the next step – picking the perfect pillow size and material.
Step 2: Select Pillow Size and Fabric Options
Alright, you’ve picked the photo that makes you smile – now it’s time to decide how big that memory should sit on your couch. The size and fabric you choose will shape the whole experience, from the first swipe of sequins to the night you drift off resting your head on it.
First thing’s first: why does size matter? A pillow that’s too tiny can feel like a novelty, while one that’s oversized might dominate the room and make the image look cramped. Think about the space you’ll put it in and who will be using it.
Most print‑on‑demand services, including ours, offer two standard formats: a square 18 × 18 inches (or 16 × 16 inches for a cozier feel) and a rectangular 20 × 26 inches. The square works like a canvas for portrait‑style photos – a baby’s tiny hand, a pet’s goofy grin, or a close‑up of a wedding ring. The rectangle gives you room to showcase landscapes, group shots, or wide‑angle moments without chopping off important details.
Here’s a quick decision tree: if your image is taller than it is wide, go square; if it’s wider, opt for the rectangle. Most design tools let you preview the crop before you confirm, so you can see exactly how the edges will be trimmed. Don’t be afraid to experiment – a tiny adjustment can turn a “good” picture into a “wow” picture.
Real‑world scenario: a new mom wanted a pillow for her nursery. She chose a high‑resolution snap of her newborn’s face, which is naturally portrait‑oriented. She picked the 16 × 16 inch square because it fit perfectly on the small nursery chair and didn’t overwhelm the pastel walls. The result? A sweet, intimate keepsake that she can hold while soothing her baby.
Another story: a couple celebrating their 10‑year anniversary wanted to immortalize the moment they first danced at their wedding. The photo was a wide, candle‑lit scene. They selected the 20 × 26 inch rectangle and paired it with a deep navy background that echoed the night‑time sky in the image. When the sequins flip, the lights sparkle just like they did on the dance floor.
Now, let’s talk fabric. The back side of a custom photo sequin pillow is usually a soft suede‑like material, which feels plush against the skin and holds its shape over time. Some shops also offer a cotton‑blend for a lighter touch, or a velvet finish for extra luxury. Think about who will be leaning on it: children and pets appreciate the durability of suede, while a bedroom setting might benefit from the silky feel of velvet.
Pro tip: order a small swatch if the service offers it. Running your fingers over the fabric before you commit can save you from a surprise texture mismatch later. You’ll notice whether the material is too stiff (which can make the pillow feel like a board) or too floppy (which might sag after a few weeks of use).
Durability matters, especially for gifts that will travel – think grandparents moving houses or friends taking the pillow on a weekend getaway. Look for fabric that’s machine‑washable or at least removable via a hidden zipper, so you can keep it fresh without worrying about damage to the sequins.
To wrap things up, use this simple checklist before you click “Add to Cart”:
- Determine the orientation of your photo (portrait vs. landscape).
- Choose square for portrait, rectangle for landscape.
- Measure the space where the pillow will live – couch arm, bedroom chair, car seat.
- Select fabric based on feel (suede for durability, velvet for luxe, cotton‑blend for lightweight).
- If possible, order a fabric swatch or read product reviews about texture.
- Confirm the pillow has a removable insert or washable back for easy care.
Take a moment now to visualize the pillow in its future home. Does the size feel right? Does the fabric match the vibe you want to create? Answer those questions, and you’ll be one step closer to a custom photo sequin pillow that looks stunning and feels just right.
Step 3: Upload and Position Your Photo
Now that you’ve nailed the size and fabric, it’s time to get the image onto the design canvas. This part feels a little like moving furniture – you want everything to line up just right before you lock the layout in.
1. Open the upload window
Log into the heartful.gifts design portal (or any similar tool you’ve chosen). Click the bright “Upload Image” button – it usually looks like a cloud with an arrow. If you’re on a phone, tap the “Choose File” icon; on a computer, browse to the folder where you saved your high‑resolution photo.
Pro tip: keep the original file untouched. If you need to crop, do it inside the tool so the DPI stays intact.
2. Check resolution and orientation
Once the file appears, the platform will show a quick stats panel: dimensions in pixels, file size, and whether the image is portrait or landscape. Aim for at least 150 DPI at the final pillow size – that translates to roughly 2700 × 2700 px for an 18‑inch square pillow.
If the numbers look low, pull a higher‑resolution version from your phone or cloud storage. A parent who tried to use a grainy snapshot of a newborn learned the hard way that the sequin side looked blurry once printed.
3. Drag, scale, and align
The canvas usually lets you click‑and‑drag the photo. Move it so the most important part (a smiling face, a pet’s nose, or a wedding toast) sits in the center. Use the corner handles to scale up or down – watch the live preview so you don’t accidentally cut off a key detail.
Here’s a real‑world example: a spouse uploaded a candid shot from their anniversary dinner. By zooming out just enough to keep the candle‑lit table in view, the final pillow captured the whole scene, not just the couple’s faces.
4. Use the “fit to frame” or “fill” options wisely
Many services offer a “fit” mode that squeezes the whole picture inside the pillow borders, and a “fill” mode that crops the edges to fill the space. If your image has a clean background, “fill” often looks cleaner because the sequins won’t show a white border.
But if the photo includes a wide landscape, “fit” prevents you from losing horizon details. Experiment with both; the preview will flash a quick before‑and‑after.
5. Preview the flip effect
Because a sequin pillow has two sides, it helps to toggle the “sequin view” if the tool offers it. You’ll see how the hidden image will emerge when the sequins are brushed aside. If the picture seems too dark or the main subject sits too close to the edge, go back and nudge it a few pixels.
One gift buyer shared that their first try placed the family dog’s head right at the edge, and the flip revealed only half the face. A quick drag inward solved the problem before checkout.
6. Save a draft and double‑check
Most platforms let you save a draft. Do that, close the tab, and reopen after a short break. Fresh eyes often spot a mis‑aligned eye or a stray speck of background you missed while focused.
For parents, this step is golden: you can ask a partner to glance at the draft while you’re still half‑asleep – the quick “Is the baby’s cheek centered?” question saves a costly re‑print.
7. Final checklist before you hit “Add to Cart”
- Image resolution ≥150 DPI at final size.
- Correct orientation (portrait vs. landscape) matches pillow shape.
- Key subject centered with a comfortable margin.
- Used “fill” or “fit” mode that preserves important details.
- Previewed the sequin side to ensure the hidden picture looks as expected.
- Saved the design and double‑checked on a different device.
When you’ve ticked all the boxes, go ahead and click “Add to Cart.” The moment you see the confirmation page, you’ll know the memory you chose is about to become a tactile, glitter‑filled keepsake that friends and family can actually hug.
And that’s it – uploading and positioning may feel a little technical, but with these steps you’ll end up with a custom photo sequin pillow that looks exactly how you imagined, every time.
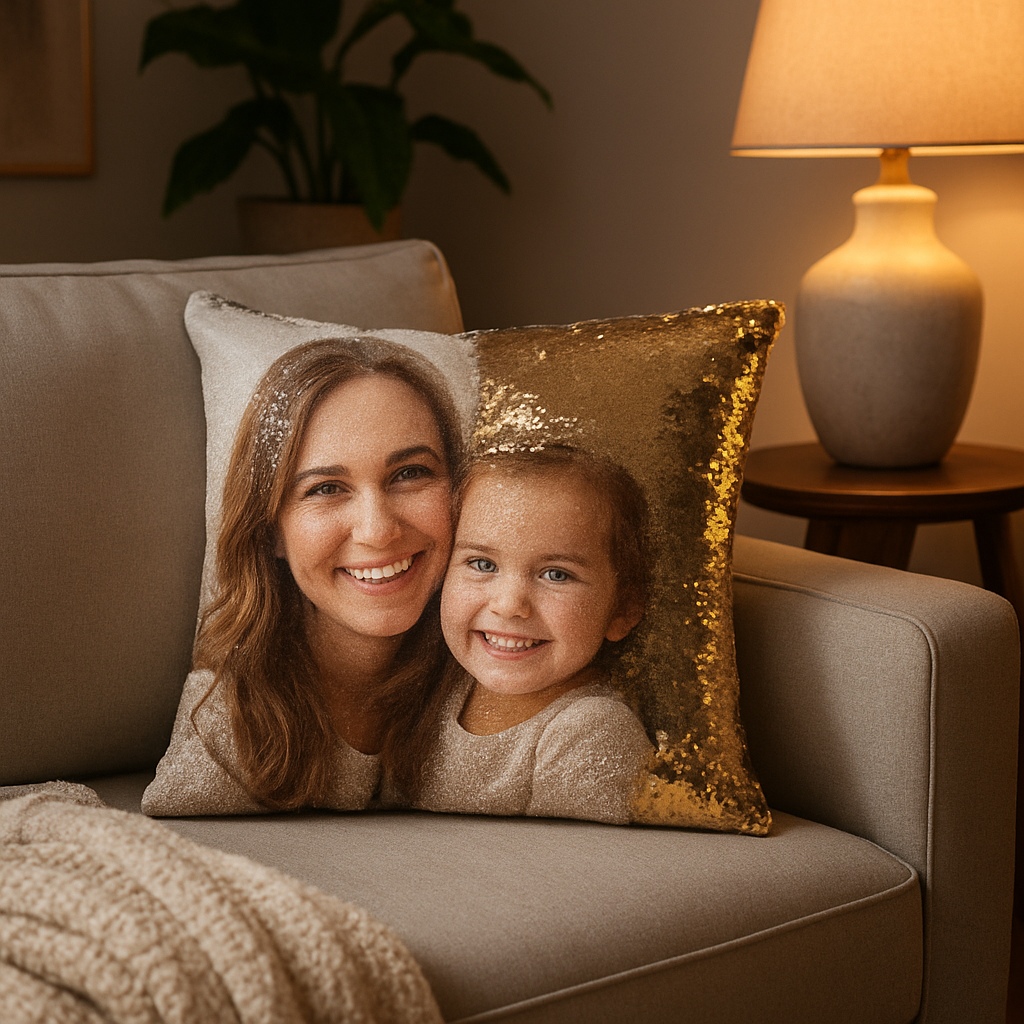
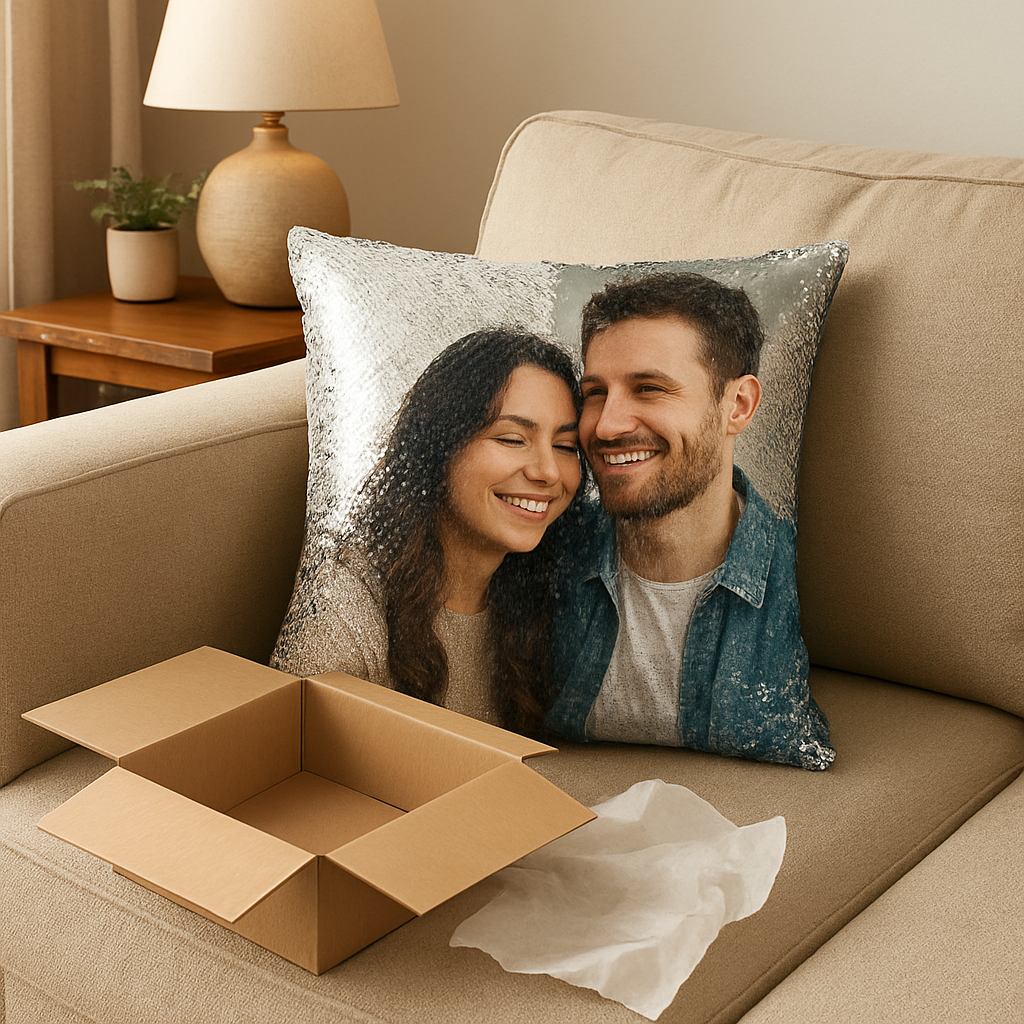
Step 4: Pick Sequin Color and Finish Options
Now that your image is perfectly placed, the next decision feels a lot like choosing the paint for a wall – it sets the mood for the whole piece. You’ll want a sequin color that not only makes the hidden photo pop, but also blends nicely with the room where the pillow will live.
Understanding sequin color basics
Most print‑on‑demand services, including heartful.gifts, offer three core shades: classic black, shimmering gold, and cool silver. Black gives the highest contrast, which is perfect for lighter photos or pastel décor. Gold adds a warm glow that works well with earth tones, while silver feels modern and pairs nicely with cooler blues or greys.
Think about the vibe you’re after. If you’re creating a gift for a new parent who wants a calming nursery, a soft silver or matte black can keep things gentle. If you’re surprising a spouse who loves a bit of drama, a bold gold might be the “wow” factor you need.
Finish options beyond color
Beyond the hue, you’ll also choose a finish – matte, glossy, or iridescent. Matte sequins keep the surface subtle; they’re great for a sleek, understated look. Glossy sequins catch the light and make the flip feel more tactile, which many kids love. Iridescent sequins shift between colors as you move, adding an extra layer of surprise that works wonderfully for holiday gifts or anniversary surprises.
One tip we’ve seen work time and again: pair a matte black base with a glossy gold accent line around the pillow edge. It adds a touch of elegance without overwhelming the main image.
So, how do you decide?
Watch the quick video above for a visual walk‑through of how each color and finish looks on a real pillow. Seeing the sparkle in motion can make the choice a lot easier than guessing from a static swatch.
Quick comparison table
| Sequin Color | Best Photo Types | Room Style Match |
|---|---|---|
| Black | Light or pastel images, baby photos | Nursery, minimalist, Scandinavian |
| Gold | Warm tones, sunset scenes, family gatherings | Traditional, boho, warm‑toned living rooms |
| Silver | Cool tones, beach shots, night sky | Modern, coastal, urban lofts |
When you’re scrolling through the options, ask yourself two quick questions: Does this color make the hidden image pop? Does the finish complement the room’s existing palette? If the answer is “yes” to both, you’ve probably found the right combo.
Don’t forget durability. Glossy sequins can attract a bit more dust, so if the pillow will live in a high‑traffic area, a matte finish might stay cleaner longer. Iridescent sequins are beautiful, but they can show wear a touch sooner because the coating is thinner.
Here’s a small checklist you can print out before you click “Add to Cart”:
- Pick a sequin color that contrasts with the dominant tones in your photo.
- Match the finish (matte, glossy, iridescent) to the room’s style and maintenance needs.
- Consider a combo – matte base with a glossy accent for extra flair.
- Visualize the pillow in its future spot; does the sparkle feel right?
Once you’ve answered those, you’re ready to lock in the look and move on to checkout. The right sequin color and finish will turn a simple pillow into a conversation starter that your friends, family, or partner will love to swipe over again and again.
Step 5: Review, Order, and Care for Your Pillow
Alright, you’ve tweaked color, size, and sequins – now it’s time to double‑check everything before you hit that final “Place Order” button.
First, give the preview one last look. Does the hidden image sit where you imagined? Is the background hue still a good match for the room?
If anything feels off, hit the back button. It’s way easier to tweak a crop now than to wait for a re‑print that lands weeks later.
Here’s a quick mental checklist to run through while the cart page loads:
- Image resolution still ≥150 DPI at final size.
- Pillow size matches the space you measured.
- Sequin color and finish (matte, glossy, iridescent) are exactly what you want.
- Fabric choice (suede, velvet, cotton‑blend) feels right for the intended user.
- Zipper or removable insert is present for easy washing.
- Shipping address is correct and includes any gift‑wrap notes.
- Preview of the flip effect looks clean, with no important detail cut off.
Got all that? Great. Now let’s walk through the ordering steps so you feel confident the pillow will arrive ready to sparkle.
Step‑by‑step ordering
1. Add to Cart – click the green “Add to Cart” button. A mini‑window will pop up showing a thumbnail of your design. If you see a tiny glitch, hit “Edit” right there.
2. Review the cart – this screen shows the pillow dimensions, fabric, sequin options, and price. Double‑check the quantity; most of us forget to remove the default “1” when we’re only ordering a single gift.
3. Enter your details – fill in billing, shipping, and any special instructions. We love seeing notes like “Wrap in pastel paper for a baby shower” – they help us personalize the final package.
4. Choose payment – we accept credit cards, PayPal, and Apple Pay. Your payment info is encrypted, so you can relax.
5. Confirm and place order – hit the big “Place Order” button. You’ll get an order confirmation email with a tracking link as soon as we ship.
Keep that email handy. It not only proves you bought the pillow, but also lets you monitor the shipment and contact support if anything looks off.
Caring for your custom photo sequin pillow
Sequins love a gentle touch. When you first get the pillow, give it a soft shake to loosen any packing dust. Then flip the sequins a few times – this primes the fabric and makes the hidden image pop the next time you use it.
For routine cleaning, most of our pillows have a removable inner insert and a zip‑up cover. Pull the zip, take out the insert, and toss the cover in the washing machine on a gentle cycle, cold water, mild detergent. Lay it flat to dry – no tumble dryer, because heat can melt the sequins.
If the pillow doesn’t have a zip, spot‑clean only. Use a damp cloth with a little soap, and avoid scrubbing directly on the sequin side – you’ll just dull the sparkle.
A quick tip we hear from parents: place the pillow in a low‑traffic spot for the first week. That way the sequins settle and you can catch any loose threads before kids start climbing on it.
When you’re not using it, store the pillow in a breathable cotton bag. This prevents dust from settling and keeps the colors vibrant.
Unboxing feels like a tiny celebration – the box slides open, and the pillow peeks out, ready to become the centerpiece of your space.
Now you’re all set. With the design locked, the order placed, and a care routine in place, your custom photo sequin pillow will stay vibrant for years, delighting anyone who swipes the sequins and discovers the memory inside.
Step 6: Troubleshooting Common Issues
Even when you’ve followed every step, a custom photo sequin pillow can still surprise you with a hiccup. The good news? Most problems are fixable with a few simple tricks, and knowing what to look for saves you time and frustration.
Sequins falling off
One of the most common complaints shows up in customer reviews – the tiny sequins can detach soon after the pillow arrives. It usually happens when the adhesive layer isn’t fully cured or when the pillow is jostled in transit.
What you can do:
- Give the pillow a gentle shake right after unboxing. This helps any loose pieces settle before you start using it.
- Run a lint roller over the sequin side. The sticky sheet catches stray sequins without scratching the fabric.
- If you spot a few missing pieces, a dab of fabric glue on the back of the sequin can hold it in place. Use a toothpick for precision and let it dry 24 hours before swiping.
Real‑world example: a new mom noticed a handful of sequins fell off the first night her baby slept on the pillow. She followed the glue tip and now the pillow stays intact through nightly cuddles.
Image misalignment or cropping issues
Sometimes the hidden photo looks off‑center, especially if the original image had a lot of white space. This can happen when the design tool automatically “fits” the picture.
Fix it by:
- Opening the saved draft on a different device (phone vs. laptop) to see if the alignment shifts.
- Re‑uploading the photo and using the “fill” option instead of “fit” so the edges are trimmed evenly.
- Adding a subtle margin in your photo editor – a few pixels of background give the sequin side room to breathe.
We’ve seen a father who wanted a panoramic beach shot; after switching to “fill” the whole horizon stayed visible and the pillow looked like a mini postcard.
Zipper or zip‑less cover problems
If your pillow has a hidden zipper, a stuck pull can be maddening. The most frequent cause is a sequin snagging the zipper teeth.
Use these quick fixes:
- Use a pair of tweezers to gently lift any sequin caught in the zipper.
- Run a small piece of waxed thread along the zipper to lubricate it – it’s safe for fabric and won’t stain the sequins.
- For zip‑less designs, keep a spare cover on hand; swapping it out after a heavy cleaning session prevents wear.
A spouse shared that after a weekend road trip the zipper jammed. A few seconds with tweezers got it moving again, and the pillow was back on the couch.
Color fading or dull sequins
Sequins can lose their sparkle if they’re exposed to direct sunlight for long periods or if harsh detergents are used.
To preserve the sparkle:
- Place the pillow away from windows where UV rays hit it all day.
- When washing, use a cold‑water gentle cycle and skip fabric softener – it can leave a film on the sequins.
- After drying, give the pillow a quick brush with a soft paintbrush to lift any settled dust.
One set of grandparents reported that after three washes the sequins looked a shade duller. Switching to cold water and adding a rinse with white vinegar revived the shine.
Odor or static cling
New fabric can sometimes have a faint chemical smell, and synthetic sequins may attract static. Both are annoying but easy to manage.
Try these steps:
- Air the pillow outdoors for a couple of hours on a breezy day.
- Lightly mist the surface with a mixture of water and a few drops of essential oil (lavender works well for a calming scent).
- Run a metal hanger over the sequin side to discharge static before you start swiping.
A friend who gifted a pillow for a birthday said the initial odor vanished after a short sunset porch session, and the static was gone after the hanger trick.
Checklist before you give it a swipe
Keep this short list handy whenever you notice something odd:
- Inspect for loose sequins right after opening.
- Verify image alignment on both solid and sequin sides.
- Test the zipper or ensure the cover fits snugly.
- Check for fading or dullness after the first wash.
- Air out any new‑fabric odor and neutralize static.
- Store in a breathable cotton bag when not in use.
By running through these steps, you’ll catch most issues before they become a hassle, and your custom photo sequin pillow will stay a beloved memory keeper for years to come.
Conclusion
So you’ve walked through picking the perfect photo, sizing the pillow, and even wrestling with sequin colors. By now you know that a custom photo sequin pillow isn’t just décor – it’s a tiny, tactile memory capsule you can swipe open whenever you need a smile.
Think about the moment you’ll gift it: a newborn’s first giggle, a partner’s anniversary grin, or a pet’s goofy head‑butt. The surprise of the sequins flipping from solid to sparkle turns a simple hug into a shared story.
What’s the biggest takeaway? Keep the basics simple: high‑resolution image, right size for the space, a sequin shade that contrasts, and a fabric that matches the room’s vibe. Then run through the quick checklist we’ve built – it catches loose sequins, mis‑alignments, and static before they become headaches.
Ready to make that memory stick? Head over to heartful.gifts, upload your favorite snap, and let us handle the rest. You’ll get a pillow that looks great, feels soft, and stays vibrant for years.
And remember, a little care – gentle wash, air‑dry, and a brief shake – keeps the sparkle alive. So go ahead, swipe, smile, and share the magic.
Whether it’s for a birthday, a baby shower, or just because, the custom photo sequin pillow turns everyday moments into keepsakes you’ll treasure forever.
FAQ
What is a custom photo sequin pillow and how does it work?
A custom photo sequin pillow is a two‑sided throw where one side is a solid fabric and the other is covered in flip‑over sequins that reveal your photo when you brush them aside. The image is printed on the sequin side, so when the tiny discs turn, the picture pops into view. Think of it as a memory‑trigger you can actually touch and swipe.
Do I need a super‑high‑resolution photo?
Yes, aim for at least 150 DPI at the final pillow size – that usually means around 2,700 × 2,700 px for an 18‑inch square. If the file is smaller, the sequin side can look blurry once the fabric stretches. A quick tip: open the image in a free editor, check the pixel dimensions, and upscale only if you’re sure the original isn’t already grainy.
How do I pick the right pillow size?
First, picture where the pillow will live – a cozy armchair, a sofa corner, or a nursery shelf. Square pillows (16 × 16 or 18 × 18 in) work best for portrait‑oriented photos like a baby’s face, while rectangular (20 × 26 in) shines with landscape or group shots. Measure the space, then match the orientation of your image to the format; a snug fit makes the reveal feel intentional, not cramped.
What sequin color should I choose?
Black gives the highest contrast – perfect for light‑toned photos and minimalist rooms. Gold adds warmth and drama, making sunset or family‑gathering images pop. Silver works well with cool blues or beach scenes and fits modern décor. If you’re unsure, picture the pillow in its future spot and ask yourself which hue will make the hidden picture “wow” without clashing with the surrounding walls.
How do I care for my custom photo sequin pillow?
Treat the cover like a delicate blanket: zip off the insert, wash the cover on a gentle cold cycle, and lay it flat to dry – no tumble dryer. After the first wash, give the sequin side a light shake to redistribute any settled dust. Avoid harsh detergents and direct sunlight for long periods, as they can dull the sparkle.
What’s the shipping timeline and return policy?
Once your design is approved, most orders ship within 3–5 business days, and you’ll get a tracking link via email. We pack pillows in recyclable boxes to protect the sequins during transit. If the item arrives damaged or with missing sequins, contact us within 7 days and we’ll send a replacement at no extra cost – no questions asked.
Is a custom photo sequin pillow a good gift for any occasion?
Absolutely – it’s a personal, tactile surprise that works for birthdays, baby showers, anniversaries, or just because. Parents love the nursery‑friendly vibe, spouses appreciate the drama of a hidden love‑note image, and friends enjoy the playful “swipe‑to‑reveal” moment. Pair it with a handwritten card and you’ve got a keepsake that feels both thoughtful and fun.