
Understanding the Difference Between DTF and Sublimation Printing
Ever stared at a blank mug and wondered why some prints look buttery smooth while others feel a bit flat?
You're not alone. Most gift buyers hit that exact moment when they have a perfect photo but the printing method feels like a mystery.
That's where the difference between DTF and sublimation comes into play, and trust me, it matters more than you might think.
In a nutshell, DTF (direct‑to‑film) pushes ink onto a special film, then transfers it to fabric or coated items using heat. Sublimation, on the other hand, turns solid dye into gas that bonds directly with polyester or polymer‑coated surfaces.
Imagine you're creating a personalized birthday pillow for a parent. With DTF you can print vivid, opaque colors on cotton, even on dark fabrics, without worrying about the background bleeding through.
Now picture a custom photo coaster for a spouse. Sublimation will give you a silky‑smooth finish that feels almost like the image is part of the material, but it only works on polyester‑based surfaces.
So which one fits your project? If you need flexibility—cotton tees, canvas art, even leather patches—DTF is the go‑to. If you crave that glossy, photo‑realistic look on mugs, shirts made of polyester, or metal plates, sublimation wins.
One thing we've seen time and again at heartful.gifts is that customers start with the design, then discover the right method by testing a small sample. It saves money and avoids the dreaded “color looks different after printing” surprise.
But here’s the kicker: DTF can handle darker backgrounds with ease, while sublimation struggles because the dye needs a light base to show up true.
And don’t forget durability. DTF layers sit on top of the fabric, so they can be a bit thicker, which some people love for a textured feel. Sublimation inks actually become part of the material, making them virtually un‑scratchable.
Feeling a bit overwhelmed? That’s normal. The key is to match your material, color vibrancy needs, and the final feel you want for the gift.
In the next sections we’ll break down cost, setup time, and how each method performs after washes, so you can pick the perfect technique without second‑guessing.
TL;DR
If you need vibrant, opaque prints on cotton, canvas, or dark fabrics, DTF gives you flexibility and a slightly textured feel, while sublimation shines on polyester‑based items with a smooth, photo‑realistic finish that becomes part of the material.
Pick the process that fits your material, color vibrancy, and durability needs.
How DTF Printing Works
Ever wondered what actually happens when you hit "print" on a DTF order? Picture a tiny printer head dancing over a clear PET film, laying down layers of pigment just like a painter would on a canvas. The ink is water‑based, so it stays fluid long enough to form those ultra‑sharp details we love.
First, the design is sent to the printer. The head sprays the ink in tiny droplets, building the image line by line. Then the film goes through a rapid dryer – think of it as a mini‑oven that bakes the ink just enough to stick, but not so much that it smudges.
Step 1: Prepare the Transfer Film
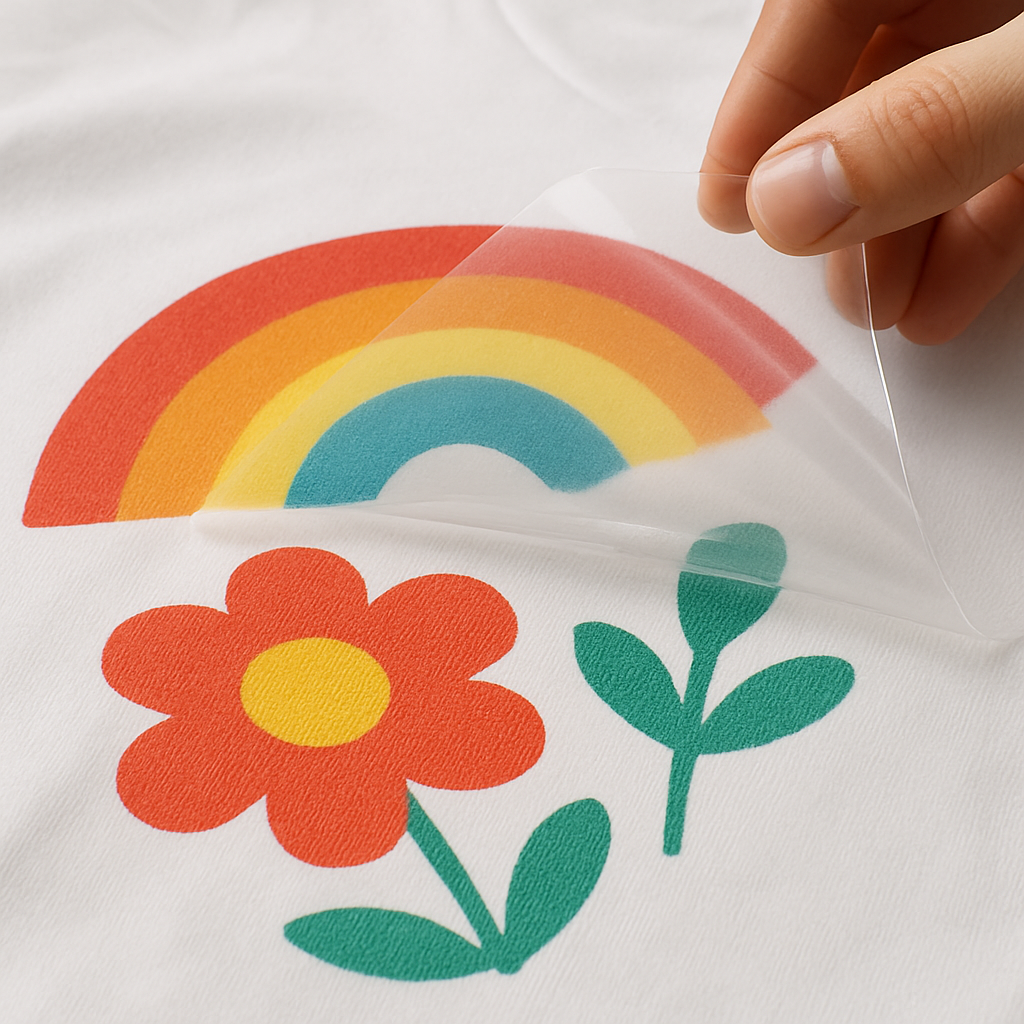
You start with a transparent PET film that’s been pre‑coated with a special adhesive layer. When the ink lands, it adheres to that coating, creating a thin, flexible skin that holds every color exactly where you placed it.
Tip: If you’re printing on dark cotton, you’ll want a white under‑base. The printer can add that automatically, which is why DTF can stay opaque on black fabrics.
Step 2: Apply the Powder Adhesive
Once the ink is dry, you sprinkle a fine powder of hot‑melt adhesive over the whole sheet. The powder clings only where the ink is, kind of like snow sticking to a warm roof. A quick shake removes the excess, leaving a thin glue film right on the printed pixels.
We’ve found that a light, even dusting prevents the later “peeling” issue that some newcomers complain about.
Step 3: Transfer to the Substrate
Now the magic happens. You lay the film face‑down on your garment or tote bag, then run it through a heat press. At around 160 °C (320 °F) for 15–20 seconds, the adhesive melts and fuses the ink to the fabric. When you peel the PET film away, the design stays perfectly bonded.
Does this sound complicated? Not really – it’s a repeatable process, and the equipment is surprisingly compact. That’s why many small‑batch POD shops can offer DTF without a huge upfront investment.
Here’s a quick checklist to keep your DTF prints consistent:
- Calibrate the printer head pressure every month.
- Use fresh adhesive powder – old powder can clump.
- Set the press temperature and time based on fabric type.
And if you ever hit a snag, a good place to compare DTF with other print methods is our dtg vs screen printing quality: A Friendly Guide. It walks you through when DTF shines versus when screen printing might be the better fit.
So, what’s the takeaway? DTF gives you bold, opaque colors on almost any material – from cotton tees to canvas art – with a texture that feels a bit like a subtle emboss. It’s perfect for parents looking to create a cozy, personalized blanket or spouses wanting a vibrant pillow cover that stands out.
Watching the video above can help you visualize each step, especially the powder‑adhesive dance – it’s oddly satisfying.
When you’re ready to scale up, consider the SEO side of things. A partner like Rebel Growth can help you get those product pages ranking so more gift‑buyers discover your custom designs.
And if you’re targeting a French‑speaking audience or just want to fine‑tune your local search, Referencement Positionnement offers specialized SEO audits that can boost visibility for niche POD shops.
How Sublimation Printing Works
Ever wonder how that glossy photo on a custom mug looks like it’s actually part of the ceramic? The trick is sublimation – a process that turns solid dye into gas and fuses it right into a polyester‑coated surface.
In plain English, the ink never sits on top of the material; it becomes part of it. That’s why the result feels smooth, scratch‑resistant, and perfect for bright, photo‑realistic gifts.
Step 1: Print on Transfer Paper
First, you print your design onto a special sublimation transfer paper using sublimation inks. These inks are water‑based but contain dye that will vaporize when heated. Make sure the printer is set to a high resolution – 300 dpi or more – so the details stay crisp, especially for a family photo or a kid’s artwork.
Tip: If you’re making a birthday pillow for a parent, choose a polyester‑blend fabric (often labeled “poly‑cotton 65/35”) so the colors stay vivid after the press.
Step 2: Heat‑Press Transfer
Next, you place the printed side of the paper against the target item – whether it’s a mug, a polyester tee, or a metal coaster – and feed them into a heat press. The press typically runs at 380–410 °F (190–210 °C) for 45–60 seconds. The heat turns the solid dye into gas, which then penetrates the polymer coating and solidifies as it cools.
Because the dye actually bonds with the surface, you don’t have to worry about the image peeling or cracking after a few washes. That’s a huge win for spouses who want a durable keepsake for their anniversary.
After the press, let the item cool for a minute before removing the paper. You’ll see the design looking seamlessly integrated, almost as if the picture was printed directly onto the material.
Step 3: Cooling, Inspection, and Care
Give the piece a final cool‑down, then inspect for any faint spots. If something looks a bit light, you can run it through the press again for an extra 5‑10 seconds – just be careful not to over‑heat, which could warp a mug.
For care, treat sublimated items gently at first: wash polyester shirts inside‑out in cold water, and avoid abrasive scrubbers on mugs. Most of the time, the print will survive dozens of washes and dishwasher cycles without fading.
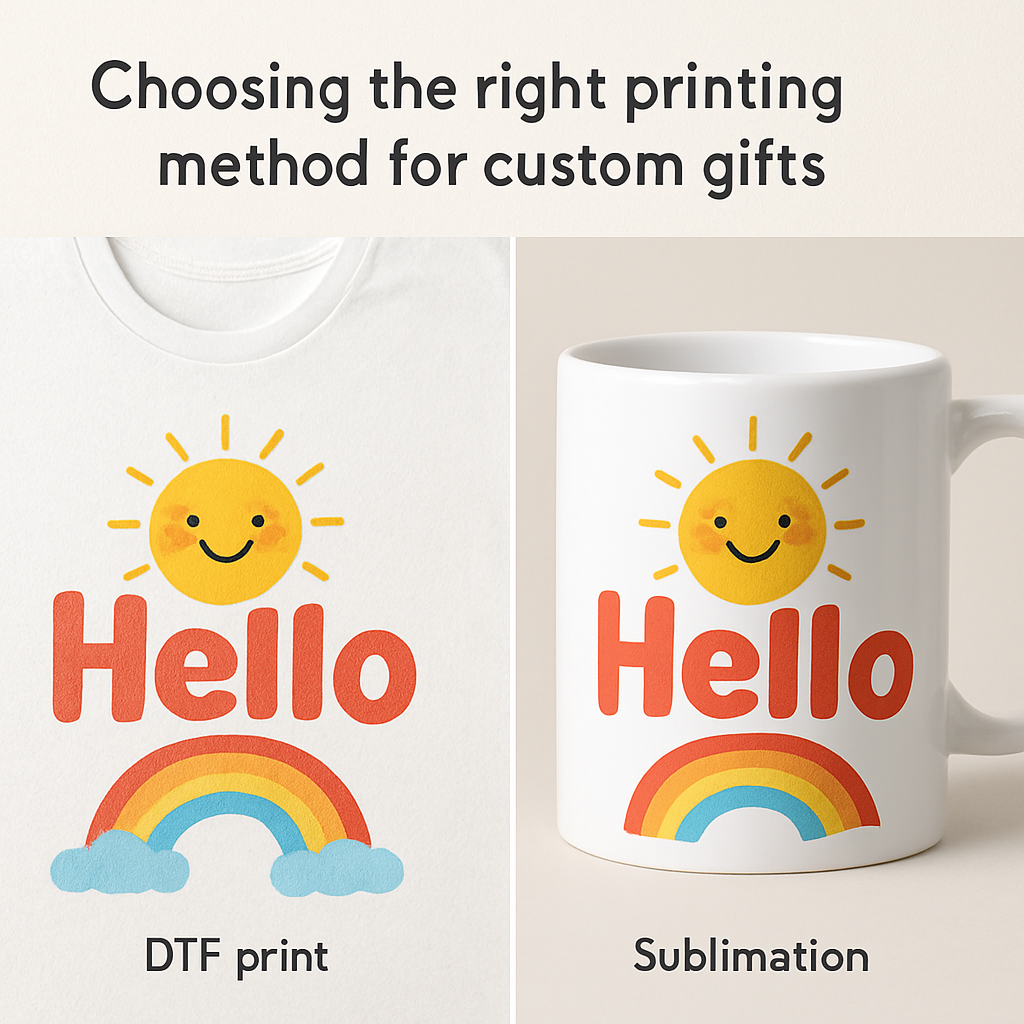
So, what does this mean for you as a gift buyer? If you’re after a sleek, photo‑rich finish on a polyester tote or a glossy mug for a coffee‑loving spouse, sublimation is the go‑to method. It delivers colors that pop, no white background needed, and a surface that feels as smooth as the original material.
One practical tip we’ve learned at heartful.gifts: always do a short test run with a small swatch of the same material before committing to a large batch. It saves you time, ink, and a lot of “what‑if” anxiety.
Bottom line: sublimation transforms ink into gas, bonds it to a polymer coating, and creates a durable, vibrant print that’s perfect for polyester‑based gifts. Understanding these steps helps you pick the right method for each project, whether it’s a mug for Mom, a pillow for Dad, or a custom coaster for your partner.
Comparing Print Quality and Durability
How the colors actually look
When you stare at a custom tote or a photo mug, the first thing you notice is the color. DTF tends to give you a slightly raised, “pop‑out” look because the ink sits on a thin film that adheres to the fabric. That texture can feel nice on a cotton tee – it’s like a subtle embossing you can run your fingers over.
Sublimation, on the other hand, is a different beast. The dye turns into gas and fuses right into the polyester fibers, so the image is literally part of the material. The result is a glass‑smooth finish with no texture at all – perfect for a mug where you want the photo to feel like it was baked into the glaze.
So, what does that mean for the difference between dtf and sublimation in terms of visual fidelity? If you need razor‑sharp, photorealistic detail (think a family portrait on a coaster), sublimation usually wins. If you’re after a bold, tactile vibe on a cotton hoodie, DTF gives you that extra “bite.”
Durability under real‑world use
We’ve seen a lot of gift buyers send their custom pieces through the laundry or dishwasher. DTF prints are durable, but because the ink sits on top of the fabric, the surface can develop micro‑cracks after dozens of washes, especially on darker fabrics where the white base layer expands and contracts.
Sublimation inks, being embedded at the molecular level, stay put. A sublimated polyester shirt can survive repeated hot washes without fading, and a sublimated mug can go through the dishwasher hundreds of times and still look brand new. That’s why sports‑team gear and kids’ school‑year memorabilia often get the sublimation treatment.
If you’re worried about a gift losing its sparkle after a month of use, think about the end‑product’s exposure. A pillow on a couch will get a lot of friction – DTF’s raised surface might feel a tad stiffer over time. A photo‑printed mug, however, will stay smooth forever if it’s sublimated.
Practical steps to test before you commit
Here’s a quick checklist you can run at home before you order a big batch:
- Print a 2×2 inch swatch on the exact material you plan to use.
- Wash the DTF swatch inside‑out in cold water, tumble low, and check for any peeling after 5 cycles.
- For sublimation, run the swatch through the dishwasher once, then inspect for any dull spots.
- Feel the surface. If you want a soft hand‑feel, sublimation is the safer bet.
Doing this simple test saves you from the “what‑if” anxiety we always talk about.
Cost vs. longevity trade‑off
DTF equipment usually requires an extra adhesive‑powder station and a curing oven, which can bump up the upfront cost. But the per‑item cost stays low because you can print on any fabric, even cheap cotton blanks.
Sublimation presses are a bit cheaper to set up, yet the material itself – high‑percentage polyester – can be pricier. The upside? Because the print is essentially permanent, you often spend less on re‑printing or replacing faded items down the road.
Think of it like buying a pair of shoes: you could get a cheap pair that looks good at first (DTF) but wears out fast, or invest a little more in a pair that lasts years (sublimation). The right choice depends on how long you want the gift to stay vibrant.
Expert tip from the shop floor
One trick we’ve learned at heartful.gifts is to match the print method to the gift’s emotional weight. A sentimental anniversary photo on a polyester canvas deserves sublimation’s everlasting brilliance. A fun, bold logo on a tote that’s meant for daily errands can thrive with DTF’s slight texture, which actually hides minor wear.
Bottom line: the difference between dtf and sublimation isn’t just about how the ink gets there – it’s about how the finished piece will look, feel, and hold up over time. Choose the method that aligns with the material, the visual goal, and the expected lifespan of the gift, and you’ll end up with a present that truly feels personal and lasts longer than the memory it celebrates.
Cost, Speed, and Equipment Comparison
When you start weighing the difference between dtf and sublimation, the first thing that pops up is money – both upfront and per piece. That’s why we always ask ourselves: “Will this method keep the gift affordable without compromising the wow factor?”
Up‑front equipment investment
DTF needs a dedicated printer, a powder‑shaker, and a curing oven. A decent desktop DTF printer starts around $2,000, while an industrial‑grade line can push past $15,000 DTF vs Sublimation guide. Add $500–$5,000 for the powder applicator and another $1,000 for a heat‑press, and you’re looking at a six‑figure setup if you go big.
Sublimation is a bit kinder to the wallet at launch. A converted Epson or Sawgrass printer can be bought for $500–$3,000, and a heat press for mugs or tees runs $300–$800 Sublimation equipment overview. The catch? You’ll also need a steady supply of polyester‑coated blanks, which can add $2–$5 per item.
Per‑item cost breakdown
Because DTF prints on a film, you pay for the film roll, adhesive powder, and white ink. For a standard cotton tee, the consumables average $1.20–$1.80, plus the blank shirt ($3–$5). That puts a finished product around $6–$8 in material costs.
Sublimation’s consumables are simpler: ink and transfer paper. On a polyester shirt, ink and paper together are roughly $0.80–$1.10. The biggest variable is the blank, which for a high‑quality polyester tee can be $4–$7. Overall, you’re looking at $5–$8 per finished piece – very close to DTF, but with a slightly lower ink cost.
Speed of production
If you’re cranking out a single custom mug for a spouse’s birthday, sublimation wins. One press cycle of 45–60 seconds gets the design embedded, and the item is ready to cool. DTF, on the other hand, adds a film‑print step, powder dusting, and a cure cycle – roughly 30 seconds extra per piece.
When the order scales to a batch of 50‑100 items, the gap narrows. Modern DTF printers can lay down CMYK + white at 30–40 sq ft per hour, while a high‑volume sublimation press can handle 20–25 sq ft per hour. In practice, both methods can meet a typical gift‑shop turnaround of 1–2 days if you plan the workflow.
Real‑world examples
Imagine a parent ordering a set of 12 custom pillowcases for a baby shower. They want bright pastel colors on soft cotton. DTF lets you print opaque pastels on the cotton without worrying about the fabric’s base shade. The total cost per pillowcase lands at about $9 after labor, and the texture adds a cozy feel.
Now picture a couple ordering a set of four photo mugs for their anniversary. Because mugs are ceramic‑coated, sublimation is the only viable route. Each mug costs $7 in material, and the 45‑second press means you can finish the whole set in under five minutes. The glossy, “in‑the‑glass” look is exactly what makes the gift feel premium.
Actionable checklist before you decide
Here’s a quick checklist before you decide:
- List the substrates you plan to offer (cotton tees, polyester shirts, ceramic mugs, etc.).
- Calculate the per‑item cost using the formulas above.
- Check your budget for equipment – decide if a $2,000 desktop DTF printer fits your start‑up cash flow.
- Run a timed test: print a 4 × 4 inch swatch on each method and note total cycle time.
- Consider future product expansion – DTF opens doors to leather, denim, and dark fabrics; sublimation locks you into polyester and coated hard goods.
| Aspect | DTF | Sublimation |
|---|---|---|
| Initial equipment cost | $3,000–$20,000+ | $800–$4,000 |
| Per‑item material cost | $1.20–$1.80 + blank | $0.80–$1.10 + blank |
| Typical press time | 30–45 sec (incl. cure) | 45–60 sec |
Bottom line? If you need versatility across fabrics and love the tactile “DTF feel,” the higher upfront spend pays off in a broader catalog. If your focus is on glossy, ultra‑soft polyester gifts that survive endless washes, sublimation gives you a leaner start‑up and a razor‑sharp finish.
Whichever path you choose, the key is to test, measure, and align the costs with the emotional weight of the gift you’re creating.
Choosing the Right Method for Your Projects
When you stand in front of a blank canvas—whether it’s a cotton tote for a mom’s grocery run or a glossy mug for a spouse’s morning coffee—the first question that pops up is: “Which printing technique will actually bring my vision to life?” That’s the heart of the difference between dtf and sublimation, and the answer depends on three practical lenses: material, visual impact, and longevity.
1. Match the material to the method
If your gift is a soft‑touch cotton pillow, DTF is practically tailor‑made. The white ink layer gives you opacity on dark fabrics, so a midnight‑blue backdrop won’t turn your design into a ghost.
On the flip side, a polyester‑blend tote or a ceramic mug demands sublimation. The dye‑into‑polymer process only bonds with light‑colored synthetic fibers or coated surfaces, delivering that seamless “inside‑the‑material” look.
So, ask yourself: “What am I printing on?” If it’s natural fiber or a dark hue, lean DTF. If it’s a light polyester or hard surface, sublimation wins.
2. Decide the visual vibe you want
DTF gives a subtle raised texture—think of a soft‑embossed logo that you can feel when you run your fingers over a hoodie. That tactile quality can be a selling point for a cozy family blanket.
Sublimation, however, creates a glass‑smooth finish. The colors are ultra‑vibrant and photorealistic, perfect for a wedding photo mug where you want the image to look like it’s baked into the glaze.
Picture this: a dad wants a “best dad” shirt with bold, blocky lettering. The raised DTF texture adds a rugged feel that matches his personality. Meanwhile, a mom ordering a set of anniversary coasters would probably prefer the sleek, fade‑proof finish of sublimation.
3. Factor in wear and wash cycles
DTF prints sit on top of the fabric, so after dozens of washes they can develop micro‑cracks, especially on stretchy or heavily used garments. A quick tip: turn DTF items inside‑out, wash cold, and tumble low to extend life.
Sublimation inks become part of the fiber, meaning they survive hot washes, dishwashers, and even sunlight without fading. If the gift is meant to be a lasting keepsake—like a child’s birthday blanket that will be tossed around for years—sublimation’s durability is hard to beat.
4. Run a quick feasibility test
Before you commit to a full production run, try this three‑step checklist:
- Print a 2×2 inch swatch on the exact material you plan to use.
- Subject the swatch to the intended usage: wash the DTF piece five times, run the sublimated piece through a dishwasher cycle.
- Compare color vibrancy, texture, and any signs of peeling or fading.
If the swatch holds up, you’ve got a green light. If not, consider swapping the method or adjusting press temperature and time.
5. Align with budget and scale
DTF equipment can start modestly, but the adhesive powder and film rolls add ongoing costs. Sublimation needs a special inkjet and transfer paper, which can be pricier per blank but often results in lower re‑print rates because the prints last longer.
For small, on‑demand orders—like a single personalized keychain for a birthday—DTF’s quick turn‑around shines. For medium‑size batches, say a set of 20 custom mugs for a bridal party, sublimation’s consistent quality and lower per‑unit waste can keep your margins healthier.
Expert tip from the shop floor
We’ve found that pairing the method with the emotional weight of the gift makes the decision easier. A sentimental photo on a child’s polyester blanket deserves sublimation’s permanent brilliance. A fun, bold graphic on a canvas tote that will be tossed to the farmer’s market benefits from DTF’s texture and flexibility.
Bottom line: let the substrate, the visual story, and the expected lifespan guide you. When those three line up, the difference between dtf and sublimation collapses into a clear, confident choice.
Conclusion
We've walked through the whole difference between dtf and sublimation, and I bet you’re feeling a bit clearer about which path fits your next gift.
Remember that moment when you imagined a cozy cotton pillow for a parent – DTF gives you that opaque pop and a subtle texture you can actually feel. And when you picture a glossy photo mug for a spouse, sublimation locks the image right into the glaze so it never scratches out.
So, what’s the quick decision matrix? Look at three things: the material you’re printing on, the visual vibe you want, and how long the piece needs to survive.
If the substrate is natural fiber or a dark canvas, DTF wins. If it’s polyester, a coated ceramic, or a metal surface, sublimation is the safe bet.
For the look‑and‑feel, ask yourself – do you want a tactile, slightly raised finish (DTF) or a glass‑smooth, photo‑realistic surface (sublimation)? That tiny preference often decides the whole project.
Finally, think about durability. Gifts that will see daily washes or dishwasher cycles tend to stay brighter with sublimation, while occasional‑use items like tote bags or decorative patches hold up nicely with DTF.
Take a minute now to run a tiny swatch test on the exact blank you plan to use. A quick wash or dishwasher run will reveal which method holds its color best.
Once you’ve matched the method to the material, vibe, and lifespan, the difference between dtf and sublimation collapses into a confident choice – and you can move forward creating that perfect, heart‑felt present.
Need a hassle‑free way to order? Platforms like heartful.gifts let you pick the method and preview the result before you hit checkout, so you can focus on the joy of gifting, not the tech.
FAQ
What’s the main difference between DTF and sublimation printing?
In a nutshell, DTF (direct‑to‑film) deposits a thin ink layer onto a film that’s later heat‑pressed onto the substrate, leaving a slightly raised texture. Sublimation turns solid dye into gas that fuses directly with polyester or polymer‑coated surfaces, creating a glass‑smooth, fully embedded image. The choice boils down to material compatibility, desired finish, and long‑term durability. That’s why you’ll see DTF on dark cotton tees and sublimation on glossy mugs or polyester tote bags.
Can I use DTF on dark fabrics without a white base?
Yes – DTF includes a white ink layer that acts as an undercoat, so the colors stay opaque even on black or navy fabrics. You simply print the white first, then the color layers, and the heat press bonds everything in one go. The result is a vibrant design that doesn’t bleed through the background. For gift buyers, that means a midnight‑blue hoodie can showcase bright logos without looking faded.
Is sublimation suitable for cotton items?
Pure sublimation won’t stick to 100% cotton because the dye needs a polyester polymer to bond with. However, you can use a cotton‑poly blend (typically 65/35) that contains enough polyester for the dye to fuse, giving you a soft‑hand feel with the same durability. If you need 100% cotton, DTF is the better route. That’s why many parents choose DTF for baby blankets but turn to sublimation for polyester‑woven pillowcases.
How do wash and dishwasher cycles affect DTF versus sublimation prints?
Washing a DTF‑printed tee inside‑out in cold water and tumble‑drying low usually preserves the image for about five to seven washes before you might notice tiny cracks in the white layer. Sublimated pieces behave like the fabric itself; you can toss a polyester shirt through hot cycles or a mug into the dishwasher and the print stays vivid for months. To extend DTF life, keep the temperature below 40 °C and avoid harsh detergents.
Which method is faster for a single custom mug?
If you only need one custom photo mug, sublimation is the clear winner. The mug and transfer paper go into the press for about 45 seconds, then cool – you’re done in under a minute. DTF would require printing the design onto film, dusting powder, a short cure, and then a press, adding roughly 30 seconds extra per piece. For a single item, that time adds up and the extra steps increase cost.
What’s the cost difference for a small batch of 10 items?
For a batch of ten items the math stays simple. DTF material costs (film, powder, white ink) run about $1.30 per piece, plus the blank – say $4 for a cotton tote – totalling roughly $5.30 each. Sublimation uses transfer paper and ink at about $0.90 per piece, and a polyester tote costs $5, so you’re looking at $5.90 per item. The difference is small, but DTF gives you more fabric flexibility, while sublimation offers a lower per‑unit price on polyester blanks.
How can I test which method works best for my specific gift?
The easiest way is to print a tiny 2 × 2 inch swatch on the exact material you plan to sell. For DTF, run the swatch through a full heat‑press cycle, then wash it five times inside‑out. For sublimation, run the swatch through one dishwasher cycle or a hot wash. Compare color vibrancy, feel, and any signs of peeling. If the DTF sample shows micro‑cracks, consider switching to sublimation, or adjust press temperature by 5 °C and test again.