
How to Create a Personalized Photo Keychain That Looks Lovely and Lasts
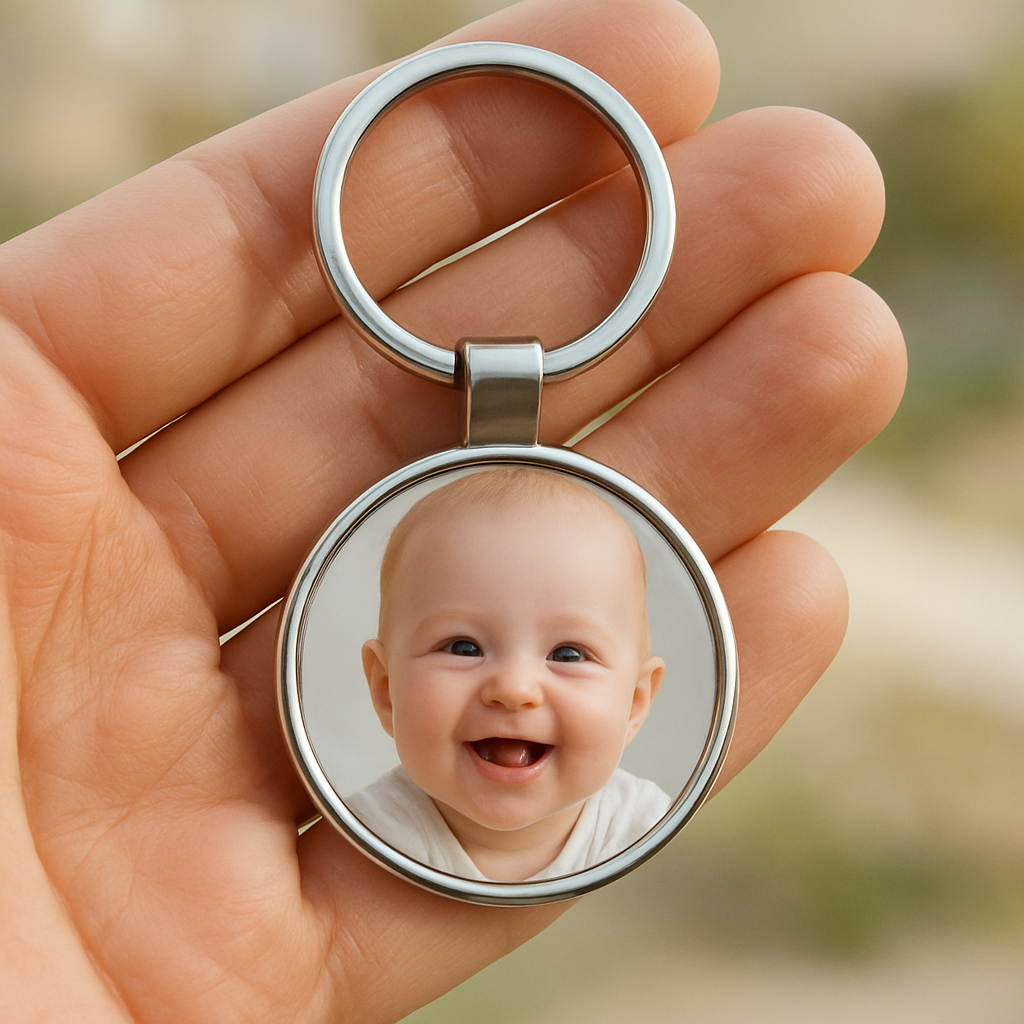
Ever found yourself fumbling for your keys and wishing you could see a familiar smile every time you unlock the door? That's the tiny magic of a personalized photo keychain – a piece of everyday utility turned into a memory‑keeper.
For gift buyers, parents, and spouses, it’s more than a trinket. It’s a way to carry a loved one’s face into the hustle of the day, whether it’s a baby’s first grin, a graduation snapshot, or a goofy pet pose. And because it hangs on something you already use, the sentiment never gets lost in a drawer.
Think about Sarah, a mum of two, who slipped a photo of her toddler onto a metal keychain before heading to work. She tells us she smiles every time she grabs the handle, and her colleague even asked where she got it – turning a simple keyring into a memory starter. Or James, who gave his partner a custom keychain with a picture from their honeymoon; it’s now the go‑to excuse for “I’m late, I was looking at the photo again.”
Here’s a quick, actionable checklist to create yours: 1️⃣ Pick a high‑resolution image (at least 300 dpi). 2️⃣ Decide on material – metal for durability, acrylic for a lightweight feel. 3️⃣ Choose a shape (classic round, rectangular, or a fun silhouette). 4️⃣ Upload the image to our design tool, position it, and add any optional text. 5️⃣ Review the preview, then hit “order” – we usually ship within 2‑3 days.
Pro tip: metal keychains resist wear and look great with a brushed finish, while acrylic lets colours pop brighter. In our experience, couples love matching sets – one keychain for each partner, each bearing the other's favorite photo.
If you’re already planning a photo gift, you might also enjoy our guide on how to create a personalized photo bookmark, which follows a similar design process.
Looking for another on‑demand keepsake? Check out Quench Bottles for custom drink bottles that complement your photo keychain – perfect for a coordinated gift set.
So, ready to turn a plain keyring into a daily dose of joy? Grab that favourite snap, follow the steps above, and let your keys tell a story.
TL;DR
A personalized photo keychain turns a plain keyring into a daily burst of joy, showing a loved one’s face whenever you reach for your door.
Just pick a high‑resolution photo, select metal or acrylic, upload, preview, and order—your custom keepsake ships in days, ready to brighten routines for you today.
Step 1: Choose Your Photo and Design
Alright, imagine you’ve just snapped that perfect shot of your toddler’s cheeky grin or your dog’s tongue‑out pose. You know it belongs on something you’ll see every day, but you’re not sure where to start. That’s where the first step of creating a personalized photo keychain really matters – picking the right image and giving it a design that feels just right.
First things first: resolution. A clear, high‑resolution photo (at least 300 dpi) prevents pixelation once it’s printed onto metal or acrylic. If you’ve taken the picture on a smartphone, open the file and zoom in – can you still see the eyes? If the details start to blur, try a slightly larger version or a fresh snap. Trust me, you’ll thank yourself when the keychain looks crisp, not fuzzy.
Choosing the material that fits your vibe
Metal keychains give a sturdy, timeless feel. They’re great for people who juggle keys, gym bags, and a coffee mug all at once – the brushed finish hides tiny scratches and the metal stays cool to the touch.
Acrylic, on the other hand, lets colours pop like a mini‑photo print. It’s lighter, so it won’t add much weight, and the glossy surface can make a sunrise or a vibrant party photo really shine.
Think about who you’re gifting. Parents often prefer metal because it can survive a busy household, while a teen might love the bright pop of acrylic for a selfie.
Shape and layout – keep it simple, but personal
Round is classic and works well for most faces. Rectangular gives you a bit more room for a group shot or a short message. If you’re feeling playful, a custom silhouette (like a paw‑print for pet owners) adds a fun twist without overcomplicating the design.
When you upload the image to our design tool, you’ll see a live preview. Drag the photo until the most important part – usually the eyes or a smiling mouth – sits in the centre. A quick tip: leave a tiny margin around the edges; the keychain’s edge will cut off anything too close.
Do you want to add text? A short line like “Love you” or a date can turn a photo into a keepsake. Keep the font legible; something sans‑serif works best on small surfaces.
Testing the look before you order
Our preview window is your sandbox. Zoom in, rotate the keychain, and imagine it dangling from your own set of keys. Does the photo still look good from every angle? If something feels off, swap the photo or tweak the cropping now – it’s much easier than a re‑order later.
And here’s a little secret: many of our customers notice that a photo taken in natural light (morning or late afternoon) translates better onto acrylic, while indoor, flash‑lit shots tend to look richer on metal.
So, what’s the next move? Grab that favourite snap, decide on metal or acrylic, pick a shape that matches the personality of the person you’re gifting, and fire up the design tool. In a few clicks you’ll have a preview that feels ready for the real world.
Take a moment to watch the short video above – it walks you through the upload process step by step, highlighting the little tricks we’ve learned from hundreds of happy keychain creators.
Once you’re satisfied with the preview, hit “order” and let us handle the printing. Most orders ship within 2‑3 days, so you’ll have that little piece of joy ready to attach to a set of keys, a backpack, or even a luggage tag. And remember – the best keychains are the ones you’ll actually see and smile at, so choose a photo that feels warm, genuine, and instantly recognizable.
Step 2: Select the Right Material and Size
Now that you’ve nailed the perfect photo, the next decision is what the keychain itself will be made of and how big it should sit on your keyring.
The material you pick isn’t just about looks – it decides whether your personalised photo keychain will survive a dropped car key or fade after a few weeks of sunshine.
Below we’ll walk through the two most popular options, size guidelines, and a few insider shortcuts we’ve picked up at heartful.gifts.
Material choices
Metal – usually brushed aluminium or stainless steel – feels sturdy in the hand and protects the image with a protective coating.
It’s great for parents who want a keychain that can survive a toddler’s tug‑of‑war, and the metal surface tends to keep colours looking sharp for months.
Acrylic is lighter, almost weightless, and lets bright colours pop because the clear plastic acts like a tiny window.
If you’re gifting a friend who loves a splash of summer sky or a pet portrait with vivid fur, acrylic often shows those hues a shade brighter than metal.
If you prefer a hands‑on approach, the DIY photo keychain tutorial on AmyRomeu.com walks you through cutting faux leather and acrylic with a Cricut, which can be a fun weekend project.
Both materials can be finished with a glossy top coat or a matte seal – the choice is yours, but remember that matte can hide fingerprints a bit better.
Still not sure which feel you prefer? Check out this quick visual comparison – it walks you through the look and feel of metal versus acrylic.
Take a minute to watch; the demo shows how the same photo looks on each substrate, so you can picture the final result before you click ‘add to cart’.
Choosing the right size
Keychains typically range from 1.5 in to 2.5 in across. Anything smaller can feel like a tiny postage stamp, while anything larger may wobble on a standard keyring.
A good rule of thumb is to match the image’s focal point to the centre of a 2‑inch circle – that gives you enough room for the photo without sacrificing detail.
If you’re using a rectangular shape, keep the longer side under 2.2 in and the short side above 1.2 in; this keeps the design balanced and prevents the keyring from sliding off.
For silhouette shapes (like a paw‑print or heart), measure the inner “window” area on the preview tool – the outer edges are just the cut‑out, so the photo can’t extend into them.
Here’s a quick size checklist you can run through before you hit “order”:
- Is the photo at least 300 dpi?
- Does the image stay clear when you zoom to 150 %?
- Is the chosen shape compatible with a 2‑inch keyring?
- Does the material you’ve selected match the intended durability or colour vibrancy?
- Have you previewed both metal and acrylic to see which vibe you prefer?
Practical tips for a flawless finish
If you love a matte metal look but worry about scratches, add a thin clear coat spray – it’s inexpensive and adds a protective layer without changing the colour.
Acrylic can get a tiny rainbow sheen when light hits at an angle; that’s normal, but you can minimise it by choosing a matte acrylic variant if you prefer a more uniform look.
When you order, double‑check the mock‑up’s edge bleed. A 1‑mm buffer around the photo ensures the cutter doesn’t trim away any crucial detail.
And a little secret we’ve learned: ordering a small batch of two different materials for the same design lets you compare side‑by‑side without committing to a larger quantity.
Bottom line: pick metal for durability and a classic feel, acrylic for colour‑burst lightness, and keep the overall dimensions between 1.5 in and 2.5 in so the keychain sits comfortably on any ring.
Once you’ve settled on material and size, the next step is to bring your design to life – stay tuned for the printing and assembly guide.
Step 3: Customize with Text and Extras
Now that you’ve locked in material and size, it’s time to make the keychain truly yours.
Do you want a short sweet note, a date, or maybe a tiny inside‑joke? Adding text is the easiest way to turn a plain photo into a memory capsule.
Choosing what to say
Start by thinking about the moment the keychain will see the most love – a morning commute, a gym bag, or a car door.
For parents, a simple "Love you, Mum" under a baby’s grin works wonders; for partners, a date like "01‑08‑2024" can become a daily reminder of a special day.
Keep it short – most keychains only have space for 15–20 characters before the text starts to look cramped.
Font, colour, and placement
Our design tool gives you a handful of clean, readable fonts – think sans‑serif for a modern vibe, or a light script for a handwritten feel.
Pick a colour that contrasts with the base material: white or light‑grey on metal, dark‑grey or black on acrylic.
Place the text either beneath the photo, wrapped around the edge, or right in the centre if the image has a natural blank space.
Tip: a thin white border around the photo can act as a buffer, letting the text sit comfortably without overlapping important details.
Adding extras – charms and engravings
Some of our customers love a tiny metal charm dangling from the keyring – a heart, a paw‑print, or even a miniature key.
Because the charm is attached after printing, you can swap it out later if you change your mind.
If you prefer something permanent, consider a laser‑etched engraving on the back of the metal piece. A short phrase or initials can be added without affecting the front photo.
Remember, engraving adds a few extra minutes to production, but the result feels ultra‑personal.
Finishing touches
A clear matte coat spray works well on metal to hide fingerprints, while a glossy seal keeps acrylic looking like a tiny window.
We usually recommend a thin protective layer if the keychain will travel in a bag or pocket.
Once you’re happy with the preview, double‑check the spelling – a tiny typo is impossible to fix after the keychain is printed.
And don’t forget to hit the ‘Add to Cart’ button before the design resets!
Quick comparison of text and extra options
| Option | Best For | Notes |
|---|---|---|
| Short text (≤20 chars) | Everyday reminders | Fits beneath most photos; choose high‑contrast colour. |
| Laser‑etched back engraving | Permanent personalisation | Only on metal; adds a few minutes to production. |
| Swap‑able metal charm | Gift sets or themed collections | Attached after printing; easy to change later. |
So, what’s your next move? Draft a short line, pick a font you love, and decide if a charm or an engraving will make the keychain feel complete.
When you’re done, the preview will show exactly how the photo, text, and any extra will sit together – a final check before you order.
That’s it – a personalised photo keychain with your words and little extras ready to become a daily smile.
Step 4: Order and Production Process
Confirm your design before you click “order”
At this point you’ve already picked the photo, material, size and any extra text or charm. The final step is to make sure the digital preview matches what you see in your head. Zoom in on the mock‑up, check the edges for any bleed, and read the text aloud – does it still look natural at that tiny scale?
One trick we’ve seen work for busy parents is to print the preview on a piece of regular paper, cut it out and tape it onto a spare keyring. If the tiny photo still reads clearly, you’re good to go.
Placing your order on heartful.gifts
When you’re ready, hit the bright “Add to Cart” button – it’s easy to miss because the design tool resets after a few minutes of inactivity. Once the item is in your basket, double‑check the quantity (most people order a pair for couples or a set for a family).
Our checkout asks for a short delivery note. If the keychain is a gift, you can add a personalised message that will be printed on the packing slip – a tiny touch that makes the moment feel extra thoughtful.
Production timeline you can count on
Heartful.gifts operates a print‑on‑demand workflow, which means your keychain goes straight from the design file to the laser‑etch or UV‑print machine. In our experience the whole process takes 2‑3 business days from order confirmation to dispatch.
Why does it move that fast? We keep a small inventory of blank metal and acrylic blanks, and our printers are calibrated for a 300 dpi minimum, so there’s no waiting for bulk runs. The same day you place the order, the file is queued, printed, trimmed and quality‑checked.
Typical milestones
- Day 0 – Order received, design file verified.
- Day 1 – Printing/laser‑etching completed, pieces cut to exact shape.
- Day 2 – Quality inspection, optional matte or glossy seal applied.
- Day 2‑3 – Packaged in a clear protective bag and handed to the courier.
Most Australian customers see their parcel within 2‑4 days after dispatch, thanks to local courier partnerships.
What to expect in the packaging
Each personalised photo keychain arrives in a crystal‑clear hanger bag that protects the surface from scratches. The bag also has a small tag where we print the order number – handy if you’re ordering a batch for a wedding favour.
If you opted for a metal charm, you’ll find it attached with a tiny split ring that you can swap out later. The charm sits on the opposite side of the photo, so you can flip the keychain to show either side.
Real‑world examples
Emily, a mother of three from Brisbane, ordered two matching keychains for her kids’ school bags. She chose acrylic for the bright colours of the kids’ drawings and added each child’s first name on the back. The entire order arrived on a Tuesday, and she was able to slip the keychains into the lunch boxes that very afternoon.
Meanwhile, Mark, a husband in Melbourne, wanted a durable reminder of his anniversary. He selected brushed metal, added the date “12‑02‑2023” in a subtle script, and chose a tiny heart charm. The metal held up perfectly after a week of daily commuting, and the charm stayed securely attached.
Tips to avoid common hiccups
- Double‑check spelling before you confirm – a typo can’t be fixed after printing.
- Make sure the photo’s focal point isn’t within 1 mm of the edge; the cutter needs a bleed margin.
- If you’re ordering for a group, use the same material and size for consistency.
- Consider ordering a small “sample” of each material if you’re undecided – the cost is negligible and saves regret.
And remember, the moment you see that tiny, crisp image on the keyring is the payoff for all the little checks you made along the way.
Now you’re ready to hit “order” with confidence, knowing exactly what happens behind the scenes and how quickly your personalised photo keychain will be in your hands.

Step 5: Care, Gifting, and Creative Uses
Now that your personalised photo keychain is printed and sitting in that clear hanger bag, the fun part really begins – looking after it, handing it over as a gift, and finding quirky ways to let it live its best life.
First, a quick care cheat‑sheet. Metal finishes love a gentle wipe with a dry microfiber cloth – it removes fingerprints without scratching the protective coating. If you opt for acrylic, a soft damp cloth works fine; avoid abrasive cleaners, because they can cloud the clear surface.
A little extra love goes a long way: slip a tiny drop of clear nail polish onto the back of a metal keyring where the metal meets the split ring. It acts as a barrier against rust and keeps the charm from wobbling after weeks of daily use.
So, how do you turn that tiny piece of nostalgia into a gift that feels like a hug? Think about the moment you’ll hand it over. For parents, slip the keychain into a cute lunch‑box note and say, “I thought you could carry a little piece of baby’s smile with you today.” For partners, pair it with a handwritten card that explains why that photo means “us” – it instantly upgrades a simple trinket into a story.
If you’re sending it across the country, our packaging already includes a sturdy cardboard backing that protects the surface during transit. Add a small “open me first” sticker on the bag – it’s a tiny surprise that tells the recipient to unwrap it with curiosity, not just toss it on the keyring.
Creative uses? The personalised photo keychain isn’t just for keys. Slip it onto a backpack zipper pull for a quick visual reminder during a hike. Clip it onto a gym bag so you spot yours in a sea of black totes. Even attach it to a spare set of house‑keys you keep in the kitchen drawer – every time you grab a spoon you’ll see that smiling face.
A fun family twist is to make a “photo keychain chain” – each member creates their own miniature version, then you link the rings together on a larger chain that hangs on the fridge or a wall hook. It becomes a rotating gallery of smiles that you can swap out whenever a new picture arrives.
When you’re ready to give, think about presentation. A small velvet pouch adds a luxe feel without much extra cost, and it protects the keychain from scratches while it sits in a gift bag. Pair it with a tiny bottle of hand‑made soap or a scented candle for a mini “self‑care” bundle – suddenly the keychain is part of a ritual, not just a random add‑on.
Finally, a quick maintenance routine keeps your personalised photo keychain looking fresh for months. Every few weeks, give it a once‑over with the same cloth you use for your glasses. If you notice the image fading (which can happen with heavy sun exposure), a quick polish with a non‑abrasive jewelry cleaner restores the shine. And remember – the charm is detachable, so you can swap it out for a new one whenever the occasion calls for it.
Conclusion
We've walked through picking the perfect photo, choosing material, and adding a dash of text that keeps your personalised photo keychain looking fresh.
So, what's the final takeaway? A custom keychain works best when it feels effortless – a high‑resolution smile, a sturdy metal or vibrant acrylic, and a tiny note that means something to you.
In our experience, parents love the durability of brushed metal for busy mornings, while spouses often pick acrylic to make colours pop on a romantic snapshot. Either way, the real magic is that tiny image greets you every time you grab your keys.
Before you hit “order,” run through this quick checklist: is the photo sharp at 150 % zoom? Is the focal point at least a millimetre from the edge? Have you double‑checked spelling and material choice?
Once it arrives, treat it like any favourite accessory: wipe it with a soft cloth, tuck it into a velvet pouch for gifting, or swap the charm whenever a new memory pops up.
Ready to turn a simple keyring into a daily dose of joy? Grab that favourite snap, follow the steps we’ve laid out, and let your personalised photo keychain start telling your story every time you step out the door.
FAQ
What size should a personalised photo keychain be for everyday use?
For most people the sweet spot is a 2‑inch diameter round or a 2‑inch‑by‑1.2‑inch rectangle. Anything smaller starts to look like a postage stamp, and anything larger can wobble on a standard keyring. Aim for a clear focal point at least a millimetre from the edge – that way the cutter won’t trim off any important detail and the image stays recognisable each time you grab your keys.
Can I use any photo, or are there restrictions?
In theory you can upload any image, but the keychain only shows about a centimetre of detail, so you’ll want a high‑resolution picture – at least 300 dpi when you zoom to 150 %. Avoid photos with heavy grain, watermarks or text that sits right at the edge. A close‑up of a face, a pet’s eyes, or a bright‑coloured object works best because the tiny canvas can’t carry a lot of background clutter.
How long does it take to receive a personalised photo keychain after ordering?
Our print‑on‑demand workflow is designed for speed. Once you hit “order”, the file is queued for printing the same day. Production usually finishes within 1‑2 business days, and we dispatch on day 2 or 3. For Australian customers the courier typically delivers within 2‑4 days, so you’ll be holding the finished piece in under a week in most cases.
Is the photo on a metal keychain waterproof?
Yes, the metal surface is coated with a protective UV‑cured finish that guards against splashes, rain and everyday moisture. That said, prolonged sub‑mersion isn’t something we test for, so it’s best to avoid leaving it in a bathtub or pool for hours. For a truly waterproof feel you can add a clear matte spray after it arrives – it adds a thin shield without dulling the colours.
How do I care for my acrylic versus metal keychain to keep the image sharp?
Metal keychains love a quick wipe with a dry microfiber cloth; the coating repels fingerprints and the occasional splash. Acrylic prefers a soft, slightly damp cloth – never use abrasive cleaners or ammonia, as they can cloud the clear surface. In both cases store the keychain in the velvet pouch we include; it protects the printed side from scratches and keeps the image looking fresh for months.
Can I order a set of matching keychains for a family?
Absolutely. Our cart lets you add multiple items, and you can choose the same material and size for a uniform look while swapping each family member’s photo. It’s a popular gift for parents wanting a mini‑gallery on their keyrings or for couples who want matching reminders of a shared memory. Ordering a batch together also saves on shipping because we pack them in one protective box.
What if I need to change the text or image after I’ve placed the order?
If you spot a typo or decide on a different snapshot, contact us within 24 hours of purchase. Because the file is already queued for production, we can only make changes before the print stage begins. After that point the design is locked, so the fastest route is to cancel the order (no penalty) and place a fresh one with the corrected artwork.