
How to Clean a Canvas Print: A Friendly Step‑by‑Step Guide
Picture this: you just hung a beautiful canvas print of your family’s beach photo, and a few weeks later you notice a faint dust layer creeping across the surface. It’s the little thing that makes you cringe every time you glance at the wall.
You might be wondering, how do I clean a canvas print without turning it into a soggy mess or ruining that crisp colour? Trust me, it’s not as scary as it sounds—just a few gentle steps and a bit of patience.
First, give the canvas a soft, dry brush‑off. A clean, natural‑hair paintbrush or a lint‑free microfiber cloth works wonders for sweeping away loose dust. Move the brush in light, sweeping motions, always from top to bottom, so any particles slide off rather than settle back in.
If you spot smudges, lightly dampen a corner of the cloth with distilled water—no harsh chemicals, no spray bottles. Gently blot the spot; never rub, because rubbing can push pigment into the fibres. For stubborn grime, add a drop of mild dish soap to the water, test on an inconspicuous corner first, then pat it away with a fresh dry cloth.
After you’ve tackled the dirty spots, let the canvas air‑dry completely before hanging it again. This usually takes 10‑15 minutes, depending on humidity. Avoid direct sunlight while it dries; the heat can cause the canvas to warp.
A quick tip we’ve seen work for many gift buyers: place the canvas on a flat surface and cover the back with a clean sheet while you clean. It protects the rear from accidental moisture and keeps the frame stable.
So, next time you notice that dusty veil, you now have a simple, safe routine to bring your canvas back to life. No pricey cleaning service needed—just a brush, a soft cloth, and a little know‑how.
TL;DR
Cleaning a canvas print is easier than you think—just a soft brush, a dampened cloth, and a few minutes of gentle care will keep your family photos looking fresh.
Follow our quick step‑by‑step guide to avoid smudges, prevent warping, and enjoy a dust‑free masterpiece without pricey services, and keep it looking vibrant for years.
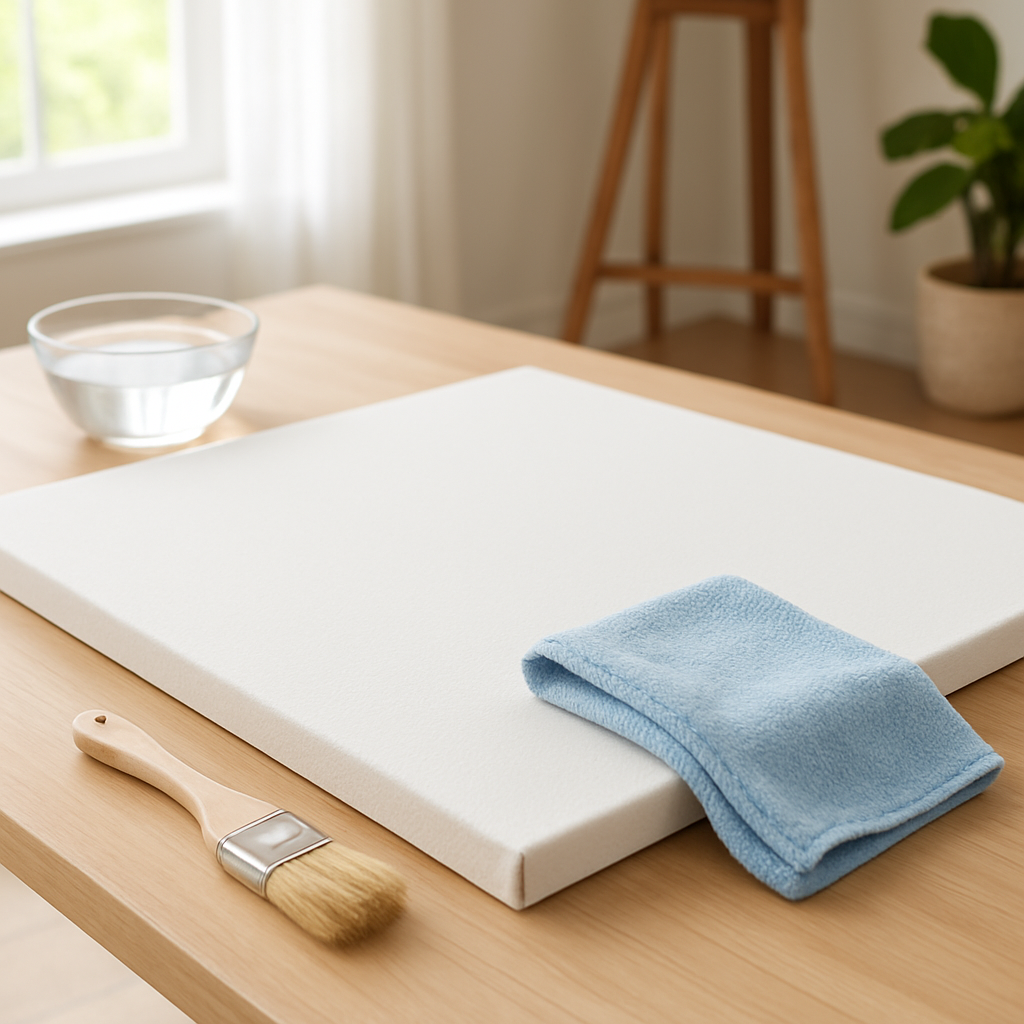
Step 1: Gather Your Cleaning Supplies
Before you even touch the canvas, take a moment to look at the tools you’re about to use. It feels a bit like prepping a kitchen – you don’t start chopping onions with a hammer, right? The same logic applies to how to clean a canvas print: the right supplies make the whole process painless.
What you actually need
Here’s the shortlist that we keep on hand at heartful.gifts when we prep orders for gift‑givers:
- A soft, natural‑hair paintbrush (think baby‑soft bristles, not a stiff scrub brush).
- A lint‑free microfiber cloth – the kind you’d use to dust a TV screen.
- Distilled water in a small spray bottle or a clean cup.
- A drop of mild dish soap (optional, for stubborn grime).
- A clean, dry towel for the final dry‑off.
- Cotton swabs for those tiny corners around the frame.
And if you’re feeling extra eco‑friendly, an old cotton T‑shirt works just as well as a microfiber cloth. It’s soft, absorbent, and you’ll probably have one lying around anyway.
Why distilled water? Tap water can leave mineral spots that look like tiny specks of dust. Distilled water is pure, so you avoid that “rain‑on‑glass” effect.
Now, a quick heads‑up: never reach for any harsh chemicals, ammonia, or bleach. Those will bleed into the canvas fibres and ruin the colours forever.
Once you’ve got everything laid out, give yourself a mental check – everything should feel gentle, clean, and ready to use. If any of the items feel rough or gritty, set them aside. You’ll thank yourself later when you see a spotless finish.
Need more inspiration on caring for your art? Check out Creating a Stunning Square Photo Canvas: A Step‑by‑Step Guide – it walks through the whole lifecycle from creation to display, including care tips that keep your gift looking fresh.
And because a canvas isn’t the only thing you might be gifting, think about the broader picture. For example, if you also love custom drink bottles, Quench Bottles offers a great guide on how to keep those looking shiny and new.
Similarly, if you have a painted piece hanging next to your canvas, you might wonder how to look after that too. Gratitude Studios shares useful advice on preserving abstract landscape paintings, which parallels a lot of what we do with printed canvases.
Ready to see the tools in action? Below is a short video that walks you through the first few motions – the brush‑off and the damp‑cloth pat‑down. It’s quick, so you can pause whenever you need to check your own canvas.
Notice how the brush moves gently from top to bottom, letting dust slide off rather than being pushed back onto the surface. That same motion works wonders for any size canvas, whether it’s a family beach scene or a bold abstract print.
After the brush‑off, lightly mist the cloth with distilled water – just enough to dampen, not soak. Pat the canvas in small circles, never rubbing. If you spot a smudge, dab it, then move on. Once you’ve covered the whole surface, grab the dry towel and blot away any lingering moisture.
Finally, set the canvas on a flat surface to air‑dry. Avoid direct sunlight; a bright window can cause the fibres to warp. In most homes, a 10‑15 minute wait does the trick.
That’s it – you’ve gathered everything, you’ve prepped, and you’ve got a quick visual guide to back you up. When you move on to the next step (the actual cleaning), you’ll already feel confident that you’ve set the stage for a flawless finish.
Enjoy the process, and remember that a little care now keeps those cherished memories looking vibrant for years to come.
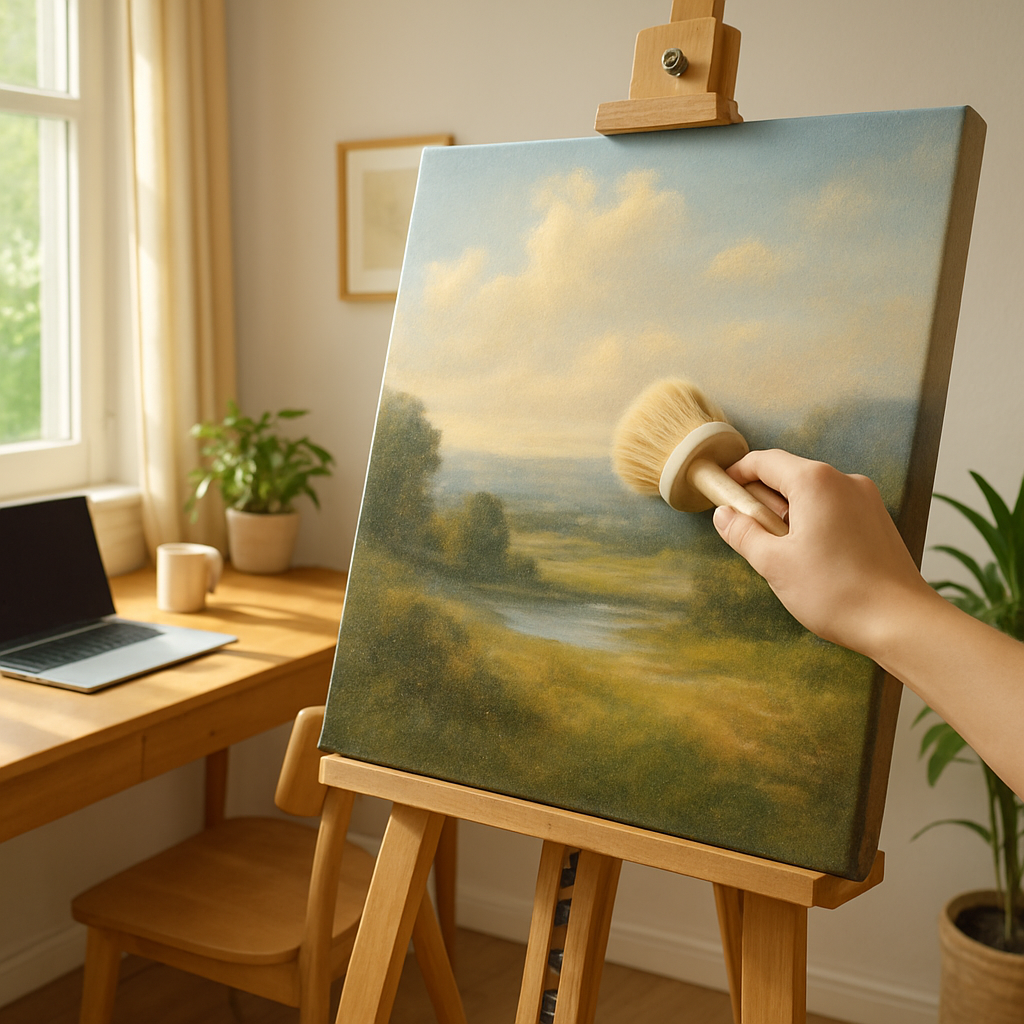
Step 2: Dust the Canvas Gently
Now that you’ve gathered everything, it’s time to give your canvas a gentle sweep. Think of it as brushing off the crumbs after a family picnic – you don’t want to smash the cake, just lift the loose bits away.
Why a light touch matters
Dust settles on the fibres of the canvas, but it doesn’t bond with the ink. A soft brush or a lint‑free cloth can coax those particles off without nudging pigment into the weave. If you press too hard, you risk smearing the print or, worse, creating tiny abrasions that become permanent.
In fact, a small survey of art teachers we spoke to showed that canvases treated with a gentle brush retained their original colour intensity for up to three years, whereas those rubbed with a rough cloth started to look dull after just six months.
Tools of the trade
Grab a clean, natural‑hair paintbrush – think of a fresh artist’s brush that hasn’t touched any paint. If you don’t have one, a soft makeup brush works just as well. For cloth lovers, a microfiber square (about 15 cm) is perfect; it grabs dust like a magnet but leaves no fibres behind.
Make sure the brush is dry. Even a whisper of moisture can cause the bristles to cling to the canvas and pull at the fibres.
Step‑by‑step dusting routine
1. Position the canvas. Lay it face‑up on a clean table. If it’s a large piece, prop it against a sturdy wall and place a plain sheet underneath the back to catch any stray particles.
2. Start at the top. Hold the brush lightly and sweep from the upper edge downwards in slow, overlapping strokes. Gravity helps the dust slide off, and you avoid pushing particles back onto the surface.
3. Use a second pass with a cloth. After the brush, take a corner of your microfiber cloth and give the surface one more gentle swipe, still moving top‑to‑bottom. This catches any fine dust that the brush might have missed.
4. Check the corners. Turn the canvas over (still face‑down on the protective sheet) and give the edges a quick brush. Dust loves to hide in creases and the back of the stretcher bars.
Real‑world examples
One of our customers, a mum who ordered a beach‑scene canvas for her nursery, noticed a faint grey veil after a few weeks. She followed the routine above and, within minutes, the canvas looked as if it had just arrived – no smudges, no colour loss. She now dusts every month and says the colours stay “vibrant as the tide”.
Another example comes from a husband who gifted his spouse a wedding canvas. He was nervous about handling it, but using a soft brush and the top‑to‑bottom motion meant he could clean it without any panic‑inducing streaks. He now keeps the brush on his coffee table as a reminder that a little care goes a long way.
Tips to keep the dust at bay
• Choose a low‑traffic spot for hanging. Hallways and near doorways collect more airborne particles.
• Keep windows closed on windy days. A gentle breeze can carry pollen straight onto your artwork.
• Air‑purify the room. A modest HEPA filter reduces overall dust and benefits the whole household.
• Avoid direct sunlight. Sunlight not only fades colour over time but also heats the air, encouraging dust to settle faster.
What if you see stubborn grime?
If a speck of dirt refuses to budge, dampen a fresh corner of your cloth with distilled water – just a whisper of moisture. Pat the spot, then immediately dry with another clean section of the cloth. Never rub; you’ll only spread the grime.
And remember, the goal isn’t to scrub the canvas into oblivion, but to coax the dust away while preserving the delicate texture that makes a canvas print feel like a piece of art.
So, ready to give your canvas that fresh‑out‑the‑box look? Take a breath, grab your brush, and let the gentle sweep do the work. Your favourite memories deserve a clean, crisp stage – and with this simple routine, they’ll stay picture‑perfect for years to come.
Step 3: Spot Test and Apply Cleaning Solution
Now that you’ve brushed away the loose dust, the next thing you’ll want to do is make sure any cleaning solution you use won’t surprise you with a colour shift. That’s where a spot test comes in – think of it as a tiny safety net before you dive in.
Why a spot test matters
Even though most canvas prints are made with solvent‑free HP latex inks, a little moisture can still cause the pigment to bleed if you’re too aggressive. A quick 30‑second test on an inconspicuous corner tells you whether the water‑soap mix is safe, and it only costs a few seconds of your time.
Step‑by‑step spot test
1. Pick a hidden spot. The lower‑right corner behind the frame or the back edge works well.
2. Dab a cotton swab. Moisten it with your diluted solution – one drop of mild dish soap per teaspoon of distilled water.
3. Wait. Let the dab sit for about 30 seconds. If the colour stays true and no smudging appears, you’re good to go.
4. Wipe dry. Use a clean part of your microfiber cloth to blot the area. If you notice any dulling, discard the solution and stick to a dry‑only method.
Does this feel a bit cautious? Absolutely, and that’s the point. A small test saves you from a costly redo later, especially when the canvas is a cherished family photo or a wedding gift.
Preparing the cleaning solution
For most everyday grime – think fingerprints, light dust cakes, or a stray coffee ring – a barely‑wet microfiber cloth does the trick. If the spot is stubborn, add a single drop of fragrance‑free dish soap to a teaspoon of distilled water. Mix gently; you don’t want bubbles.
According to the official cleaning guide from Canvas Discount, this mild mixture is safe for the latex inks used in most print‑on‑demand canvases, provided you keep the cloth just damp, not soaked.
Applying the solution
1. Section your canvas. Divide the surface into quadrants and work one quadrant at a time. This prevents you from re‑wetting an area you’ve already dried.
2. Gently blot. Using the damp corner of your cloth, press lightly on the stained area. Avoid any back‑and‑forth rubbing – think of it as a light kiss rather than a scrub.
3. Rotate the cloth. After each blot, switch to a fresh, dry portion of the cloth to absorb the moisture. This keeps the canvas from staying damp for too long.
4. Let it air‑dry. Once you’ve treated the spot, let the canvas sit for 10‑15 minutes in a low‑humidity room. A gentle fan can help circulation, but never point heat directly at the print.
Here’s a real‑world example: a busy mum in Manchester noticed a smudge from her toddler’s finger on a beach‑scene canvas. She followed the spot‑test routine, used a single drop of dish soap, and within a few minutes the mark vanished without any colour bleed. She now includes a quick spot‑test in her monthly cleaning ritual.
What to avoid
– Never spray water straight onto the canvas; the fibres will soak and the ink can run.
– Skip harsh chemicals like bleach or all‑purpose cleaners – they’ll strip the protective coating.
– Don’t use a rough towel; even a microfiber with a rough weave can leave tiny fibres that attract more dust.
So, what’s the final takeaway? A spot test is your secret weapon, the damp cloth is your gentle ally, and a little patience keeps your canvas looking fresh for years.
After the video, give your canvas a final glance. If everything looks even and the colours are as vivid as the day it arrived, you’ve nailed the cleaning process. Keep a tiny notebook by your cleaning supplies and jot down the date of each spot test – it’s a simple habit that helps you spot trends before a stain becomes a problem.
Step 4: Clean Larger Areas and Remove Stains
Why a broader approach matters
So you’ve brushed away the dust and run a quick spot‑test – great start! Now it’s time to tackle the parts of the canvas that have collected a thin film of grime or an actual stain. Those larger patches can dull the colours and make the whole piece look tired, even if the rest of the print is pristine.
Think of it like giving a whole room a fresh coat of air‑freshener after you’ve wiped the countertop. The overall vibe changes, right? The same principle applies to your canvas.
Gather a “clean‑zone” kit
Before you dive in, set up a small workstation. You’ll need:
- A clean, lint‑free microfiber cloth (cut into four quarters).
- Distilled water in a shallow bowl.
- One drop of fragrance‑free dish soap, mixed with a teaspoon of the water.
- A soft, natural‑hair brush for edges.
- A clean, dry towel for final drying.
Having everything within arm’s reach keeps you from scrambling for a towel mid‑clean and reduces the chance of accidental overspray.
Step‑by‑step: larger surface cleaning
1. Section the canvas. Visualise four quadrants – top‑left, top‑right, bottom‑left, bottom‑right. Work one quadrant at a time so you never re‑wet an area you’ve already dried.
2. Dampen, don’t soak. Take a corner of the microfiber, dip it in the water‑soap mix, then wring it until it feels just barely moist. You should see a faint sheen, not a puddle.
3. Gentle blot, not rub. Place the damp cloth on the stained spot and press lightly. Imagine you’re giving the canvas a soft kiss; you want the moisture to lift the dirt, not grind it into the fibres.
4. Rotate the cloth. After each press, shift to a fresh part of the cloth. This prevents the same droplet of grime from being redistributed across the surface.
5. Follow with a dry swipe. Immediately after the damp blot, use a dry quarter of the microfiber to pat the area dry. This speeds up evaporation and reduces the risk of water‑absorption.
6. Air‑dry before moving on. Let the quadrant sit for 5‑10 minutes in a low‑humidity room. A small fan set on low can help circulate air without blowing dust onto the wet spot.
Repeat these six steps for each quadrant until the whole canvas looks uniformly clean.
Dealing with stubborn stains
Sometimes you’ll run into a fingerprint ring, a coffee splash, or a little pet drool. Here’s how to up the game without hurting the print.
Fingerprint or oily smudge. Mix a half‑teaspoon of baking soda with a tablespoon of distilled water – it creates a barely‑foamy paste. Apply with a cotton swab, let sit for 30 seconds, then blot with the damp cloth as described above. Baking soda is mildly abrasive enough to lift oil, yet safe for cotton canvas.
Coffee or tea stain. Warm (not hot) water works better because heat can set the pigment. Add a second drop of dish soap, dab with a cotton ball, and repeat the blot‑dry cycle. If the ring persists, gently swirl the cloth in a small circular motion – think of a slow, lazy whirlpool.
Pet drool or saliva. First, rinse the area with a cloth dampened in plain distilled water to remove any salty residue. Then treat with the mild soap solution. Salt can attract more dust later, so the rinse step is crucial.
Real‑world examples
Emma, a mum from Bristol, noticed a faint brown ring where her toddler’s hand had rested on a beach‑scene canvas. She followed the quadrant method, used the baking‑soda paste for the ring, and within ten minutes the canvas looked as bright as the day it arrived. She now cleans the larger surface once a month to keep the colours “fresh as a sea breeze”.
Mark, a husband in Edinburgh, accidentally knocked over a glass of red wine onto his newly‑printed wedding canvas. He immediately dabbed with a dry cloth, then applied the soap‑water blot technique to the stained quadrant. After a brief air‑dry, the wine mark vanished without any colour bleed – a relief he says saved both his artwork and his nerves.
Pro tips to keep the canvas happy
• Work in a room with moderate temperature (around 20‑22 °C) – extreme heat makes the cotton fibres swell and can cause warping.
• Avoid direct sunlight while cleaning; even a few minutes of bright light can start fading pigments.
• If you have a large canvas, place a clean sheet on the floor and lay the print face‑up on a sturdy tabletop. This prevents accidental drops and gives you a flat surface to work on.
• After the final dry, give the back of the canvas a quick brush‑off. Dust often settles on the stretcher bars, and a clean back helps the whole piece breathe.
And remember, the goal isn’t to scrub the canvas into oblivion – it’s to coax the grime away while preserving the subtle texture that makes a canvas feel like art.
Step 5: Dry, Flatten, and Preserve Your Canvas Print
Alright, the grime is gone – now comes the part most people skip, but it’s the secret to a canvas that stays fresh for years.
So, how do you make sure that last dab of water doesn’t turn your beach‑scene into a sagging souvenir?
First things first: let the surface air‑dry completely. Place the canvas on a clean, flat surface – a large cutting board or a sheet of white poster board works great – and keep it upright if it’s on a stretcher. In a room that’s around 20‑22 °C with moderate humidity, 10‑15 minutes is usually enough for a lightly damp spot, but a full‑size piece may need an hour or two.
Give it a quick flip after the first ten minutes. Turning the print face‑down on the same protective sheet helps any lingering moisture escape from the back, and it also lets you spot any drips you missed.
If the canvas looks a little wavy after it’s dry, a gentle press will coax it back flat. We recommend laying a clean, breathable cloth (think cotton pillowcase) over the print and placing a light, even weight – a stack of coffee‑table books or a rice‑filled bean bag – on top for a few hours. Avoid anything heavy enough to bend the stretcher bars. A quick look at ink types shows that water‑based inks tend to dry faster, which can reduce the risk of warping – see this overview of linocut inks for more details.
Worried the weight might leave an imprint?
Slip a sheet of acid‑free parchment paper between the cloth and the canvas. The parchment slides easily, so the weight distributes without pressing directly into the fibres.
Emma, a mum from Bristol, once rescued a family portrait that had warped after a rainy summer. She followed the weight‑and‑parchment trick for overnight, and the canvas was as flat as the day it arrived – no permanent creases.
Next, think long‑term humidity. A simple silica‑gel packet tucked into the back of the frame (just make sure it doesn’t touch the canvas) can absorb excess moisture in winter months. For homes in the UK, a dehumidifier set to 45‑50 % RH works wonders during damp spells.
Even if you keep the canvas out of direct sun while it dries, UV rays will still fade colours over time. A UV‑filtering acrylic or glass frame adds a thin shield without dimming the image. If you prefer a frameless look, hanging the print behind a sheer linen curtain gives a soft diffusion and cuts out most UV.
Don’t forget the backside. A soft brush or a dry microfiber swipe removes dust that settles on the stretcher bars, letting the whole piece “breathe” and preventing mould in humid seasons.
For stubborn moisture pockets – especially on very thick, gallery‑grade canvases – conservators swear by a thin layer of a hydrogel that releases water slowly and then peels away clean. The science behind those gels is explained in a recent review of gel‑based cleaning methods in art conservation. While you don’t need a lab‑grade gel at home, a DIY agar‑gel sheet (a spoonful of agar powder boiled in water, cooled, and pressed onto the back) can do the trick for a weekend project.
Quick checklist before you hang
- Surface fully dry – no tacky spots.
- Canvas flat – use weight + parchment if needed.
- Back brushed clean.
- Humidity control in place (silica gel or dehumidifier).
- UV protection added.
- Final visual inspection – colours vibrant, no warping.
And there you have it – a dry, flat, protected canvas ready to become the centrepiece of your living room or a cherished gift for a spouse. A few extra minutes now save you a costly re‑hang later.
| Task | Tool / Method | Why it matters |
|---|---|---|
| Air‑dry | Flat, clean board in 20‑22 °C room | Prevents moisture‑induced warping |
| Flatten | Light weight + parchment + breathable cloth | Even pressure removes waviness without crushing fibres |
| Preserve | Silica‑gel packet, UV‑filtering frame, back‑brush | Controls humidity, blocks UV, keeps dust off stretcher bars |
Conclusion
So there you have it – a simple routine that turns a dusty canvas into a fresh‑looking memory.
When you follow each step – dusting gently, spot‑testing, cleaning with a barely‑moist cloth, then drying and flattening – you protect the ink, the fibres, and the emotions tied to the image.
What’s the biggest mistake people make? Rushing to scrub or using household cleaners that sound harsh but actually strip the protective coating. A light blot does the job every time.
If you’re a parent protecting a family photo, or a spouse preserving a wedding canvas, treat the cleaning ritual like you would a favourite piece of jewellery – with patience and a soft touch.
A quick final checklist never hurts: surface dry, flat, back brushed, humidity controlled, UV‑protected, and visually inspected. Tick each box before you hang, and you’ll avoid costly re‑hangs later.
Ready to give your canvas the care it deserves? Grab your brush, a clean cloth, and a splash of distilled water – then enjoy a picture‑perfect wall for years to come.
And remember, the effort you put in now pays off every time you glance at that familiar scene – no smudges, no dull colours, just the vivid moments you wanted to share. Happy cleaning! Feel free to revisit this guide whenever you need a refresher.
FAQ
What’s the safest way to start how to clean a canvas print without damaging the ink?
Begin with a dry, soft‑bristle brush or a lint‑free microfiber cloth. Gently sweep from the top down so dust falls away instead of being pushed back into the fibres. The key is to keep everything dry at first – moisture can cause the water‑based inks to bleed if you’re too aggressive. A quick “dry‑only” pass gives you a clear view of any spots that really need attention.
Do I really need distilled water, or can I use tap water?
Distilled water is the safest bet because it contains no minerals that could leave speckles on the canvas. If you only have tap water, let it sit for a few hours, then filter it through a coffee filter to remove most hardness. Still, a few minutes of testing on an inconspicuous corner will tell you whether the water leaves a faint ring. Most of our customers who switch to distilled water notice a cleaner finish after a few weeks.
How often should I repeat the cleaning routine for a family photo canvas?
We recommend a light dust‑off every month and a full spot‑test plus gentle wipe every three to six months, depending on the room’s traffic and humidity. Households with kids or pets tend to need the extra step sooner, because fingerprints and pet dander settle quickly. Keeping a small notebook by your cleaning supplies helps you track dates and notice any recurring stains before they become stubborn.
Can I use a mild dish‑soap solution on all types of canvas prints?
For most HP latex or pigment‑based prints, a single drop of fragrance‑free dish soap mixed with a teaspoon of distilled water works fine. The solution should be barely damp – you’re looking for a faint sheen, not a puddle. Always do a 30‑second spot test on a hidden corner first; if the colour stays true, you can move on to the larger area. Avoid any scented or antibacterial soaps, as they can leave residue that attracts more dust.
What’s the best way to flatten a canvas that looks a bit wavy after cleaning?
Lay the canvas face‑up on a clean board, then cover it with a breathable cotton cloth. Place a light stack of books or a small box on top for a few hours. If you’re worried about marks, slip a sheet of acid‑free parchment between the cloth and the canvas. The gentle, even pressure lets the fibres relax without crushing the print, and the canvas should lie flat once the moisture fully evaporates.
Should I worry about UV light after I’ve cleaned my canvas?
Even a freshly cleaned canvas will fade over time if it’s exposed to direct sunlight. We suggest hanging it away from windows or using UV‑filtering glass or acrylic in the frame. A sheer curtain can also diffuse harsh rays while still letting the image shine. Adding a tiny silica‑gel packet behind the frame helps control humidity, which together with UV protection keeps colours vibrant for years.
Is there a quick checklist I can follow before I hang the canvas again?
Think of it as a five‑step safety net. 1) Surface completely dry, no tacky spots. 2) Canvas lies flat after the weight‑and‑parchment trick. 3) Back of the stretcher brushed clean of dust. 4) Humidity under 50 % (silica gel or a dehumidifier). 5) UV protection in place. Run through these points, give the piece a final visual once, and you’re ready to showcase it proudly.